Hey Bulldog*
Some firearm designs are iconic, almost mythic. One of those was introduced in the early 1870s, and was widely carried both by military forces and civilians, and is credited by many firearms historians as being a critical factor in the ‘taming of the West’.
No, I’m not talking about the Colt SAA. I’m talking about the SA/DA Webley No. 2 in .450 Adams/CF (center fire), commonly referred to the Bulldog, designed as a self defense revolver small enough to carry in a pocket. Like this one:

That pic doesn’t give a good idea of the small size of this big-bore revolver. But overall it’s about the size of a modern J-frame. Here are a couple of images of me holding it:


The serial number of this particular gun (23905) indicates that it was made in the first batch of guns (serial numbers 20,000 – 25,000 were made 1872 – 1876). Made in Britain, these guns usually had the legend “BRITISH BULL DOG” on the top strap, except those sent for sale in the American market, which were marked with the importer/seller’s name. This is one such example, with the legend “LIDDLE & KAEDING, SAN FRANCISCO” on the top strap:

I assume that the decorative elements are stamped, but this is the only one of this era I’ve seen with it, so I may be mistaken.
While many of these guns were made, not many today are in sufficiently good condition to be shot safely. Partially this is due to the fact that the original black powder cartridge, containing a 255gr bullet traveling at about 650fps (for about 211ft/lbs of ME), was superseded by more powerful cartridges that fit the gun and would cause damage if not catastrophic failure. You can see how this could happen if you look at the thinness of the webbing between the chambers in the cylinder:

However, this example seemed solid and in good condition upon examination. There were no signs of damage or significant wear on the functional parts, and the lock-up of the cylinder was good, with only minimal play. We had .450 Adams/CF ammo loaded to original spec (made using .455 Webley brass cut down), and decided to give it a try:

A note about that ammo name: The cartridges were .450 Adams, designed by another company for their firearms. But evidently Webley didn’t want to have another gun manufacturer’s name on their guns, so decided to just call the round the .450 CF, and marked their guns such. That may have contributed to the use of more inappropriately powerful rounds later which damaged the guns.
The gun is very well designed. The ramrod swings over to eject spent cases, then the retaining clip through which it passes can be shifted to allow removal of the cylinder for cleaning. While the grip design is different from modern revolvers, it isn’t unpleasant in the hand. Felt recoil is substantial, but mild compared to lightweight modern small revolvers such as a J-frame in .38sp. In terms of power, 211 ft/lbs of Muzzle Energy is about half to two-thirds of what modern pocket guns typically generate — certainly effective, particularly given the state of medical knowledge at the time these guns were popular.
While the sights are simple, just a blade on the front and the typical trough along the top strap, they’re adequate for a self defense gun. All of us were able to keep rounds on the black of an 8″ target at about 10 yards without a problem.
Here’s shooting it:


The Webley No. 2 didn’t have the effective range or power of the Colt SAA, but it was well suited to its role as a reliable close-range self-defense firearm. While it was never widely issued as a military side-arm, British officers would frequently purchase it separately to carry, and many were sold in the civilian market. It was so popular that the design pattern was copied and produced in many countries, earning its iconic status. It was a real pleasure to have a chance to shoot an original.
Jim Downey
*With apologies to The Beatles.
Making a 15th century Hand Gonne
Last Spring I made a 14th century style Hand Gonne from bronze stock using minimal tools and equipment, just to see what was possible. That project turned out to be a big success, and the resultant hand gonne has been popular among friends and when I taught last year’s workshops on “Primitive Black Powder Firearms” for the Liberal Gun Club‘s Annual Meeting in Las Vegas.
Well, last month a local auction site I follow had a sale of various firearms, part, and accessories. Included was what was billed as a ‘bucket of barrels’. Looking over the listing, it was clear it was mostly old shotgun barrels, a bunch of .22 barrels, and what looked to be a half dozen or so very old, and very rusty, black powder rifle barrels. Just for grins, I bid a small amount, and wound up winning. When I went to collect the barrels, I swear the auction house had added a number of other misc barrels, probably just to get rid of them. Here’s the bucket I brought home:

And after basic rust removal with phosphoric acid:

After examining what I actually had, it occurred to me that I might be able to use some of these to make another black powder firearm. The original black powder barrels were too far gone to safely use, but the shotgun barrels had potential.
In thinking it over, I decided to make a slightly later style of Hand Gonne, and again to see if I could do it with minimal tools, to demonstrate the possibilities if others wanted to make their own.
Now, before we go any further, let’s get a few important caveats in place, like last time:
- This is a description of how I made a black powder hand gonne for my own use
- I am not recommending that you make a black powder hand gonne
- If you do decide to make a black powder hand gonne, I am not recommending that you make it this way
- Any black powder hand gonne is potentially dangerous, and if you make one, the risk is entirely on you
- A black powder hand gonne is a firearm, and all the rules of safe handling and usage of a firearm apply
- Lastly: I selected a barrel from a single-shot shotgun, the style of which I have never owned, so as to reduce the likelihood that someone might think I was making an illegal short-barrel shotgun, and I plugged that barrel shortly after cutting it down.
OK, we clear about that? Good.
The tools and materials needed.
In thinking it through, I decided that the most basic tools needed for this project would be:
- Electric drill with a 3/8″ chuck (or larger), misc drill bits
- Hacksaw
- Basic hammer and/or ballpeen hammer
- Hand sledgehammer or small anvil
- Clamps or vise
- Metal files
- Wood chisels or gouges
- Propane torch or similar
- Measuring tape/yardstick/square or similar
Now, some additional tools that are common, and which I used to speed up the whole process:
- Belt sander
- Bench grinder
- Dremel or similar rotary tool with various small bits
- Side-cutting pliers
Pretty basic, right? So is the list of materials needed:
- Mild steel rod 13/16″
- Silver soldering supplies (solder, flux, propane or similar torch)
- Sandpaper (various grades, starting with 60grit)
- Brass strap, 1/8″ x 1″, sufficient for 3 straps 5″ long
- 10d common nail or 1/4″ steel rod
- #10 x 3/4″ brass screws
- 2″ x 2″ x 48″ hardwood for the stock (finish size 1.5″ x 1.5″)
- Stain/finish for the stock, if desired
Selecting the barrel to use.
After the first bronze hand gonnes were developed, it wasn’t long before people started making similar weapons using iron or mild steel. Such firearms would be lighter, stronger, and at least in theory easier to make.
So adapting an old shotgun barrel to make a 15th century style hand gonne made sense.
A 12ga shotgun is nominally supposed to have a 0.729″ inner diameter barrel. I wanted the new hand gonne to be about that size, so one of the old 12ga barrels was perfect. I looked over the options from my bucket of barrels, and selected one using the following criteria:
- Condition: surface rust was acceptable, but not severe pitting or signs of cracks
- From a style of shotgun I did not own (to avoid someone thinking I was doing something nefarious)
- With a suitable lower projection of hardware which would aid in mounting the barrel securely
The one I picked had been of a common design for single shot 12ga shotguns from the early 1900s. I do not now, nor had I ever, owned such a shotgun, so I was reasonably confident that no one would think I was trying to make an illegal shotgun. I also intended on plugging the breech soon after cutting it to length to render it unusable as a conventional shotgun. This style of shotgun barrel has a heavy lug welded on the bottom of the barrel which was part of the original design, and that would prove useful for making sure it was securely mounted to the stock. Here’s the one I chose:

And after cleaning (the one on the bottom):

And just to be on the safe side, I used calipers to check the actual diameter of the barrel so I could order lead balls for ammo. And I’m very glad I did — while 12ga is nominally 0.729″, the barrel was just under 0.700″. I ordered .69cal lead balls.
Barrel prep and plugging.
The first step was to remove the surface rust on both the inside and the outside of the barrel. On the outside this was accomplished with a wire wheel. On the inside I used some #2 coarse steel wool mounted on a mandrel (in this case, a long lag screw with the head cut off) in my drill:

Next, I needed to prep and plug the breech of the barrel. This plug would be secured using three different methods: friction, silver solder, and steel rivet.
I checked the ID (inner diameter) of the breech/chamber, and it was right at 0.800″, after cleaning. So I needed a piece of mild steel rod about that diameter. A piece of 13/16″ rod specs out to 0.8125″, so that’s what I got. A bit of sanding the interior of the breech/chamber with fine sandpaper, and then doing the same with the rod got them almost the same diameter. With a little gentle force I could insert the rod about half an inch into the breech. That was a good start.
What I did next was use my propane torch to heat up the breech end of the barrel. Since the barrel is hollow, when heated it would increase the ID slightly as the metal expanded due to the heat. I’d marked the rod at the 1.5″ mark, which I figured would be a sufficient length of plug. Once the breech end of the barrel was heated, I inserted the rod to the mark, then cut it off flush with the back of the breech:


As the breech of the barrel cooled, it would contract and cinch down on the plug. So long as there was no sign of the barrel splitting, I figured it would be secure. I checked using another piece of steel rod and a hand sledge, seeing if I could move the plug at all. I could not.
Next, I used basic silver soldering skills to fill the void at the very back of the breech:

After clean up, the solder joint looked and felt good:

Lastly, I drilled through the barrel and plug at about 0.75″ from the back of the breech (so halfway into the plug), and put a rivet through the entire barrel, using a common 10d (10 penny) nail. You can substitute a 1/4″ iron rod for this. After peening over the rivet ends, I smoothed those over with a file. Unfortunately, I seem to have forgotten to take an image of this step.
Preparing the stock.
I selected a piece of 2″ x 2″ x 48″ red oak from a local lumber yard, which had actual dimensions of 1.5″ x 1.5″ x 48″.
First I positioned and then marked where the barrel needed to be mounted:

Then I used gouges and chisels to carve a shallow gully for the barrel to rest in, with deeper areas for the small stud and the big lug on the bottom of the barrel:


I periodically checked to see how the barrel would rest, until I got it to where I wanted. Then using a belt sander, I beveled the corners to almost an octagonal shape and shaped the front of the stock, and gave it a light finish sanding:


Lastly, I stained it:

Making the bands and mounting the barrel.
I decided that I wanted to use brass mounting straps for aesthetic reasons. This would hearken back to the bronze hand gonne, and indicate that it was supposed to be a transitional form. I used 1/8″ x 1″ straps.
1/8th” brass strap is stronger than you think. Well, at least it was stronger than I thought. I figured that it would be a fairly easy matter to hammer it into shape using some basic metalworking tools.
I was wrong.
Eventually I got it done, but it took multiple applications of heat from my propane torch, then hammering using different metal forms I had. But eventually I got the basic shape done:

After a little clean up and trimming:

I decided that I didn’t like the look of the raw oiled steel barrel with the rest of the gonne, so I cleaned it and then used a commercial gun blueing paste to darken it. Then I drilled the mounting holes and counter-sunk them:

I also positioned and then drilled the touch hole, so it was just in front of the front of the breech plug, and created a small ‘pan’ to hold gunpowder if I didn’t want to use fuse.
Then it was a simple matter to install the brass screws. I wanted to use solid brass rather than plated, for good color match. I thought they would be strong enough, but if they fail I can go to steel screws:


Proofing the hand gonne.
The usual recommended procedure to test a home-made black powder firearm for safety is to take it to the range, put a double load of powder into it with a lead ball, secure the firearm, and then fire it from a safe distance using a string or fuse or whatever is necessary. I’d come to prefer using cannon fuse for shooting the first hand gonne, so had it on hand for this purpose.
I got out to my range on a cool Monday morning, when I was reasonably sure that no one else would be there. I wanted to avoid putting anyone else at risk, on the off chance that my project didn’t work out and wasn’t safe. That is, if the thing blew up, I wanted everyone else to be clear.
I set up a large sheet of cardboard (about 2×4′), about 10 yards from the gonne. I put in 120gr of FFg black powder, twice the standard load I’ll shoot out of the thing, along with a .69cal lead ball (500gr). I then laid the gonne down on a picnic table, with a pair of leather gloves under the muzzle end to maintain a slight elevation. Then I positioned a metal ammo box beside the gonne as a protective barrier for my phone, with an inexpensive mirror positioned so the phone was protected but would record the first firing of the gonne . I positioned my usual range bag on the back of the stock to help hold it in place. Like this:

And here’s the slow-motion firing of the proof charge:
And this was the result:

The first thing I did was closely examine the gonne for any signs of damage or stress. It looked pristine, except for some dirt and gravel dust from falling on the ground. Then I checked the target. The first shot was partially in the bull’s eye (luck!). The second shot, also from a resting position on the table, with a ‘normal’ charge of 60gr of FFg, hit the upper right of the target:

I went ahead and shot it a third time, again with a normal charge, but this time holding it and shooting it as I normally would. Again, I noticed a fair amount of recoil, even given the substantial weight of the whole thing (I’d guess ~10 pounds or so). But it’s not the sort of thing that most people would mind at all. The third shot was on the lower left corner of the target:

Given the very basic design of this thing, it’s still respectable in terms of control and power. I didn’t chrono it, but based on previously checking black powder guns, I’d guess that the .69 ball was probably traveling about 800fps. That gives a muzzle energy of about about 700 ft/lbs, or about what a modern .357mag revolver with a 4″ barrel would do. Even dropping the velocity down to just 600fps, you’re getting the kind of performance you see out of a short barrel 9mm carbine. In other words, it’s an effective weapon, at least at moderate range. Not bad for a technology that is almost 600 years old.
Conclusions.
To repeat myself from the start:
- This is a description of how I made a black powder hand gonne for my own use
- I am not recommending that you make a black powder hand gonne
- If you do decide to make a black powder hand gonne, I am not recommending that you make it this way
- Any black powder hand gonne is potentially dangerous, and if you make one, the risk is entirely on you
- A black powder hand gonne is a firearm, and all the rules of safe handling and usage of a firearm apply
- Lastly: I selected a barrel from a single-shot shotgun, the style of which I have never owned, so as to reduce the likelihood that someone might think I was making an illegal short-barrel shotgun, and I plugged that barrel shortly after cutting it down.
As noted, after the ‘proof’ shot, I did a close inspection of the hand gonne. There were no signs that anything had shifted or been stressed. Same thing after the two subsequent ‘normal’ charges were shot. So my conclusion is that the gonne is safe, though of course I will keep a close eye on it going forward. My experience with the bronze version I made last year gives me some confidence that this one will hold up fine, but I don’t want to take that for granted.
And overall, I’d have to say that the project was a success. It is possible for an average person, using common, non-specialized tools and a little ingenuity, to make their own reproduction 15th century hand gonne with modern materials and an old shotgun barrel. My total cost out-of-pocket for this project was under $50, because rusty old shotgun barrels are pretty cheap.
Thanks for coming along for the ride. Feel free to share.
Jim Downey
“Heavy” .25acp? Isn’t that a contradiction??
Last year Buffalo Bore came out with two loadings of what they called HEAVY 25 ACP Pistol and Handgun Ammo, saying that it was standard pressure but heavy-for-caliber and which met the FBI penetration criteria. We got some, and decided to do an informal test recently to see if it performed as promised.
First off, .25acp is not my preferred choice for a self-defense round out of any platform. When we tested the cartridge, the available SD ammo all came in at between 60 and 70 ft/lbs of muzzle energy (M.E.) That’s … not much. And penetration tests others had conducted were unimpressive. Sure, a .25 can kill, and Vasily Blokhin executed thousands of prisoners with one (well, several), but that hardly qualifies as self defense. Given the options, I’d almost always pick something better for protection.
But sometimes, you gotta go with what you got. And if all you have is a .25acp, at least you want the best ammo for it. That’s why BB came out with these two new loadings.
Since this was just an informal test, we only had a radar chronograph, and these two handguns to try:

That’s a Beretta 21A Bobcat on top, and a Bernadelli Baby .25 below it. The Beretta has a 2.4″ barrel, the Bernadelli a 2.0″ one. The Beretta is small, but the Bernadelli is tiny — I could only get my middle finger on the grip, holding the gun between that and my thumb with my index finger on the trigger.
Here’s the ammo:

That’s BB’s 60 gr. Hard Cast FN and the 50 gr. FMJ-RN loads, and you’ll find Buffalo Bore’s claims on those pages for how the loads performed out of four different handguns, including a Beretta Bobcat.
So, how did it go? Pretty well. Here are my data notes:

That’s an average of 841fps for the Hard Cast out of the Beretta, and 758fps out of the Bernadelli. The FMJ was 871fps out of the Beretta and 807fps from the Bernadelli. That’s right in the ballpark of what Buffalo Bore claims. Unsurprising, since Buffalo Bore has consistently performed as claimed, in my experience.
It’s also important to note that both loadings seem to meet the FBI’s penetration protocol. This indicates that it should be lethal if shot placement is good.
.25acp still wouldn’t be my choice for self defense. But particularly with the Buffalo Bore ammo, you could do worse.
Jim Downey
Goodbye Tavor TS12, Hello KS7.
Two years ago, I closed a blog post with this:
Overall, I’m very happy with the Tavor TS12. Altogether I ran about 75 shells through it in an hour, half the light target loads, the other half full-power, high-brass slugs and 00Buck. It’s been decades since I shot a 12 gauge that much in that short a period of time, and my shoulder isn’t the slightest bit sore.
Yeah, the TS12 is a keeper.
Well, it was, up until this week.
Why? What happened?
This:

That’s a friend’s brand-new Kel Tec KS7.
Let me explain: one of the other BBTI guys got this, and brought it out to try … specifically, with 12ga minishells. Both Aguila slugs and Federal 4B defensive loads.
We ran a BUNCH of minishells through it. Not one single misfire, mis-feed, or problem. It just ate ’em all and asked for more. At 25 yards, we shot the sh!t out of targets for the better part of an hour.
And here’s the thing: with the minishells, the gun held 12+1 rounds (12 in the tube, one in the chamber). Recoil was modest, operation was simple and intuitive (as is the case with most pump shotguns), and the basic fiber-optic sight was more than adequate for the distances we were shooting (and for any expected use I would have).
By the time we were done, I knew I wanted one of these, if for no other reason than it would be much easier for my Good Lady Wife to handle if need arose. She had shot the Tavor, but never really took to it, and it was heavier and a little more for her to wrangle than she was really comfortable with.
Now, don’t get me wrong — I like the Tavor TS12. A lot. I still think that it is a hell of a gun, and it handles the full-power, full size 12ga rounds with aplomb. So I had zero qualms about offering it to an old friend, at a decent price, and then rolling that sale over into this:

I could have just kept the Tavor, of course, but I tend to have guns for specific uses, and the 12 shot KS7 filled the same niche as the 15 shot Tavor: home defense. I’ll probably put a light on it, but no optic — it’s just not needed with the standard fiber optic sight — though I may change my mind on that as time goes on. We’ll see.
In looking over reviews of the KS7 before I made the final purchase, one of the things that I read was that while using minishells was fine, loading minishells was a little more tricky than loading standard-sized shells, particularly under stress. And I think that’s a perfectly fair point; loading the slugs in particular was a little tricky.
So my solution will be to load the gun with minishells, but keep standard sized shells in a bandoleer for reloads (if they’re needed). It’s exactly what I planned for the Tavor if I ever needed it, so it’s no change at all for me.
One last thing: why not just get a KSG? That’s the double-tube 12ga predecessor from Kel Tec.
I’ve shot the KSG. Nice gun. But fully loaded, the KSG is closer to the Tavor in terms of weight and overall size. The real advantage of the KS7 is that it is thin, light, and basic. But I think it does come down to personal preference and intended use. YMMV.
Jim Downey
ETA: got a request for pics of the sight on the KS7. Here ya go:


An informal .32 H&R Magnum test, and a lesson relearned.
I’m not a fan of the .32acp for self-defense. But the .32 H&R mag or the .327 Federal mag are both respectable options, even out of a short barrel revolver. Since the 100gr Buffalo Bore Heavy 32 H&R Magnum +P ammo load wasn’t available when we did the .32 H&R tests, we weren’t sure how it would perform. And we decided to do some informal testing to find out, learning another lesson in the process that I thought I’d share.
We had both 5 shot and 6 shot versions of the Charter Arms Undercoverette snub nose:


Charter Arms sometimes has “hit or miss” quality control, but generally they seem to work just fine.
Anyway, we did chrono ammo out of both guns, and it performed in accord with the Buffalo Bore claims on their website:
- 1,054 fps – Taurus Ultra Light 2-inch barrel
That’s right at 250 ft/pounds of muzzle energy. Like I said, respectable. I sure as hell wouldn’t want to be shot by it.
However …

Take a close look at the primers.
Here’s another pic:

See how the primers stick up above the base of the case?
Yeah. Those are from the 5 shot version of the revolver. And each time, the primer protruded enough to lock up the cylinder, making the nice little revolver into a single-shot gun. And it happened every time.
It did not, however, happen with the 6 shot version. Same ammo. Same box. Completely different results. Oh, they chrono’d the same. But in one gun they rendered the firearm completely non-functional after the first shot.
So, the lesson: ALWAYS TEST YOUR CARRY AMMO IN YOUR CARRY GUN.
Yeah, I know you probably know this. I certainly know it, and always tell people to do it. But I’ve rarely seen such a clear object lesson showing it.
Why the difference? I don’t know. Could be that the recoil impulse in the 12oz version (the 5 shot) is just that much more powerful than in the 15oz version. That’s about the only thing I can think of.
Jim Downey
Review: M&P FPC.
Sometimes, smaller *is* better:

Yup, that’s the new Smith & Wesson M&P FPC (Folding Pistol Carbine), which I got to shoot recently.
I’m a big fan of Pistol Caliber Carbines, and am on record loving my Kel Tec Sub2000 folding carbine in 9mm. That gun has served me well for the last 20 years or so, and I’m not ready to get rid of it.
But the new M&P FPC is tempting. And if I didn’t already have my Sub2k already tricked-out/upgraded to my personal preferences, I’d jump on getting one immediately.
OK, so there’s my bottom line. Now, let’s talk about what I like particularly about the M&P FPC, and how it compares to the Sub2k.
The M&P FPC is something of an extension of the M&P line of pistols. It can use the same magazines as both the original version and the 2.0 version. The fire controls are the same, as are the grip modules. Anyone familiar with the M&P pistols will find themselves at home with this new carbine.
As is typically the case with Smith & Wesson products, everything is well made, and fit & finish are fine. We had no problems with the gun right out of the box. The gun folds and unfolds quickly, and even a novice user gets the hang of that mechanism after one or two tries. Location of the charging handle and folding release are logical and easy to use.
We slapped a basic Sig Sauer Romeo red dot on it and sighted it in. After that, it was easy to shoot out the bullseye of a target at 25 yards (max distance on the range we used). Seriously, all three of us shooting it could basically make one ragged hole when shooting supported, and do almost as well shooting unsupported while standing. The ergonomics are great on this PCC.
Recoil was also better than I expected. Both guns use a direct-blowback action, but the FPC has a nice recoil buffer built in, making it a soft-shooting gun that will please even someone who is recoil shy. That’s one regard in which it is better than my Sub2000.
Also, since the gun folds horizontally (off to the left), rather than flipping up like the Sub2000, you can mount an optic on it and not worry about it getting in the way (or being knocked off zero). Another improvement over the Kel Tec.
The bolt holds open after the last round. My Sub2k doesn’t.
The charging handle on the FPC doesn’t reciprocate, so there’s less of a chance to snag clothing (or beards!). My Sub2000 charging handle rarely snags, but it can (and has) on occasion.
There’s a clever mag holder on the FPC that holds two additional mags in the buttstock, and it is easy to remove a new mag and load it into the gun. My Sub2k has no such holder.
The trigger is good on the M&P. I had to upgrade the trigger on my Sub2000 with an after-market product.
As I mentioned, it’s easy to shoot well, and the ergonomics are good. I had no problems getting a good sight picture while wearing earmuffs, while that is still a problem with my Kel Tec. And while the Sub2000 still feels short in my hands (after adding a stock extension), the M&P felt fine.
The M&P FPC is wider than the Kel Tec Sub2000, due to the folding mechanism. The difference is 2.5″ for the M&P, 1.75″ for the Sub2k, so it’s not insignificant. The M&P is also slightly heavier bare, and significantly so with two additional fully-loaded 23 round magazines. But the weight is well balanced.
And the M&P comes in a nice, nondescript padded carrying case.
It’s a great little carbine. If I didn’t already have my Sub2000 operating just as I like, I’d be tempted. And to be honest, I’m tempted nonetheless.
Jim Downey
Making a 14th century Hand Gonne
Last Fall I taught a day-long workshop on “Primitive Black Powder Firearms” for the Liberal Gun Club‘s Annual Meeting in Las Vegas. In addition to my own black powder guns, I borrowed a couple of items from friends to help fill out the historical selection, including this very nice reproduction of a 14th century .62 cal cast bronze hand gonne:

I had shot the gun previously with friends, and it never fails to put a smile on people’s faces. It’s so simple: pour gunpowder down the muzzle, roll in a lead ball (tolerances for these guns are very slack, and the ball will roll right back out if you’re not careful), add a little powder to the touch-hole on the top, and light it off when ready. Very basic. Very fun. People in the workshop loved it.
And I decided that I wanted to get one of these for my own collection.
The problem is, they’re almost impossible to find. I spent a couple of months poking around online, asking friends, and the closest I could come were a couple of simple hand gonnes made using steel. Nice, but not what I was looking for.
So I started to think about making my own, and I consulted with an old friend who does bronze casting for his jewelry business. Turned out that it was certainly possible to do such a project, but it was bigger than my friend’s casting set-up could handle. We set aside the idea for the time being.
But I thought some more about it, and figured that such a bronze hand gonne was so simple, that it should be possible to make one without casting. I could order a bar of the appropriate alloy of bronze, have a machine shop bore it out, and do the external work myself. I tried contacting some local machine shops, explained what I wanted done. Most never responded. The ones that did had no interest in the project. I was stymied again.
By then, however, I was invested in the project. Again, I thought through just how basic the hand gonne was, and I figured that if I ordered the correct components, I would be able to make one without a machine shop. In fact, as I thought it through, I realized that it would be possible to make one just using some very basic modern tools which almost anyone would have or could get at a modest price. So I set out to do just that.
And this is the result.
Now, before we go any further, let’s get a few important caveats in place:
- This is a description of how I made a black powder hand gonne for my own use
- I am not recommending that you make a black powder hand gonne
- If you do decide to make a black powder hand gonne, I am not recommending that you make it this way
- Any black powder hand gonne is potentially dangerous, and if you make one, the risk is entirely on you
- A black powder hand gonne is a firearm, and all the rules of safe handling and usage of a firearm apply
OK, we clear about that? Good.
The tools and materials needed.
So, in thinking it through, I decided that the most basic tools needed for this project would be:
- Electric drill with a 1/2″ chuck, misc drill bits
- Hacksaw
- Basic hammer
- Hand sledgehammer or small anvil
- Clamps or vise
- Metal files
- Metal chisel (‘cold chisel’, 1/2″ wide or so)
- Measuring tape/yardstick/square or similar
- Calipers
Now, some additional tools that are common, and which I used to speed up the whole process:
- Belt sander
- Bench grinder
- Dremel or similar rotary tool with various small bits
- Side-cutting pliers
Pretty basic, right? So is the list of materials needed:
- Bronze stock
- Sandpaper (various grades, starting with 60grit)
- 1/2″ iron bar stock
- 3″ common nails (x2)
- Epoxy
- Duct or box tape
- 1.75″ x 48″ hardwood dowel for the stock
- Stain/finish for the stock, if desired
In addition, I used a number of bits of scrap wood, foam, and wood screws I had in my workshop. You’ll see.
Selecting the bronze stock to use.
I knew that historically, early black powder guns were typically constructed of a type of bronze called gunmetal or red brass. This is a bronze alloy containing mostly copper, some tin and lead, and a little zinc. I spent some time looking over modern bronze alloys which were readily available, and settled on “Bearing Bronze 932” as being a reasonable approximation of common gunmetal.
The modern metal industry offers a range of different types of products. What I figured was that I could get a product called “hollowbar”, which is basically a thick-walled pipe. That would allow me to select both the overall diameter and the wall thickness. By choosing a 1.75″ O.D. hollowbar with a 0.625″ I.D., I would get a suitable length of bronze which didn’t need to have a bore drilled into it. In addition, I ordered a length of round bar stock with a nominal 0.625″ O.D. that I could use as a breech plug. Metal prices fluctuate regularly, but I was able to get both pieces shipped for about $160.
Both pieces of bronze arrived. As expected, they were “overcast” — meaning that they were slightly larger than the specs given. The hollowbar was 13″ long, and the bore down the center of it was at 0.585″. The round bar stock was likewise 13″, and the O.D. was 0.675″. That meant that I would need to ream out the bore to .62 cal and shave down the bar to fit the finished diameter of the breech.

Reaming out the bore.
I didn’t order a solid length of bar stock because that would have required that I have the ability to drill out the bore. Even making a smooth-bore hand gonne (with no rifling) would present a substantial technological challenge which would have required, at a minimum, a floor-mounted drill press if not an actual metal lathe.
However, by ordering the hollowbar, I would already have the basic geometry of the hand gonne provided. The hole down the center would already be established. It would just be a matter of getting the bore to the correct diameter to handle a .62 cal lead ball.
To do this, I decided that the best approach would be to use a length of 1/2″ iron rod (called a mandrel) with a piece of sandpaper at the end, driven by the hand drill. It would take time, and require frequent changes of the sandpaper, but it would give me the ability to ream out the bore with a reasonable amount of control.
This is easy to do. You just use one piece of tape applied to the back of your piece of sandpaper, with a tab of about an inch protruding past the edge of the paper. Then you apply another piece of tape to the tab, and use the overhang to secure it to the mandrel. Like so:


The next thing I needed to do is secure the hollowbar stock so that I could spend time reaming out the bore without the stock moving. I decided to make a simple sandwich of scrap wood, dense foam, and screws to hold everything in place:


Then it was just a matter of reaming out the bore slowly, frequently stopping to change the sandpaper, dump out the waste material, check the progress, and let both the drill and the hollowbar cool down. It took a total of about 8 hours over four days to do this.

But, in the end, a .62 cal lead ball would pass freely through the length of the hollowbar:
Now, one thing I want to note: when you repeatedly insert a mandrel with sandpaper from one end, that end will tend to get over-reamed. So I was careful to consistently do this from the end of the hollowbar that I intended to be where it would be mounted to the wood stock later (i.e.; not the muzzle end).
Making the socket.
The hand gonne would need to be mounted to a stock of some kind. Historically, these seem to have been just a simple stave of wood, with the hand gonne stuck on the end. That was also the style of the others I’d seen in person, so it was what I decided to do.
There were a number of ways that such mounting could be accomplished. I considered the options and settled on just creating a hollow at the end of hand gonne that would accept about a 2″ deep piece of the stock.
Therefore, to make the socket, I needed to remove additional material to a depth of about 2″. To do this, I used a drill with a 5/32″ bit (marked with tape to a 2″ depth) to create a starting set of holes in a circle:


Then I went to a 1/4″ bit to remove more of the bulk:

After this, I used the cold chisel to start to cut through the remaining material:

And then the Dremel rotary tool with a steel carving tip to remove the rest of the bulk and thin down the sides some:


I wasn’t worried about it being perfectly symmetrical or smooth at the bottom, since these areas would be hidden by the stock.
Making and installing the breech plug.
Since I was starting with a length of hollowbar, which had a hole down the center of the entire length, I needed to close up and secure the breech of the gun. The historic models and modern versions which are cast just have a closed-off breech to start with, so this step isn’t necessary.
Black powder is a low-pressure propellant, and I could have probably just gotten away with inserting a tight plug of bronze and then mounting the hand gonne to the stock. But I wanted something that would be more secure. More secure, yet still low tech (no brazing or anything). I decided that a couple of mild steel rivets through the outside of the hand gonne, and through the plug to the other side, would be sufficient. But this meant that the plug would need to be long enough put a couple of rivets through. I settled on a 2″ plug.
Using the calipers, I checked the bronze rod, and confirmed that it was larger than what I wanted. I also checked by trying to insert the end into the breech end of the hand gonne, just to be safe. It was still 0.675″, so I needed to file/sand it down:

Checking frequently, I continued that until the rod would barely start to insert into the breech. Then, using the hacksaw, I cut off a 2″ long piece of it:

I did some additional sanding, then inserted it, first by hand, then using the hammer and the iron rod I’d used as a mandrel to ream out the bore:


Shaping the outside.
OK, first things first: at this point, you could rivet the breech plug in place, drill the touch-hole, mount the hand gonne, and use it. The shaping I’m about to show/discuss is not necessary to having a functional black powder firearm.
But the historical record shows that most of these were shaped and/or decorated in some fashion. Likewise most of the reproductions I’ve seen. I decided to do something similar to the design of the one my friend owns, though going with an octagon form rather than a hexagon one.
Why bother? Mostly just for aesthetic reasons. But also, the entire bulk of the hollowbar isn’t necessary for the hand gonne to be strong enough to function. You do want to have some extra bulk/strength to contain the primary explosion of the black powder, in the area that is called the “chamber”. But as the lead ball/bullet starts to move down the barrel, the pressure drops off quickly. Meaning that the barrel walls don’t need to be quite so thick/strong. By removing the excess, you can cut down on the weight of the hand gonne by about a third. I also decided that I liked the flare at the muzzle often seen on these guns, and thought it would help connect it visually to that history.
Since the final shape of the hand gonne is largely an aesthetic decision, what follows is just a quick photo-essay of the steps I took to come up with my preferred design. Also, while I started out using a file, I almost immediately shifted over to using a belt sander to get the overall shape, then a bench grinder to rough out the barrel, followed by more use of the belt sander. Basic shaping was done using a 60grit belt, then finished with a 150grit belt.
First, I marked the end of the muzzle with the basic shape I wanted:

Then I put it back into the trough to hold it in place:

I chose an octagon shape for a simple reason: it would be easier to keep it aligned in the trough while working.


Once the overall shape was defined, I started to cut down the barrel bulk:


This all actually went faster than I expected, just a couple hours work with the belt sander & grinder, with frequent stops to check dimensions with the calipers.


Securing the breech plug and drilling the touch hole.
Once I had the exterior shape mostly finished, it was time to secure the breech plug with a couple of mild steel rivets and drill the touch-hole (how you fire the hand gonne).
The first step was to carefully measure and mark the locations of the rivets and the touch-hole. I did this by using a dowel from both the back of the socket and from the muzzle. I wanted the rivets to be evenly spaced about 1/3 the way from the front and the back of the breech plug, and the touch-hole to be positioned so that it was just in front of the breech plug.
Using a Sharpie, I marked the location of each of the holes. First I used a 7/64″ bit and drilled the touch hole, centered on that face of the octagon and angling slightly back into the chamber for the black powder. This would tend to force the jet of hot gas forward away from the shooter when the gonne was fired. I used a larger drill bit to start a larger hole just on the surface — the beginning of a simple ‘pan’ to hold a small amount of black powder.
Then I selected a drill bit the same diameter of the 3″ nails I was going to use for the rivets, and drilled through the exterior of the hand gonne, the breech plug, and out the other side of the hand gonne:

Next I used the Dremel tool with a small grinding head to deepen the ‘pan’ and slightly counter-sink the holes for the rivets. I cut off the head of the nails, and inserted them through the holes, cutting them off with about a 1/8″ protruding from either side. Then these were hammered (with a hand sledge under them, though if you have an anvil that will work better) so that the mild steel filled the counter-sunk area:


Next I dressed those areas again using the belt sander and 150grit paper:


Shaping and mounting the stock.
I’d hoped to find a suitable length of oak, ash, or hickory to use as the stock. I settled for a 1.75″ x 48″ poplar dowel I was able to select at a local lumbar yard.
The first thing was to shape the end to fit the socket:

Once I had it so that it fit, I needed to secure it. I decided that normal 5-minute epoxy would be sufficient for this purpose. So I did some additional undercutting of both the dowel and the socket walls (so that the epoxy would fill in those, and couldn’t just pull loose). Then I mixed the epoxy, poured it into the socket, and shoved the dowel into place. To hold everything in place for the 24 hours needed to let the epoxy cure, I used this high-tech set up:

Surprisingly, this worked, and the dowel rod was almost perfectly straight off the back of the hand gonne.
I had debated whether or not to leave the dowel round, or to put partial flats on it, or what. But once the epoxy had set, the round dowel just didn’t feel right, so I decided to go ahead and use the belt sander to shape the dowel into the same shape/dimensions as the hand gonne:


If you look carefully, you can see the slight skew of the hand gonne off to the left. It’s only 3 or 4 degrees, and really isn’t noticeable when you actually hold the thing, but it is there. I decided not to worry about it.
I wanted to have some basic surface protection for the stock, so used some dark walnut colored Danish Wood Oil I had available:

Proofing the hand gonne.
The usual recommended procedure to test a home-made black powder firearm for safety is to take it to the range, put a double load of powder into it with a lead ball, secure the firearm, and then fire it from a safe distance using a string or fuse or whatever is necessary. I’d ordered in some cannon fuse for just this purpose.
I got out to my range on a cool Friday morning, when I was reasonably sure that no one else would be there. I wanted to avoid putting anyone else at risk, on the off chance that my project didn’t work out and wasn’t safe. That is, if the thing blew up, I wanted everyone else to be clear.
I set up a large sheet of cardboard (about 2×4′), about 7 yards from the gonne. I put in 120gr of FFg black powder, twice the standard load I’ll shoot out of the thing, along with a .62cal lead ball (345gr). I then laid the gonne down on a picnic table, with a fold piece of cloth under the muzzle end to maintain a slight elevation. Then I positioned my black powder range box (minus the black powder casks) balancing on the stock just behind the gonne as a protective barrier. I positioned my usual range bag on the back of the stock to help hold it in place. And I set up an inexpensive mirror and my smart phone so the phone was protected but would record the first firing of the gonne. Like this:

I cut a 6″ length of cannon fuse, inserted it into the touch-hole. I started the camera recording, then lit the fuse. Then got about 10 yards away, on the other side of my vehicle. And this is what happened:
And here the relevant bit is in slow-motion (1/8th normal speed):
Mwahahahahaha! It works!!!
Here’s where the first shot hit:

Not bad! It was time for the second shot, using a normal charge of 60gr of FFg black powder:
I was stabilizing the gonne with one hand, while filming with the other. There was a decent amount of recoil, even with the standard charge.
I went ahead and shot it a third time, again with a normal charge, but this time holding it and shooting it as I normally would. Again, I noticed a fair amount of recoil, even given the substantial weight of the whole thing (I’d guess ~10 pounds or so). But it’s not the sort of thing that most people would mind at all.
And all three shots hit in roughly the same place at 7 yards:

Not bad.
Given the very basic design of this thing, it’s still respectable in terms of control and power. I didn’t chrono it, but based on previously checking black powder guns, I’d guess that the .62 ball was probably traveling about 800fps. That gives a muzzle energy of about 500 ft/lbs, or about what a modern .40S&W handgun would get with typical loads. In other words, it’s an effective weapon, at least at moderate range. Not bad for a technology that is almost 700 years old.
Conclusions.
To repeat myself from the start:
- This is a description of how I made a black powder hand gonne for my own use
- I am not recommending that you make a black powder hand gonne
- If you do decide to make a black powder hand gonne, I am not recommending that you make it this way
- Any black powder hand gonne is potentially dangerous, and if you make one, the risk is entirely on you
- A black powder hand gonne is a firearm, and all the rules of safe handling and usage of a firearm apply
But, after the ‘proof’ shot, I did a close inspection of the hand gonne. There were no signs that anything had shifted or been stressed. Same thing after the two subsequent ‘normal’ charges were shot. So my conclusion is that the gonne is safe, though of course I will keep a close eye on it going forward.
And overall, I’d have to say that the project was a success. It is possible for an average person, using common, non-specialized tools and a little ingenuity, to make their own reproduction 14th century hand gonne with modern materials. My total cost out-of-pocket for this project was under $250, and now I have a couple new tools as well as the gonne.
Thanks for coming along for the ride. Feel free to share.
Jim Downey
Get a grip. Or make one.
A couple of weeks ago I posted about finishing a Liegi Derringer kit, then doing the laser work to customize the grips. It turned out well enough, so I decided to finish and laser a second kit, to use as a door prize for a black powder workshop I’m doing at the annual meeting of the Liberal Gun Club this fall in Las Vegas.
All went well until the time came to mount the grip to the receiver. The top mounting screw went in fine, after drilling a pilot hole. But the bottom one broke loose as I was tightening it. I took the top screw back out so I could see what the problem was. This is what I saw:

See right there in the center? That’s where the screw broke loose, knocking out the adjacent piece of wood. Just a fluke of the grain on this piece of wood.
There are several ways you can repair a problem like this. You can use a longer screw. You can fill in the broken material with a good wood epoxy, then remount the screw. You can change the hardware to relocate the screw. There are probably other good, simple solutions, but I’m not a wood-worker.
So of course I figured that I’d do the most difficult thing: carve a replacement grip out of another piece of walnut.
See, we had to take down a big walnut in our yard some years back. Most of the big pieces of good wood went to friends who are skilled wood-workers. The rest became firewood. We still have some of the firewood, so I picked out a piece and chopped it roughly to size:

Next, I spent a couple of hours with a drill, a heavy wood rasp, and a Dremel, and got the new grip down to an approximate form:

Then it was a matter of more detailed carving, to get closer to the shape of the original grip, and to make room for the hardware of the receiver:

I had decided to make this grip a little more robust than the original, since I didn’t trust my skills to not over-do it and make a fragile grip. But I didn’t want it TOO big:

Once I was satisfied with the shape of the grip, it was time to laser the design into the sides. To get the designs positioned properly, I used some reference tape:

I did the laser work, then stained the grip and polished it slightly. Assembly went just fine, and the mounting screws set without a problem. Here’s the finished product:


I’m pretty happy with the finished product, and hope whomever wins it will enjoy shooting it.
Jim Downey
Lookin’ Sharp(s).
As anyone who has read much of this blog probably knows, I (and the other BBTI guys) like weird guns. Anything that is innovative, or unusual, or uses a transitional technology, is likely to catch my eye.
One of those I got to try this past weekend is a reproduction Sharps Pepperbox. It was designed by Christian Sharps (of Sharps Rifle fame) in the middle 1800s , and proved to be a popular little hide-away gun in early .22. .30, and .32 rimfire cartridges.
In the 1960s Uberti produced a little .22short reproduction with a brass frame and plastic grips. Here’s one recently listed on Gunbroker which has an excellent description of both the reproduction and the original: Uberti Sharps Pepperbox 4 Barrel Derringer.
And here are some pics of the one we shot this weekend:


As you can see, the barrel assembly just slides forward to allow access to the breech. You put the hammer at half cock, then depress the button latch at the front of the gun, and it slides forward. Then you can drop four rounds of .22short into the barrels:


The assembly then just slides back into position, and locks. When you draw the hammer back, the firing pin (mounted on the hammer) rotates one-quarter of the way around, to strike each cartridge in turn.
Though a modern .22short has a surprising amount of energy, out of such a short barrel you’re looking at a modest 40-50 ft-lbs of muzzle energy. Would I care to be shot by one, let alone 4? Nope. And even the original loads using black powder, which would probably generate no more than about half that M.E., such a little hide-away gun would likely give a person on the other end of the barrels pause, because the risk of disability or death from infection would be significant.
Shooting the pepperbox was easy, and had no perceived recoil. Hitting a target at more than about five or six feet was another matter. Most of us tried it at about 10′, and were lucky to get one or two rounds into a 8″ circle. You might be able to improve on that with practice, but still, this was a gun meant for up close use:

It really is a cool little design, and a fun range toy. Shoot one if you ever get the chance.
Jim Downey
That takes balls, Part 2: rebound!
Last week I posted about a little Liegi derringer that I finished and did a laser design on. Well, over the weekend I got together with the BBTI gang and, among other things, had a chance to shoot and chrono the little gun.
Here’s a short slo-mo vid of shooting the Liegi:
As expected, shooting the Liegi was simplicity itself: pour in some black powder (FFFg) until the small chamber was filled, set a .451 ball on top, screw down the barrel, then add a #11 cap and it was ready to go.
Because I wanted to chrono the gun, we were shooting it from where we had the chrono set-up, about 15 yards from the bullet trap:

There was a fair amount of variation in the multiple shots we chrono’d, ranging from about 380fps to 600+fps, but the average was about 500fps. That gives the 139gr lead ball about 80ft-pounds of muzzle energy — not a lot, but more than I would care to be shot with.
Well, more than I would care to be shot with directly, anyway. Because one of the shots I chronographed bounced off the surrounding wall of the bullet trap, and ricocheted right back and hit me in the leg. It didn’t hurt at all, just tapped me in the thigh. I picked the bullet up off the ground where it landed. Here it is next to another fresh ball:

Note that it is darkened from the combustion, and there’s a slight indentation where it was seated down on the powder chamber of the gun. Here’s a pic that better shows the flattened profile of the bullet:

And here’s what it looks like on the side that hit the building:

And yeah, that means that I missed hitting the opening of the bullet trap (covering door is about 3×6′). I would be embarrassed about that with most handguns at 15 yards, but certainly not with this thing, which was intended to be used at bad-breath distance.
Like I said: fun little project. Now I’ll add it into my collection of black powder guns for regular use.
Jim Downey
That takes balls.
I recently picked up a little Pedersoli Liegi Derriger kit. One of the other BBTI guys has one of these things, and I’ve always considered it a cool little piece of firearms history. Cap & ball firearms technology came along in the early part of the 1800s, supplanting flintlocks and earlier ignition systems. The Liegi design was very popular as a basic pocket/boot/muff small handgun, because it was relatively easy to load and carry, and lethal at close range.
The interesting thing about the Liegi is the loading system: you unscrew the barrel, load the powder charge in the chamber, place a round bullet on top of the powder, then screw the barrel back into place. It’s simple and fairly foolproof, and doesn’t even require a powder measure — you just fill the chamber with black powder and it’s the correct amount. Once the gun is loaded and the barrel is in place, you draw the hammer to half-cock, place a cap on the nipple, and the gun is ready. Here’s a short video showing all the steps:
In addition to doing the minor prep work on the walnut stock of the gun, I wanted to add some laser engraving on the side panels. Because it amused me, I decided to use the same basic pattern as I had used for the grips of a very modern handgun, my Customized Timberwolf G21. Here’s a pic of the finished product, and on the next page are pics of the process and comparisons to other small handguns I have:

Boxed sets
Remember the post about the various large cartridges?
Well, I made a display box. Actually, I made three — one for each of the BBTI team members. And now that I’ve given the other two guys theirs, I can share pics:

That’s all three boxes. They’re simple plywood exterior, with the interior of acrylic. All of it cut using my Glowforge laser. Here’s a detail shot:

The boxes were designed so that the cartridges can be easily removed so that people can actually handle them.

And they close up for safe storage.

Just thought I would share these.
Jim Downey
So, you think .44 magnum is powerful?
Yesterday I got a box of cartridges. Now, even with the shortages these days, that isn’t that unusual.
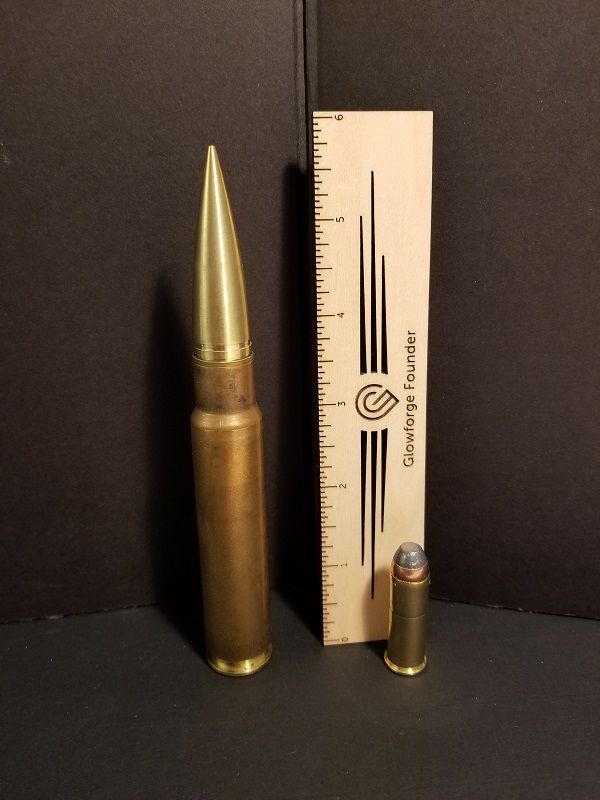
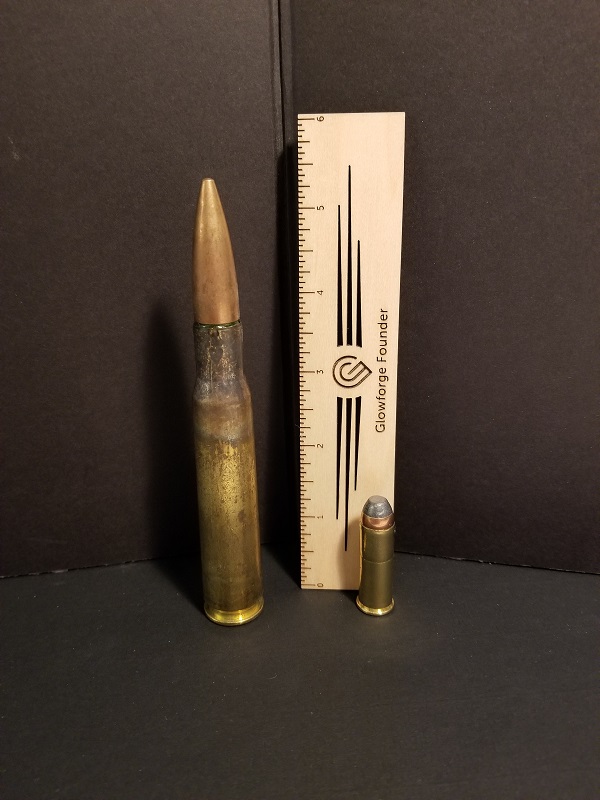
But take a look at the contents:

OK, for scale: that’s a full-sized .44 magnum cartridge on the right, outside the box.
What the Hell???
This was a box of, um, BIG cartridges put together for me by one of the other BBTI guys, just for fun. Yeah, we have odd senses of humor.
Now, I’ll admit, most of these I didn’t even recognize. But I spent some time with my copy of Cartridges of the World by Frank C Barnes, and poking around online. And I thought I’d share the results. For simplicity in putting this blog post together, descriptions of each cartridge is from Wikipedia and in blue text. Other info is probably from Cartridges of the World.
Here are the cartridges, lined up for better display:

You can make note of your guesses for each one, if you’d like, then test to see whether you’re right.
Ready?
OK, from left to right … (with ruler and full-size .44 mag for scale):

.950 JDJ. .950 JDJ cases are approximately 70 mm in length, and are based on a 20×110mm case shortened and necked up to accept the .950 in (24.1 mm) bullet. Projectiles are custom-made and most commonly weigh 3,600 grains (230 g) which is 8.2 ounces or over half a pound. The cartridge is derived from a 20mm Vulcan cannon cartridge.

12.7 x 108mm. The 12.7×108mm cartridge is a 12.7 mm heavy machine gun and anti-materiel rifle cartridge used by the former Soviet Union, the former Warsaw Pact, modern Russia, China and other countries. It was invented in 1934 to create a cartridge like the German 13.2mm TuF anti-tank rifle round and the American .50 Browning Machine Gun round.
14.5 JDJ. It uses the .50 BMG case with the neck opened up to accept a .585 in (14.9 mm) bullet. Barnes notes that this proprietary cartridge is capable of sub-MOA groups at 1,000 yards out of a SSK Industries rifle, with almost 15,000 ft/lbs of energy.
.50 BMG. The .50 Browning Machine Gun (.50 BMG, 12.7×99mm NATO and designated as the 50 Browning by the C.I.P.[1]) is a cartridge developed for the Browning .50 caliber machine gun in the late 1910s, entering official service in 1921. Under STANAG 4383, it is a standard cartridge for NATO forces as well as many non-NATO countries. * * * The .50 BMG cartridge is also used in long-range target and anti-materiel rifles, as well as other .50-caliber machine guns.

.700 Nitro Express. The .700 Nitro Express (17.8×89mmR) is a big game rifle cartridge made by Holland & Holland, London, England. It was developed in 1988 by Jim Bell and William Feldstein and built by H&H.

.600 Nitro Express. The .600 Nitro Express is a large bore Nitro Express rifle cartridge developed by W.J. Jeffery & Co for the purpose of hunting large game such as elephant.

.500 Nitro Express. The .500 Nitro Express is a rifle cartridge designed for hunting large and dangerous game animals in Africa and India.

.500 Jeffery. The .500 Jeffery is a big-game rifle cartridge that first appeared around 1920, and was originally introduced by the August Schuler Company, a German firm, under the European designation “12.7×70mm Schuler” or “.500 Schuler”. When offered by the famed British outfitter W.J. Jeffery & Co, it was renamed the .500 Jeffery so as to be more palatable to British hunters and sportsmen following World War One.

.50 Alaskan. The .50 Alaskan is a wildcat cartridge developed by Harold Johnson and Harold Fuller of the Kenai Peninsula of Alaska in the 1950s. Johnson based the cartridge on the .348 Winchester in order to create a rifle capable of handling the large bears in Alaska.

.50-110 Winchester. The .50-110 WCF (also known as the .50-100-450 WCF , with different loadings) in modern 1886 Winchesters with modern steel barrels is the most powerful lever-action cartridge, with up to 6,000 foot pounds of energy.

11 x 59mm R Gras. The 11×59mmR Gras, also known as the 11mm Vickers, is an obsolete rifle cartridge. France’s first modern military cartridge, the 11×59mmR Gras was introduced in 1874 and continued in service in various roles and with various users until after World War II.

.458 Win Mag. The .458 Winchester Magnum is a belted, straight-taper cased, Big five game rifle cartridge. It was introduced commercially in 1956 by Winchester and first chambered in the Winchester Model 70 African rifle.[2] It was designed to compete against the .450 Nitro Express and the .470 Nitro Express cartridges used in big bore British double rifles. The .458 Winchester Magnum remains one of the most popular game cartridges, and most major ammunition manufacturers offer a selection of .458 ammunition.

.500 S&W Magnum. The .500 S&W Magnum (12.7×41mmSR) is a fifty-caliber semi-rimmed handgun cartridge developed by Cor-Bon in partnership with the Smith & Wesson “X-Gun” engineering team for use in the Smith & Wesson Model 500 X-frame revolver and introduced in February 2003 at the SHOT show.[5] It has two primary design purposes: as a hunting handgun cartridge capable of taking all North American game species, and to be the most powerful production handgun cartridge to date.
And there you have it.
How did you do at identifying the cartridges? As noted, a lot of these I could not ID just by looking at them, though most of them I recognized once I examined the cartridge base for headstamp info. Two I was unfamiliar with (the .500 Jeffery and the .50 Alaskan), and one I had to break out my calipers in order to figure it out: the 14.5 JDJ. Because it’s headstamped as a 12.7 x 99mm, or BMG, cartridge. Once I realized the projectile was larger, then I guessed what it must be.
And no, we’re *not* going to be testing these or anything. It was just something fun to share.
Jim Downey
The Cunningham Speed Strip
Anyone who has considered a revolver as a self-defense option has confronted the question of whether, and how, to carry spare ammunition for it. Loose cartridges are just a pain to deal with, and take forever to reload. Speedloaders are great, but more than a little bulky. Commercial ‘speed strips’ are less bulky, are commonly available at a reasonable price, and are a big improvement over fumbling with loose rounds, but can still be awkward for reloading quickly. That’s because while they hold six cartridges, they’re difficult to position such that you can load an empty cylinder quickly — the close-packed cartridges actually get in the way. One common trick for using a speed strip is to only put two pairs of cartridges in it, with a gap between the two sets and the last position empty — that way, you can always quickly load two sets of two adjacent chambers in the cylinder of your revolver. This technique is perhaps best known due to defensive revolver guru Grant Cunningham.
Well, after recently taking a class with Grant, and learning this technique, I set out to make a more functional speed strip which would completely and quickly reload any revolver. One that almost anyone can make on their own, with minimal tools and expense, and customized to their revolver, whatever cartridge it shoots and whatever the capacity of the cylinder. I jokingly call it the Cunningham Perfect & Adaptable Speed Strip for Any Revolver regardless of Caliber or Capacity. More seriously, I’ll refer to it as the Cunningham Speed Strip, (CSS for short.)
Here some pics of what it can look like:

Bianci Speed Strip and custom homemade CSS (for a J-frame).

6 rounds of .38sp.

5 rounds of .38sp and 6 rounds of .44mag.
And this is how you make it.
YOU’LL NEED:
Tools
- A pair of common pliers
- A hammer of almost any type
- A pair of scissors or utility knife
You’ll also need
- A Heat Source (just about anything from a hair dryer to a blowtorch will do — you’ll see)
- An empty cartridge case for your revolver
- A pen or pencil
- A sheet of paper (really, just a scrap)
- A scrap piece of heavy cardboard or wood
- Suitable piece of inexpensive common vinyl (more on this to come)
PROCEDURE:
Select your vinyl. A wide variety of commonly available types of vinyl will work. If you look at the examples above you’ll see a piece from a 1/2″ ID vinyl tube, a piece of vinyl floor runner, and a piece of vinyl sheet used to cover food for microwaving. In other words, a wide variety of vinyl materials are likely to work.
So experiment a little. What you want is to find a vinyl which is flexible (not rigid/brittle) and sufficiently thick to hold cartridges in position, but will easily pull away when you have the cartridges in the chambers of the cylinder. The vinyl tubing is the one I like the most, and is 1/16″ thick. It has a slight tackiness to the surface I like because it makes it easier to use. The vinyl sheet is about one-third that thick, and the vinyl floor runner is somewhere between the two (though a little too flexible for my tastes).
Now, realize that it’s likely that any of these materials will tear after repeated use. These aren’t meant to last forever … but each of my prototypes have held up to at least a dozen uses so far. The idea is that they’re cheap and easy to make and replace.
Cut the vinyl to rough size. You want a working piece that you can trim later. Here’s what the tubing looks like when cutting:

About a 6″ piece of tubing.

Slit along the sides.

Flat section cut out.
Make a paper template. It’s difficult to mark most kinds of vinyl. So the easy thing to do is to make a paper template of what you want. For a J-frame, you want two sets of paired cartridges and one solo, with gaps in between the sets (as shown). For other guns, you may want a different arrangement. But in each case you want to use your empty cartridge case to draw the position of the circles on the paper. Like so:

Paper template.
Also note that I have a couple of marks showing the approximate ends of the strip. You want a bit of a tab on either end, to make it easy to grab and use the strip. But the final amount (and whether square or rounded off) is entirely up to your preference.
Position the template and vinyl for punching. Here I recommend that you use either a piece of dense cardboard or a scrap piece of wood. You can tape down the template if you want. But position the template, then lay the strip of vinyl on top of it in alignment with the template.

Position the template.
Heat up the case and/or strip. Again, the source of the heat really won’t matter. It can be a heat gun. Or a warm brick. Or a hair dryer. Whatever you have handy. Now, this may not be necessary. With some vinyls, you don’t need to really heat them up. But I have found that it makes things easier if you do, as the vinyl becomes softer and more pliable. And you can see in the image above that I have a .38sp case positioned in front of a heat gun, to make it even easier.
Position the case and strike with a hammer. If you have heated up the case, or if you’re worried about smacking your fingers with the hammer, the easy thing to do is to pick up the case with a common pair of pliers and then hold it in position. Put the mouth of the case over the vinyl/template in the correct position, then hit the case with the hammer.
How hard to hit, or how many times, will depend. But ideally, you want to have the case punch through the vinyl in a clean and complete way, so you have a small disk of removed vinyl left. This is the advantage of using the case instead of trying to cut the vinyl with a knife or drill bit: you wind up with a good clean cut the *exact* size of the cartridge.

Clean through!
Repeat as many times as necessary. Until you have all the holes punched out.

J-frame layout.

Anaconda layout.
Then trim the strip as desired. Once done, insert loaded cartridges and it’s ready to use.
5 rounds of .38sp and 6 rounds of .44mag.
That’s it!
I thought about patenting this idea, or seeing if I could sell it to some manufacturer. But it seemed like a good thing to just share as an ‘open source’ idea with the firearms/self-defense community so it could be used widely. If you found this instructional post useful in making your own customized speed strips, and would like to contribute a couple of bucks, just send a PayPal donation here: jimd@ballisticsbytheinch.com Proceeds will be shared with Grant Cunningham, who inspired this design.
Jim Downey
A couple of centenarians … in .32 ACP
Happy Anniversary/Birthday! By tradition, BBTI is 11 years old today!
~~~~~~~~~~~~~~~~~~~~~~~~~~~~~~~~~~~~~~~~~~~~~~~~
I recently got to shoot a couple of very nice little pistols in .32 ACP … which date back to before WWI.
The first was a Sauer & Sohn Model 1913:


The second was a Mauser Model 1914:


I’m not going to try and do an in-depth review of either gun. I didn’t shoot either one enough to really develop a strong opinion, and the two links above go into the history and context of the pistols is detail.
But I am going to say that I was honestly surprised at just how accurate and easy to shoot both of them were. Each one gave me about a 6″ group at 10 yards the first time I shot it, and I was sure that a little practice with either gun would have improved upon that quickly. They both felt comfortable & solid in the hand, easy to hold, easy to shoot.
And, surprisingly, both “spoke with authority”. What do I mean by that? Well, I must admit that I don’t care for the .32 ACP round much, and consider it sub-optimal for self-defense purposes. Out of barrels about this size, you’re only going to get about 125 ft/lbs of energy. Just stepping up to .380 ACP out of a similar sized gun will give you about half again the power … or more.
But when I thought about it, I realized that most of the .32 ACP guns I’ve shot were smaller than these … they were what we would call “mouse guns”, and never felt very solid in my large hands. Neither of these two pistols are “large” — both are about the same size as a PPK — but they really felt like ‘real’ guns. That physical size difference made a big psychological difference for me. Just knowing that I could reliably put rounds where needed matters.
Other factors to consider in understanding these guns in context: when they were made, and for what purpose. At the turn of the 20th century, people were smaller, hence the need for less penetration than is generally considered to be the case today. Medical treatment was both less developed and less available, and there were no antibiotics. This means that even a non-incapacitating wound had a very real chance of being lethal within hours or days — making getting shot something you wanted to very much avoid. While both of these guns did go on to see military service, they weren’t really designed as weapons of war. Rather, they were intended for police and private use, and by all accounts served in these roles admirably.
Given that both guns were over 100 years old, they were remarkably reliable. Between myself and my shooting companions, we put about a box of ammo through each. I don’t recall the S&S having any issues whatsoever, and the Mauser only had a couple of glitches with failure to cycle completely. Since we didn’t take the guns apart for a detail cleaning (though we did a quick inspection to make sure they looked to be in good condition), that could have just been due to build-up of dirt or weak recoil spring. At 61 myself, I sympathize.
Fun guns. If you get a chance, handle and shoot either one. You might be surprised at how much you like it.
Jim Downey
I’m not wild about Wildey …
When you see this tag on a pistol, you know things may get interesting:

Can’t read it? Here’s the text:
CAUTION
This gun is unique in many
ways. Do not handle and/or
fire it without having read
the instruction manual.
If there is anything you don’t
understand, seek advice
from someone qualified in
safe handling of firearms.
Of course, we didn’t have the instruction manual. Details, details.
Here’s the tag in context:

Yeah, that’s a new production Wildey Survivor with a 10″ barrel, in .45 Winchester Magnum. Bit of a brute. Here are some other pics of the one we shot:


The Wildey is one of those interesting experimental guns dating back to the 1970s. It uses a gas-operated system at fairly high pressures to fling a substantial slug at high velocity: the .45 WinMag version we shot is supposed to move a 230gr bullet at about 1,600fps, for about 1,300 ft/labs of energy. Now, that’s about 40% more power than the .45 Super or .460 Rowland cartridges out of a similar length barrel, so it is definitely nothing to sneeze at.
Even more interesting, the Wildey has a collar behind the barrel which allows you to adjust the gas pressure for different loads or to manage recoil while minimizing malfunctions. Well, at least in theory.
Why do I say “in theory”? Well, because in practice the thing was very finicky. Which certainly could have just been a matter of it being a brand-new gun in the hands of inexperienced shooters (well, inexperienced in shooting a Wildey … the three of us shooting it were the BBTI team, and I think it’s fair to say we have more than the typical amount of handgun shooting experience). But check out this video of Ian from Forgotten Weapons putting a Wildey Survivor through its paces and you’ll see what I mean:
He has all kinds of problems with it, rarely getting off two or three shots before experiencing a malfunction. That was exactly our experience with the gun.
Now, I don’t want to give the impression that I hated the gun. I don’t have enough experience with it to have that much of an opinion, having only run a couple of mags through it myself. But all three of us had major problems with the gun, even after we consulted online resources to get tips on managing the malfunctions and tweaking the gas adjustment.
It is a cool, innovative design. It’s very well made. You pick it up, and you know you are holding something high quality. And hey, it was even a movie star. How can you not like that?
But at 4 pounds+ weight, and a substantial grip size, it is, as I said, a bit of a brute. And interestingly, as Ian notes at the end of the video above, the thing is all sharp edges just asking for a blood sacrifice. In fact, the BBTI member who took it home to clean it sliced up his hands while doing so.
An interesting gun. I’m glad I got the chance to shoot it. But I wouldn’t want to own one.
Jim Downey
Sig P365 SAS review.
Last weekend, I got to try one of these:


Yup, it’s the latest iteration of the popular Sig P365, the SAS (“Sig Anti-Snag”), designed to be the ‘ultimate concealed-carry gun’.
Well, is it?
Take a look at this pic: 
That’s the first time I shot the gun. Draw from a low ready position, intuitive point and shoot as fast as I could, at about 5 yards. I didn’t even try to use the proprietary sighting system.
Which doesn’t mean that it is the ultimate CCW. But does mean that at least in my hands it was more than adequate for the job, right out of the box.
But what did I actually think of the gun?
I agree with most of the reviews I’ve read of the P365 generally: very small, well designed and well made (at least in the later guns, after Sig resolved some minor but real issues). Surprisingly comfortable even in my very large hands. 10+1 rounds of 9mm +P is damned nice to have in such a small package. Quite good trigger, somewhat lighter than I expected. And clearly the point & click ergonomics are very good.
I’m not at all troubled by the lack of a manual safety, though that has been an issue for other people. If it’s a deal-breaker for you, then get something other than the SAS (Sig offers a version of the P365 with a manual safety, or you can just go with another brand.)
I don’t like the ported barrel. Our research has shown that it effectively makes the ballistic performance that of a barrel the length before the ports. And stepping down from about a 3″ barrel to about a 2″ one isn’t a good idea, if you want all the power the gun could deliver. Whether it actually helps with control/muzzle flip, well, you’d have to compare head-to-head with a non-ported barrel to see. I suspect it would help some, but that probably wouldn’t matter that much for people who aren’t recoil sensitive.
And while the proprietary sight is … interesting … I don’t think that it was that great. The idea behind it is that having a single long recessed fiber optic tube (with a tritium capsule at the far end) keeps the slide completely smooth while allowing a natural sort of parallax — basically, if you can see the green dot, then that means the gun is lined up correctly. That does work, and for very close-up defensive work it is sufficient. But for very close-up defensive work not using sights at all is sufficient, as generations of very small guns has demonstrated. I found that in bright light coming down from above the FO was bright, but in most other conditions it was weak. And the tritium capsule does work under dark conditions, but again really isn’t sufficient for anything other than very close defensive work. So personally I’d probably mostly ignore the sighting system in practical use.
Overall, I think it’s a hell of a little gun. Take a look at one if you get a chance.
Jim Downey
The BEST way ever! Just like last time …
Recently I had the opportunity to take some defensive firearms use classes from some highly-respected pros in that field (no, I’m not going to say who). This was the first formal training I’ve had in a while, and it was a great weekend of experience which taught me a lot, and reminded me of a number of other things. Seriously, if you have firearms for any kind of self/home-defense, you owe it to yourself to occasionally get such training.
But in discussing the classes with friends later, I made a comment which surprised them: that while I found the classes both insightful and useful, I was going to continue to do one thing in particular the way I had previously, not the way that the instructor taught.
Why? Why would I take the time and pay the money to take a class and then not follow the lessons taught? That seems … foolish, at best.
So let’s talk about that.
First, I want to be clear on something: while I was taking the class(es), I did all that I could to follow the techniques and philosophy of the instructor(s) to the best of my ability. That started with using their preferred/recommended style of gun and extended to such things as proper grip on that gun, stance, carry style, aiming technique, reloading, etc. Because, yeah, I did indeed sign up for a class from those instructors and wanted to learn what they had to offer. It would have been foolish to take their class and not do my best to learn from them. Not only foolish, it would have been a waste of both money and time (mine & theirs) to do so.
And, as I said, I did learn a number of things, which I will be putting into my regular shooting practice going forward. Things I will share with others, as appropriate.
Yet I am going to stick with several of my previous techniques.
Is it fair to pick and choose like that?
Yup.
If you have enough experience, it’s not only fair, it’s smart. And expected. At least it is expected by almost any decent instructor I’ve ever known.
That’s because with something as dynamic as any serious martial art (and defensive firearm use is definitely a martial art), there are so many complex factors that are involved that it is impossible to reduce the skills used to one simple equation that works for everyone. And there are just too many variables in physical ability/limitation, reaction time, opportunity for practice, and so forth. This is obvious, but sometimes gets forgotten by people who become enamored of the “one true way” — whether that’s the “perfect” gun, or stance, or grip, or whatever.
And besides, I’ve been around long enough that I’ve seen a LOT of fads come and go. Each time, there’s some set of true believers who think that their way is the objectively BEST way … until the next fad comes along to knock it off the pedestal.
So, what’s the “best” way? The way that works for you, when you need it. And really, only you can make that decision.
But make it intelligently. And I mean by exposing yourself to a lot of different possibilities, from different sources. And testing those possibilities with honest, conscientious practice.
Jim Downey
From Gatling Guns to Laser Pistols.
Again, it’s been a while. Partial explanation towards the end of this post.
So, the BBTI team finally got together to do something we’ve been wanting to do for several years now: shoot a Gatling Gun. Yep, a real, honest-to-gawd Gatling Gun. Well, not an original, but a faithful reproduction of the original 1862 patent version, in .45 Colt. This one:

Keith checking the gavity-fed magazine.
It’s such an iconic weapon, having been used around the world for about 50 years (from the American Civil War until World War One). And almost anyone who has seen Westerns has probably seen one depicted on the screen. So when the opportunity presented itself to get a fine reproduction one at a reasonable cost, we jumped on it. And last weekend we were finally able to coordinate our schedules to get out to shoot the thing.
But first we had to assemble it, because it breaks down into several components for ease of transport and use. Overall, the whole thing weighs more than 300 pounds. The main element is the barrel & mechanism assembly:

Barrels & mechanism.
We’ve got a nice tripod to mount and shoot the gun. Here we are assembling that:

Tripod base.
On top of the tripod is a pivoting mount, so you can rotate the gun from side to side. Into that goes a yoke mount, to which the gun is secured. Elevation is controlled by an adjustable wheel screw at the back.
The way the gun works (the Wikipedia entry is pretty good, as well) is that you put the cartridges into machined sections of heavy steel tube called a ‘chamber’ (essentially, a section of barrel), and those are placed in a magazine. The magazine goes into the top of the gun, upside down. Each chamber drops into position behind a barrel, then is pressed forward and locked in place as it rotates to the next position. The barrel then rotates again into the firing position, a firing pin ignites the cartridge, and the bullet fires. As the barrel rotates again, the chamber is released, and falls free out the bottom of the gun. This process is repeated for each barrel in turn as long as you turn the crank and there are chambers in the magazine.
Here you can see a test run with empty chambers to make sure everything feeds and falls properly:
Success!
Next, we wanted to make sure that the firing pins were working properly:
After that, it was time to load ammo and give it a try.
I’d loaded 1000 rounds of .45 Colt, using 200gr lead bullets and 6.1gr of Titegroup powder. This is a mild handgun load, but we weren’t looking for a lot of power, just a lot of fun. Still, out of the 30″ barrels we were probably getting about 1,000fps and roughly 450ft-lbs of muzzle energy — a respectable amount of power.
Here’s Keith of the BBTI team giving the Gatling Gun its first live-fire trial;
Yay! It worked!
Soon, I got my turn:
Dude, that’s way cool.
OK, several things we discovered in shooting the Gatling Gun …
One, you quickly realize that once you start turning the crank, you find there’s an optimal speed where it feels easy and consistent. I got there at the end of the video above.
Two, you can go through the 44 rounds that our magazines hold in about 20 seconds when you know what you’re doing.
Three, it helps to have someone actually hold the magazine in position, rather than relying on the small set-screw to hold it.
Four, the gun is surprisingly accurate and consistent. Once we got the hang of it, at 20 yards (the effective distance we had to shoot it), we were all getting paper-plate sized groups. Like this:

The first target. All the rest were this good or better.
Seriously, I was very surprised by this. I expected something more like “minute of cow”. I look forward to shooting it sometime at longer ranges to see just how good you can get with such a gun.
After we all had fun shooting the modern ammo, it was time to try the gun with black powder cartridges. Specifically, 30gr of Goex FFg and the same 200gr lead bullet. I shoot a fair amount of black powder, and know that it can be messy … but man, it was an incredible mess in the Gatling Gun. But it sure was spectacular. Check out the long tongues of flame from this sucker:
And just think about what a battlefield with a bunch of those cranking out rounds would have been like. Blimey.
Now that we’ve finally had a chance to get together for an inaugural shoot of the Gatling, it’s something that each of us is going to take for a while, and share with friends. Look for more coverage of it in the future.
So, what was that about Laser Pistols, and why have I been so absent/quiet here for so long?
Well, about a year and a half ago I got a Glowforge laser cutter, which I mentioned in passing in my post last November. I kinda fell into a deep hole playing with it since then. But it’s all good, because one of the things I have been doing with it is making a whole bunch of handgun display models/art, like this:

Springfield XDM
That’s one of the 42 contemporary designs I’ve done. I’ve also done a bunch of historical firearms, such as the 1851 Colt Navy Revolver:

Colt Navy Revolver
And even favorites from various Science Fiction franchises …

Farscape Pulse Pistol
The whole thing can be found here: Art of the Gun and I invite you to stop in, check it out, see the many different designs I’ve come up with so far. I’ve just launched the site, but already it is starting to get some positive feedback — so maybe you’ll find something you like there as well.
One last thing: we’re not done with the BBTI project. Something else we did this past weekend was to start talking about future projects related to our ongoing research. It’s too early to say too much, but rest assured that we have more work yet to do, more data yet to gather and share.
Thanks for coming by, and for your ongoing support.
Jim Downey
EMP4 can’t handle the pressure.
Earlier this month I took my EMP4 out to the range, and ran into problems documented in this post. My conclusion:
Since I haven’t had any problems with my standard-pressure reloads, I’m assuming that it’s the over-pressure which is causing this problem. Both the Underwood and the BB ammo are *really* hot. But I wanted to check everything out again before shooting the gun any more. If everything looks good, then I’ll start with standard pressure loads and then slowly step up to hotter loads. I expect that will resolve the issue, and I don’t mind carrying SD ammo which is a little less powerful — shot placement is more important than power.
With one thing and another, it’s been a busy month, and I didn’t have a chance to get back out until this morning to test my conclusion. But first I did a thorough cleaning of the gun, pulled the firing pin and examined it closely. One possible problem could have been the firing pin having sharp shoulders, which could have led to it punching too hard into the primer metal. But upon close examination the firing pin looked perfectly normal and very much like every other firing pin I’ve ever seen.
In preparation for going out to the range today, I picked up some additional good self-defense ammo and grabbed a box of standard factory target ammo:

Starting on the top left (all 9mm Luger ammo, of course):
- Hornady 124gr XTP Custom
- Hornady 124gr XTP +P American Gunner
- Hornady 124gr FlexLock +P Critical Duty
- Speer 124gr +P Gold Dot Hollow Point
- Sig 124gr V-Crown JHP
- Remington UMC 115gr FMJ target
I started with the Remington, and ran a couple of mags through the gun, examining it closely between reloads. No problems.
Then I switched over and shot each type of ammo, a full mag (9 rounds), again checking the gun between reloads. It ran absolutely flawlessly with each and every kind. I checked some of the spent cases of each type, and all of them showed a perfectly normal primer strike.
Then I loaded up a mag of the Underwood 124gr +P+ I had shot previously. The first couple of rounds were OK, though I checked the spent cases and saw that the primers were completely flattened — the firing pin strike was still visible, but it was no longer an indentation. That’s a sign of too much pressure in reloads, and something you always check when you’re working up a powerful load. The next shot was similar, but there was a missing disk of metal on the primer, which was stuck on the firing pin of my gun. I popped it off, shot the next round. Same thing happened.
I unloaded the gun and the magazine, put the rest of the Underwood ammo aside. Then I loaded it with the Buffalo Bore 124gr +P+ SD ammo. Basically, the exact same thing happened, though I think I made it through three rounds before the first punched-through primer. Again, I unloaded the gun and the magazine, and set the rest of the Buffalo Bore ammo aside. Again, I checked the gun thoroughly to make sure everything looked right. It did.
Then I went back and tried each of the lower-pressure ammos again. Each again ran flawlessly.
I could do more testing, but I’m convinced: the problem is that the +P+ ammo is just too damned hot for the EMP4. Now, my other 9mm guns do shoot it fine (even the little Boberg, which is really picky about ammo), so I guess I could say that the EMP4 is somehow flawed in design or construction. And if you want to hold that against the EMP4, then go right ahead.
But I’m happy enough with the gun otherwise, and there are plenty of types of good self-defense ammo available which are just a little less powerful. Works for me.
Jim Downey
-
Archives
- April 2024 (1)
- March 2024 (1)
- May 2023 (4)
- April 2023 (1)
- August 2022 (1)
- July 2022 (3)
- May 2021 (1)
- March 2021 (1)
- December 2020 (1)
- September 2020 (4)
- August 2020 (10)
- July 2020 (1)
-
Categories
- .22
- .223
- .22WMR
- .25 ACP
- .30 carbine
- .32 ACP
- .32 H&R
- .327 Federal Magnum
- .357 Magnum
- .357 SIG
- .38 Special
- .380 ACP
- .40 S&W
- .41 Magnum
- .44 Magnum
- .44 Special
- .45 ACP
- .45 Colt
- .45 Super
- .450 SMC
- .460 Rowland
- 10mm
- 6.5 Swedish
- 9mm Luger (9×19)
- 9mm Mak
- 9mm Ultra
- Anecdotes
- black powder
- Boberg Arms
- Data
- Discussion.
- General Procedures
- historic rifles
- Links
- Revolver
- Shotgun ballistics
- Uncategorized
-
RSS
Entries RSS
Comments RSS
