Hey Bulldog*
Some firearm designs are iconic, almost mythic. One of those was introduced in the early 1870s, and was widely carried both by military forces and civilians, and is credited by many firearms historians as being a critical factor in the ‘taming of the West’.
No, I’m not talking about the Colt SAA. I’m talking about the SA/DA Webley No. 2 in .450 Adams/CF (center fire), commonly referred to the Bulldog, designed as a self defense revolver small enough to carry in a pocket. Like this one:

That pic doesn’t give a good idea of the small size of this big-bore revolver. But overall it’s about the size of a modern J-frame. Here are a couple of images of me holding it:


The serial number of this particular gun (23905) indicates that it was made in the first batch of guns (serial numbers 20,000 – 25,000 were made 1872 – 1876). Made in Britain, these guns usually had the legend “BRITISH BULL DOG” on the top strap, except those sent for sale in the American market, which were marked with the importer/seller’s name. This is one such example, with the legend “LIDDLE & KAEDING, SAN FRANCISCO” on the top strap:

I assume that the decorative elements are stamped, but this is the only one of this era I’ve seen with it, so I may be mistaken.
While many of these guns were made, not many today are in sufficiently good condition to be shot safely. Partially this is due to the fact that the original black powder cartridge, containing a 255gr bullet traveling at about 650fps (for about 211ft/lbs of ME), was superseded by more powerful cartridges that fit the gun and would cause damage if not catastrophic failure. You can see how this could happen if you look at the thinness of the webbing between the chambers in the cylinder:

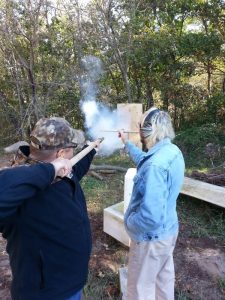
However, this example seemed solid and in good condition upon examination. There were no signs of damage or significant wear on the functional parts, and the lock-up of the cylinder was good, with only minimal play. We had .450 Adams/CF ammo loaded to original spec (made using .455 Webley brass cut down), and decided to give it a try:

A note about that ammo name: The cartridges were .450 Adams, designed by another company for their firearms. But evidently Webley didn’t want to have another gun manufacturer’s name on their guns, so decided to just call the round the .450 CF, and marked their guns such. That may have contributed to the use of more inappropriately powerful rounds later which damaged the guns.
The gun is very well designed. The ramrod swings over to eject spent cases, then the retaining clip through which it passes can be shifted to allow removal of the cylinder for cleaning. While the grip design is different from modern revolvers, it isn’t unpleasant in the hand. Felt recoil is substantial, but mild compared to lightweight modern small revolvers such as a J-frame in .38sp. In terms of power, 211 ft/lbs of Muzzle Energy is about half to two-thirds of what modern pocket guns typically generate — certainly effective, particularly given the state of medical knowledge at the time these guns were popular.
While the sights are simple, just a blade on the front and the typical trough along the top strap, they’re adequate for a self defense gun. All of us were able to keep rounds on the black of an 8″ target at about 10 yards without a problem.
Here’s shooting it:


The Webley No. 2 didn’t have the effective range or power of the Colt SAA, but it was well suited to its role as a reliable close-range self-defense firearm. While it was never widely issued as a military side-arm, British officers would frequently purchase it separately to carry, and many were sold in the civilian market. It was so popular that the design pattern was copied and produced in many countries, earning its iconic status. It was a real pleasure to have a chance to shoot an original.
Jim Downey
*With apologies to The Beatles.
Making a 15th century Hand Gonne
Last Spring I made a 14th century style Hand Gonne from bronze stock using minimal tools and equipment, just to see what was possible. That project turned out to be a big success, and the resultant hand gonne has been popular among friends and when I taught last year’s workshops on “Primitive Black Powder Firearms” for the Liberal Gun Club‘s Annual Meeting in Las Vegas.
Well, last month a local auction site I follow had a sale of various firearms, part, and accessories. Included was what was billed as a ‘bucket of barrels’. Looking over the listing, it was clear it was mostly old shotgun barrels, a bunch of .22 barrels, and what looked to be a half dozen or so very old, and very rusty, black powder rifle barrels. Just for grins, I bid a small amount, and wound up winning. When I went to collect the barrels, I swear the auction house had added a number of other misc barrels, probably just to get rid of them. Here’s the bucket I brought home:

And after basic rust removal with phosphoric acid:

After examining what I actually had, it occurred to me that I might be able to use some of these to make another black powder firearm. The original black powder barrels were too far gone to safely use, but the shotgun barrels had potential.
In thinking it over, I decided to make a slightly later style of Hand Gonne, and again to see if I could do it with minimal tools, to demonstrate the possibilities if others wanted to make their own.
Now, before we go any further, let’s get a few important caveats in place, like last time:
- This is a description of how I made a black powder hand gonne for my own use
- I am not recommending that you make a black powder hand gonne
- If you do decide to make a black powder hand gonne, I am not recommending that you make it this way
- Any black powder hand gonne is potentially dangerous, and if you make one, the risk is entirely on you
- A black powder hand gonne is a firearm, and all the rules of safe handling and usage of a firearm apply
- Lastly: I selected a barrel from a single-shot shotgun, the style of which I have never owned, so as to reduce the likelihood that someone might think I was making an illegal short-barrel shotgun, and I plugged that barrel shortly after cutting it down.
OK, we clear about that? Good.
The tools and materials needed.
In thinking it through, I decided that the most basic tools needed for this project would be:
- Electric drill with a 3/8″ chuck (or larger), misc drill bits
- Hacksaw
- Basic hammer and/or ballpeen hammer
- Hand sledgehammer or small anvil
- Clamps or vise
- Metal files
- Wood chisels or gouges
- Propane torch or similar
- Measuring tape/yardstick/square or similar
Now, some additional tools that are common, and which I used to speed up the whole process:
- Belt sander
- Bench grinder
- Dremel or similar rotary tool with various small bits
- Side-cutting pliers
Pretty basic, right? So is the list of materials needed:
- Mild steel rod 13/16″
- Silver soldering supplies (solder, flux, propane or similar torch)
- Sandpaper (various grades, starting with 60grit)
- Brass strap, 1/8″ x 1″, sufficient for 3 straps 5″ long
- 10d common nail or 1/4″ steel rod
- #10 x 3/4″ brass screws
- 2″ x 2″ x 48″ hardwood for the stock (finish size 1.5″ x 1.5″)
- Stain/finish for the stock, if desired
Selecting the barrel to use.
After the first bronze hand gonnes were developed, it wasn’t long before people started making similar weapons using iron or mild steel. Such firearms would be lighter, stronger, and at least in theory easier to make.
So adapting an old shotgun barrel to make a 15th century style hand gonne made sense.
A 12ga shotgun is nominally supposed to have a 0.729″ inner diameter barrel. I wanted the new hand gonne to be about that size, so one of the old 12ga barrels was perfect. I looked over the options from my bucket of barrels, and selected one using the following criteria:
- Condition: surface rust was acceptable, but not severe pitting or signs of cracks
- From a style of shotgun I did not own (to avoid someone thinking I was doing something nefarious)
- With a suitable lower projection of hardware which would aid in mounting the barrel securely
The one I picked had been of a common design for single shot 12ga shotguns from the early 1900s. I do not now, nor had I ever, owned such a shotgun, so I was reasonably confident that no one would think I was trying to make an illegal shotgun. I also intended on plugging the breech soon after cutting it to length to render it unusable as a conventional shotgun. This style of shotgun barrel has a heavy lug welded on the bottom of the barrel which was part of the original design, and that would prove useful for making sure it was securely mounted to the stock. Here’s the one I chose:

And after cleaning (the one on the bottom):

And just to be on the safe side, I used calipers to check the actual diameter of the barrel so I could order lead balls for ammo. And I’m very glad I did — while 12ga is nominally 0.729″, the barrel was just under 0.700″. I ordered .69cal lead balls.
Barrel prep and plugging.
The first step was to remove the surface rust on both the inside and the outside of the barrel. On the outside this was accomplished with a wire wheel. On the inside I used some #2 coarse steel wool mounted on a mandrel (in this case, a long lag screw with the head cut off) in my drill:

Next, I needed to prep and plug the breech of the barrel. This plug would be secured using three different methods: friction, silver solder, and steel rivet.
I checked the ID (inner diameter) of the breech/chamber, and it was right at 0.800″, after cleaning. So I needed a piece of mild steel rod about that diameter. A piece of 13/16″ rod specs out to 0.8125″, so that’s what I got. A bit of sanding the interior of the breech/chamber with fine sandpaper, and then doing the same with the rod got them almost the same diameter. With a little gentle force I could insert the rod about half an inch into the breech. That was a good start.
What I did next was use my propane torch to heat up the breech end of the barrel. Since the barrel is hollow, when heated it would increase the ID slightly as the metal expanded due to the heat. I’d marked the rod at the 1.5″ mark, which I figured would be a sufficient length of plug. Once the breech end of the barrel was heated, I inserted the rod to the mark, then cut it off flush with the back of the breech:


As the breech of the barrel cooled, it would contract and cinch down on the plug. So long as there was no sign of the barrel splitting, I figured it would be secure. I checked using another piece of steel rod and a hand sledge, seeing if I could move the plug at all. I could not.
Next, I used basic silver soldering skills to fill the void at the very back of the breech:

After clean up, the solder joint looked and felt good:

Lastly, I drilled through the barrel and plug at about 0.75″ from the back of the breech (so halfway into the plug), and put a rivet through the entire barrel, using a common 10d (10 penny) nail. You can substitute a 1/4″ iron rod for this. After peening over the rivet ends, I smoothed those over with a file. Unfortunately, I seem to have forgotten to take an image of this step.
Preparing the stock.
I selected a piece of 2″ x 2″ x 48″ red oak from a local lumber yard, which had actual dimensions of 1.5″ x 1.5″ x 48″.
First I positioned and then marked where the barrel needed to be mounted:

Then I used gouges and chisels to carve a shallow gully for the barrel to rest in, with deeper areas for the small stud and the big lug on the bottom of the barrel:


I periodically checked to see how the barrel would rest, until I got it to where I wanted. Then using a belt sander, I beveled the corners to almost an octagonal shape and shaped the front of the stock, and gave it a light finish sanding:


Lastly, I stained it:

Making the bands and mounting the barrel.
I decided that I wanted to use brass mounting straps for aesthetic reasons. This would hearken back to the bronze hand gonne, and indicate that it was supposed to be a transitional form. I used 1/8″ x 1″ straps.
1/8th” brass strap is stronger than you think. Well, at least it was stronger than I thought. I figured that it would be a fairly easy matter to hammer it into shape using some basic metalworking tools.
I was wrong.
Eventually I got it done, but it took multiple applications of heat from my propane torch, then hammering using different metal forms I had. But eventually I got the basic shape done:

After a little clean up and trimming:

I decided that I didn’t like the look of the raw oiled steel barrel with the rest of the gonne, so I cleaned it and then used a commercial gun blueing paste to darken it. Then I drilled the mounting holes and counter-sunk them:

I also positioned and then drilled the touch hole, so it was just in front of the front of the breech plug, and created a small ‘pan’ to hold gunpowder if I didn’t want to use fuse.
Then it was a simple matter to install the brass screws. I wanted to use solid brass rather than plated, for good color match. I thought they would be strong enough, but if they fail I can go to steel screws:


Proofing the hand gonne.
The usual recommended procedure to test a home-made black powder firearm for safety is to take it to the range, put a double load of powder into it with a lead ball, secure the firearm, and then fire it from a safe distance using a string or fuse or whatever is necessary. I’d come to prefer using cannon fuse for shooting the first hand gonne, so had it on hand for this purpose.
I got out to my range on a cool Monday morning, when I was reasonably sure that no one else would be there. I wanted to avoid putting anyone else at risk, on the off chance that my project didn’t work out and wasn’t safe. That is, if the thing blew up, I wanted everyone else to be clear.
I set up a large sheet of cardboard (about 2×4′), about 10 yards from the gonne. I put in 120gr of FFg black powder, twice the standard load I’ll shoot out of the thing, along with a .69cal lead ball (500gr). I then laid the gonne down on a picnic table, with a pair of leather gloves under the muzzle end to maintain a slight elevation. Then I positioned a metal ammo box beside the gonne as a protective barrier for my phone, with an inexpensive mirror positioned so the phone was protected but would record the first firing of the gonne . I positioned my usual range bag on the back of the stock to help hold it in place. Like this:

And here’s the slow-motion firing of the proof charge:
And this was the result:

The first thing I did was closely examine the gonne for any signs of damage or stress. It looked pristine, except for some dirt and gravel dust from falling on the ground. Then I checked the target. The first shot was partially in the bull’s eye (luck!). The second shot, also from a resting position on the table, with a ‘normal’ charge of 60gr of FFg, hit the upper right of the target:

I went ahead and shot it a third time, again with a normal charge, but this time holding it and shooting it as I normally would. Again, I noticed a fair amount of recoil, even given the substantial weight of the whole thing (I’d guess ~10 pounds or so). But it’s not the sort of thing that most people would mind at all. The third shot was on the lower left corner of the target:

Given the very basic design of this thing, it’s still respectable in terms of control and power. I didn’t chrono it, but based on previously checking black powder guns, I’d guess that the .69 ball was probably traveling about 800fps. That gives a muzzle energy of about about 700 ft/lbs, or about what a modern .357mag revolver with a 4″ barrel would do. Even dropping the velocity down to just 600fps, you’re getting the kind of performance you see out of a short barrel 9mm carbine. In other words, it’s an effective weapon, at least at moderate range. Not bad for a technology that is almost 600 years old.
Conclusions.
To repeat myself from the start:
- This is a description of how I made a black powder hand gonne for my own use
- I am not recommending that you make a black powder hand gonne
- If you do decide to make a black powder hand gonne, I am not recommending that you make it this way
- Any black powder hand gonne is potentially dangerous, and if you make one, the risk is entirely on you
- A black powder hand gonne is a firearm, and all the rules of safe handling and usage of a firearm apply
- Lastly: I selected a barrel from a single-shot shotgun, the style of which I have never owned, so as to reduce the likelihood that someone might think I was making an illegal short-barrel shotgun, and I plugged that barrel shortly after cutting it down.
As noted, after the ‘proof’ shot, I did a close inspection of the hand gonne. There were no signs that anything had shifted or been stressed. Same thing after the two subsequent ‘normal’ charges were shot. So my conclusion is that the gonne is safe, though of course I will keep a close eye on it going forward. My experience with the bronze version I made last year gives me some confidence that this one will hold up fine, but I don’t want to take that for granted.
And overall, I’d have to say that the project was a success. It is possible for an average person, using common, non-specialized tools and a little ingenuity, to make their own reproduction 15th century hand gonne with modern materials and an old shotgun barrel. My total cost out-of-pocket for this project was under $50, because rusty old shotgun barrels are pretty cheap.
Thanks for coming along for the ride. Feel free to share.
Jim Downey
Making a 14th century Hand Gonne
Last Fall I taught a day-long workshop on “Primitive Black Powder Firearms” for the Liberal Gun Club‘s Annual Meeting in Las Vegas. In addition to my own black powder guns, I borrowed a couple of items from friends to help fill out the historical selection, including this very nice reproduction of a 14th century .62 cal cast bronze hand gonne:

I had shot the gun previously with friends, and it never fails to put a smile on people’s faces. It’s so simple: pour gunpowder down the muzzle, roll in a lead ball (tolerances for these guns are very slack, and the ball will roll right back out if you’re not careful), add a little powder to the touch-hole on the top, and light it off when ready. Very basic. Very fun. People in the workshop loved it.
And I decided that I wanted to get one of these for my own collection.
The problem is, they’re almost impossible to find. I spent a couple of months poking around online, asking friends, and the closest I could come were a couple of simple hand gonnes made using steel. Nice, but not what I was looking for.
So I started to think about making my own, and I consulted with an old friend who does bronze casting for his jewelry business. Turned out that it was certainly possible to do such a project, but it was bigger than my friend’s casting set-up could handle. We set aside the idea for the time being.
But I thought some more about it, and figured that such a bronze hand gonne was so simple, that it should be possible to make one without casting. I could order a bar of the appropriate alloy of bronze, have a machine shop bore it out, and do the external work myself. I tried contacting some local machine shops, explained what I wanted done. Most never responded. The ones that did had no interest in the project. I was stymied again.
By then, however, I was invested in the project. Again, I thought through just how basic the hand gonne was, and I figured that if I ordered the correct components, I would be able to make one without a machine shop. In fact, as I thought it through, I realized that it would be possible to make one just using some very basic modern tools which almost anyone would have or could get at a modest price. So I set out to do just that.
And this is the result.
Now, before we go any further, let’s get a few important caveats in place:
- This is a description of how I made a black powder hand gonne for my own use
- I am not recommending that you make a black powder hand gonne
- If you do decide to make a black powder hand gonne, I am not recommending that you make it this way
- Any black powder hand gonne is potentially dangerous, and if you make one, the risk is entirely on you
- A black powder hand gonne is a firearm, and all the rules of safe handling and usage of a firearm apply
OK, we clear about that? Good.
The tools and materials needed.
So, in thinking it through, I decided that the most basic tools needed for this project would be:
- Electric drill with a 1/2″ chuck, misc drill bits
- Hacksaw
- Basic hammer
- Hand sledgehammer or small anvil
- Clamps or vise
- Metal files
- Metal chisel (‘cold chisel’, 1/2″ wide or so)
- Measuring tape/yardstick/square or similar
- Calipers
Now, some additional tools that are common, and which I used to speed up the whole process:
- Belt sander
- Bench grinder
- Dremel or similar rotary tool with various small bits
- Side-cutting pliers
Pretty basic, right? So is the list of materials needed:
- Bronze stock
- Sandpaper (various grades, starting with 60grit)
- 1/2″ iron bar stock
- 3″ common nails (x2)
- Epoxy
- Duct or box tape
- 1.75″ x 48″ hardwood dowel for the stock
- Stain/finish for the stock, if desired
In addition, I used a number of bits of scrap wood, foam, and wood screws I had in my workshop. You’ll see.
Selecting the bronze stock to use.
I knew that historically, early black powder guns were typically constructed of a type of bronze called gunmetal or red brass. This is a bronze alloy containing mostly copper, some tin and lead, and a little zinc. I spent some time looking over modern bronze alloys which were readily available, and settled on “Bearing Bronze 932” as being a reasonable approximation of common gunmetal.
The modern metal industry offers a range of different types of products. What I figured was that I could get a product called “hollowbar”, which is basically a thick-walled pipe. That would allow me to select both the overall diameter and the wall thickness. By choosing a 1.75″ O.D. hollowbar with a 0.625″ I.D., I would get a suitable length of bronze which didn’t need to have a bore drilled into it. In addition, I ordered a length of round bar stock with a nominal 0.625″ O.D. that I could use as a breech plug. Metal prices fluctuate regularly, but I was able to get both pieces shipped for about $160.
Both pieces of bronze arrived. As expected, they were “overcast” — meaning that they were slightly larger than the specs given. The hollowbar was 13″ long, and the bore down the center of it was at 0.585″. The round bar stock was likewise 13″, and the O.D. was 0.675″. That meant that I would need to ream out the bore to .62 cal and shave down the bar to fit the finished diameter of the breech.

Reaming out the bore.
I didn’t order a solid length of bar stock because that would have required that I have the ability to drill out the bore. Even making a smooth-bore hand gonne (with no rifling) would present a substantial technological challenge which would have required, at a minimum, a floor-mounted drill press if not an actual metal lathe.
However, by ordering the hollowbar, I would already have the basic geometry of the hand gonne provided. The hole down the center would already be established. It would just be a matter of getting the bore to the correct diameter to handle a .62 cal lead ball.
To do this, I decided that the best approach would be to use a length of 1/2″ iron rod (called a mandrel) with a piece of sandpaper at the end, driven by the hand drill. It would take time, and require frequent changes of the sandpaper, but it would give me the ability to ream out the bore with a reasonable amount of control.
This is easy to do. You just use one piece of tape applied to the back of your piece of sandpaper, with a tab of about an inch protruding past the edge of the paper. Then you apply another piece of tape to the tab, and use the overhang to secure it to the mandrel. Like so:


The next thing I needed to do is secure the hollowbar stock so that I could spend time reaming out the bore without the stock moving. I decided to make a simple sandwich of scrap wood, dense foam, and screws to hold everything in place:


Then it was just a matter of reaming out the bore slowly, frequently stopping to change the sandpaper, dump out the waste material, check the progress, and let both the drill and the hollowbar cool down. It took a total of about 8 hours over four days to do this.

But, in the end, a .62 cal lead ball would pass freely through the length of the hollowbar:
Now, one thing I want to note: when you repeatedly insert a mandrel with sandpaper from one end, that end will tend to get over-reamed. So I was careful to consistently do this from the end of the hollowbar that I intended to be where it would be mounted to the wood stock later (i.e.; not the muzzle end).
Making the socket.
The hand gonne would need to be mounted to a stock of some kind. Historically, these seem to have been just a simple stave of wood, with the hand gonne stuck on the end. That was also the style of the others I’d seen in person, so it was what I decided to do.
There were a number of ways that such mounting could be accomplished. I considered the options and settled on just creating a hollow at the end of hand gonne that would accept about a 2″ deep piece of the stock.
Therefore, to make the socket, I needed to remove additional material to a depth of about 2″. To do this, I used a drill with a 5/32″ bit (marked with tape to a 2″ depth) to create a starting set of holes in a circle:


Then I went to a 1/4″ bit to remove more of the bulk:

After this, I used the cold chisel to start to cut through the remaining material:

And then the Dremel rotary tool with a steel carving tip to remove the rest of the bulk and thin down the sides some:


I wasn’t worried about it being perfectly symmetrical or smooth at the bottom, since these areas would be hidden by the stock.
Making and installing the breech plug.
Since I was starting with a length of hollowbar, which had a hole down the center of the entire length, I needed to close up and secure the breech of the gun. The historic models and modern versions which are cast just have a closed-off breech to start with, so this step isn’t necessary.
Black powder is a low-pressure propellant, and I could have probably just gotten away with inserting a tight plug of bronze and then mounting the hand gonne to the stock. But I wanted something that would be more secure. More secure, yet still low tech (no brazing or anything). I decided that a couple of mild steel rivets through the outside of the hand gonne, and through the plug to the other side, would be sufficient. But this meant that the plug would need to be long enough put a couple of rivets through. I settled on a 2″ plug.
Using the calipers, I checked the bronze rod, and confirmed that it was larger than what I wanted. I also checked by trying to insert the end into the breech end of the hand gonne, just to be safe. It was still 0.675″, so I needed to file/sand it down:

Checking frequently, I continued that until the rod would barely start to insert into the breech. Then, using the hacksaw, I cut off a 2″ long piece of it:

I did some additional sanding, then inserted it, first by hand, then using the hammer and the iron rod I’d used as a mandrel to ream out the bore:


Shaping the outside.
OK, first things first: at this point, you could rivet the breech plug in place, drill the touch-hole, mount the hand gonne, and use it. The shaping I’m about to show/discuss is not necessary to having a functional black powder firearm.
But the historical record shows that most of these were shaped and/or decorated in some fashion. Likewise most of the reproductions I’ve seen. I decided to do something similar to the design of the one my friend owns, though going with an octagon form rather than a hexagon one.
Why bother? Mostly just for aesthetic reasons. But also, the entire bulk of the hollowbar isn’t necessary for the hand gonne to be strong enough to function. You do want to have some extra bulk/strength to contain the primary explosion of the black powder, in the area that is called the “chamber”. But as the lead ball/bullet starts to move down the barrel, the pressure drops off quickly. Meaning that the barrel walls don’t need to be quite so thick/strong. By removing the excess, you can cut down on the weight of the hand gonne by about a third. I also decided that I liked the flare at the muzzle often seen on these guns, and thought it would help connect it visually to that history.
Since the final shape of the hand gonne is largely an aesthetic decision, what follows is just a quick photo-essay of the steps I took to come up with my preferred design. Also, while I started out using a file, I almost immediately shifted over to using a belt sander to get the overall shape, then a bench grinder to rough out the barrel, followed by more use of the belt sander. Basic shaping was done using a 60grit belt, then finished with a 150grit belt.
First, I marked the end of the muzzle with the basic shape I wanted:

Then I put it back into the trough to hold it in place:

I chose an octagon shape for a simple reason: it would be easier to keep it aligned in the trough while working.


Once the overall shape was defined, I started to cut down the barrel bulk:


This all actually went faster than I expected, just a couple hours work with the belt sander & grinder, with frequent stops to check dimensions with the calipers.


Securing the breech plug and drilling the touch hole.
Once I had the exterior shape mostly finished, it was time to secure the breech plug with a couple of mild steel rivets and drill the touch-hole (how you fire the hand gonne).
The first step was to carefully measure and mark the locations of the rivets and the touch-hole. I did this by using a dowel from both the back of the socket and from the muzzle. I wanted the rivets to be evenly spaced about 1/3 the way from the front and the back of the breech plug, and the touch-hole to be positioned so that it was just in front of the breech plug.
Using a Sharpie, I marked the location of each of the holes. First I used a 7/64″ bit and drilled the touch hole, centered on that face of the octagon and angling slightly back into the chamber for the black powder. This would tend to force the jet of hot gas forward away from the shooter when the gonne was fired. I used a larger drill bit to start a larger hole just on the surface — the beginning of a simple ‘pan’ to hold a small amount of black powder.
Then I selected a drill bit the same diameter of the 3″ nails I was going to use for the rivets, and drilled through the exterior of the hand gonne, the breech plug, and out the other side of the hand gonne:

Next I used the Dremel tool with a small grinding head to deepen the ‘pan’ and slightly counter-sink the holes for the rivets. I cut off the head of the nails, and inserted them through the holes, cutting them off with about a 1/8″ protruding from either side. Then these were hammered (with a hand sledge under them, though if you have an anvil that will work better) so that the mild steel filled the counter-sunk area:


Next I dressed those areas again using the belt sander and 150grit paper:


Shaping and mounting the stock.
I’d hoped to find a suitable length of oak, ash, or hickory to use as the stock. I settled for a 1.75″ x 48″ poplar dowel I was able to select at a local lumbar yard.
The first thing was to shape the end to fit the socket:

Once I had it so that it fit, I needed to secure it. I decided that normal 5-minute epoxy would be sufficient for this purpose. So I did some additional undercutting of both the dowel and the socket walls (so that the epoxy would fill in those, and couldn’t just pull loose). Then I mixed the epoxy, poured it into the socket, and shoved the dowel into place. To hold everything in place for the 24 hours needed to let the epoxy cure, I used this high-tech set up:

Surprisingly, this worked, and the dowel rod was almost perfectly straight off the back of the hand gonne.
I had debated whether or not to leave the dowel round, or to put partial flats on it, or what. But once the epoxy had set, the round dowel just didn’t feel right, so I decided to go ahead and use the belt sander to shape the dowel into the same shape/dimensions as the hand gonne:


If you look carefully, you can see the slight skew of the hand gonne off to the left. It’s only 3 or 4 degrees, and really isn’t noticeable when you actually hold the thing, but it is there. I decided not to worry about it.
I wanted to have some basic surface protection for the stock, so used some dark walnut colored Danish Wood Oil I had available:

Proofing the hand gonne.
The usual recommended procedure to test a home-made black powder firearm for safety is to take it to the range, put a double load of powder into it with a lead ball, secure the firearm, and then fire it from a safe distance using a string or fuse or whatever is necessary. I’d ordered in some cannon fuse for just this purpose.
I got out to my range on a cool Friday morning, when I was reasonably sure that no one else would be there. I wanted to avoid putting anyone else at risk, on the off chance that my project didn’t work out and wasn’t safe. That is, if the thing blew up, I wanted everyone else to be clear.
I set up a large sheet of cardboard (about 2×4′), about 7 yards from the gonne. I put in 120gr of FFg black powder, twice the standard load I’ll shoot out of the thing, along with a .62cal lead ball (345gr). I then laid the gonne down on a picnic table, with a fold piece of cloth under the muzzle end to maintain a slight elevation. Then I positioned my black powder range box (minus the black powder casks) balancing on the stock just behind the gonne as a protective barrier. I positioned my usual range bag on the back of the stock to help hold it in place. And I set up an inexpensive mirror and my smart phone so the phone was protected but would record the first firing of the gonne. Like this:

I cut a 6″ length of cannon fuse, inserted it into the touch-hole. I started the camera recording, then lit the fuse. Then got about 10 yards away, on the other side of my vehicle. And this is what happened:
And here the relevant bit is in slow-motion (1/8th normal speed):
Mwahahahahaha! It works!!!
Here’s where the first shot hit:

Not bad! It was time for the second shot, using a normal charge of 60gr of FFg black powder:
I was stabilizing the gonne with one hand, while filming with the other. There was a decent amount of recoil, even with the standard charge.
I went ahead and shot it a third time, again with a normal charge, but this time holding it and shooting it as I normally would. Again, I noticed a fair amount of recoil, even given the substantial weight of the whole thing (I’d guess ~10 pounds or so). But it’s not the sort of thing that most people would mind at all.
And all three shots hit in roughly the same place at 7 yards:

Not bad.
Given the very basic design of this thing, it’s still respectable in terms of control and power. I didn’t chrono it, but based on previously checking black powder guns, I’d guess that the .62 ball was probably traveling about 800fps. That gives a muzzle energy of about 500 ft/lbs, or about what a modern .40S&W handgun would get with typical loads. In other words, it’s an effective weapon, at least at moderate range. Not bad for a technology that is almost 700 years old.
Conclusions.
To repeat myself from the start:
- This is a description of how I made a black powder hand gonne for my own use
- I am not recommending that you make a black powder hand gonne
- If you do decide to make a black powder hand gonne, I am not recommending that you make it this way
- Any black powder hand gonne is potentially dangerous, and if you make one, the risk is entirely on you
- A black powder hand gonne is a firearm, and all the rules of safe handling and usage of a firearm apply
But, after the ‘proof’ shot, I did a close inspection of the hand gonne. There were no signs that anything had shifted or been stressed. Same thing after the two subsequent ‘normal’ charges were shot. So my conclusion is that the gonne is safe, though of course I will keep a close eye on it going forward.
And overall, I’d have to say that the project was a success. It is possible for an average person, using common, non-specialized tools and a little ingenuity, to make their own reproduction 14th century hand gonne with modern materials. My total cost out-of-pocket for this project was under $250, and now I have a couple new tools as well as the gonne.
Thanks for coming along for the ride. Feel free to share.
Jim Downey
Get a grip. Or make one.
A couple of weeks ago I posted about finishing a Liegi Derringer kit, then doing the laser work to customize the grips. It turned out well enough, so I decided to finish and laser a second kit, to use as a door prize for a black powder workshop I’m doing at the annual meeting of the Liberal Gun Club this fall in Las Vegas.
All went well until the time came to mount the grip to the receiver. The top mounting screw went in fine, after drilling a pilot hole. But the bottom one broke loose as I was tightening it. I took the top screw back out so I could see what the problem was. This is what I saw:

See right there in the center? That’s where the screw broke loose, knocking out the adjacent piece of wood. Just a fluke of the grain on this piece of wood.
There are several ways you can repair a problem like this. You can use a longer screw. You can fill in the broken material with a good wood epoxy, then remount the screw. You can change the hardware to relocate the screw. There are probably other good, simple solutions, but I’m not a wood-worker.
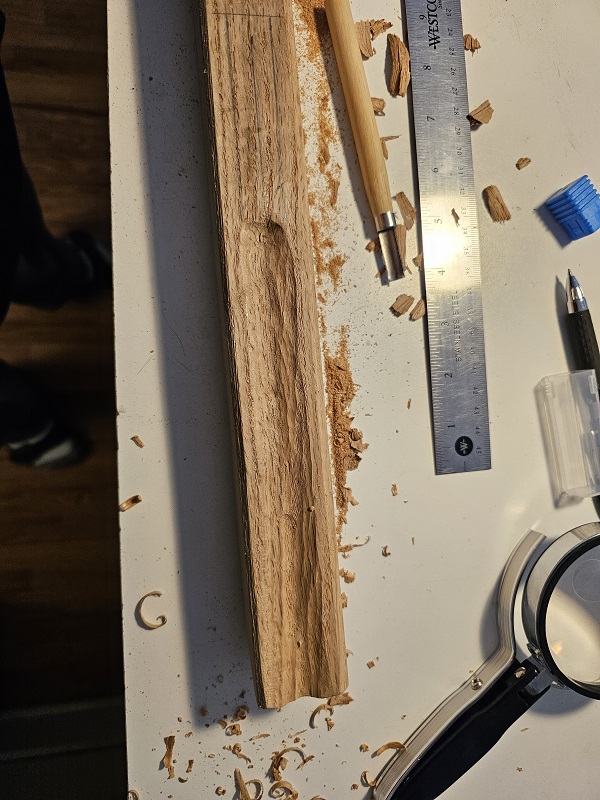
So of course I figured that I’d do the most difficult thing: carve a replacement grip out of another piece of walnut.
See, we had to take down a big walnut in our yard some years back. Most of the big pieces of good wood went to friends who are skilled wood-workers. The rest became firewood. We still have some of the firewood, so I picked out a piece and chopped it roughly to size:

Next, I spent a couple of hours with a drill, a heavy wood rasp, and a Dremel, and got the new grip down to an approximate form:

Then it was a matter of more detailed carving, to get closer to the shape of the original grip, and to make room for the hardware of the receiver:

I had decided to make this grip a little more robust than the original, since I didn’t trust my skills to not over-do it and make a fragile grip. But I didn’t want it TOO big:

Once I was satisfied with the shape of the grip, it was time to laser the design into the sides. To get the designs positioned properly, I used some reference tape:

I did the laser work, then stained the grip and polished it slightly. Assembly went just fine, and the mounting screws set without a problem. Here’s the finished product:


I’m pretty happy with the finished product, and hope whomever wins it will enjoy shooting it.
Jim Downey
Lookin’ Sharp(s).
As anyone who has read much of this blog probably knows, I (and the other BBTI guys) like weird guns. Anything that is innovative, or unusual, or uses a transitional technology, is likely to catch my eye.
One of those I got to try this past weekend is a reproduction Sharps Pepperbox. It was designed by Christian Sharps (of Sharps Rifle fame) in the middle 1800s , and proved to be a popular little hide-away gun in early .22. .30, and .32 rimfire cartridges.
In the 1960s Uberti produced a little .22short reproduction with a brass frame and plastic grips. Here’s one recently listed on Gunbroker which has an excellent description of both the reproduction and the original: Uberti Sharps Pepperbox 4 Barrel Derringer.
And here are some pics of the one we shot this weekend:


As you can see, the barrel assembly just slides forward to allow access to the breech. You put the hammer at half cock, then depress the button latch at the front of the gun, and it slides forward. Then you can drop four rounds of .22short into the barrels:


The assembly then just slides back into position, and locks. When you draw the hammer back, the firing pin (mounted on the hammer) rotates one-quarter of the way around, to strike each cartridge in turn.
Though a modern .22short has a surprising amount of energy, out of such a short barrel you’re looking at a modest 40-50 ft-lbs of muzzle energy. Would I care to be shot by one, let alone 4? Nope. And even the original loads using black powder, which would probably generate no more than about half that M.E., such a little hide-away gun would likely give a person on the other end of the barrels pause, because the risk of disability or death from infection would be significant.
Shooting the pepperbox was easy, and had no perceived recoil. Hitting a target at more than about five or six feet was another matter. Most of us tried it at about 10′, and were lucky to get one or two rounds into a 8″ circle. You might be able to improve on that with practice, but still, this was a gun meant for up close use:

It really is a cool little design, and a fun range toy. Shoot one if you ever get the chance.
Jim Downey
That takes balls, Part 2: rebound!
Last week I posted about a little Liegi derringer that I finished and did a laser design on. Well, over the weekend I got together with the BBTI gang and, among other things, had a chance to shoot and chrono the little gun.
Here’s a short slo-mo vid of shooting the Liegi:
As expected, shooting the Liegi was simplicity itself: pour in some black powder (FFFg) until the small chamber was filled, set a .451 ball on top, screw down the barrel, then add a #11 cap and it was ready to go.
Because I wanted to chrono the gun, we were shooting it from where we had the chrono set-up, about 15 yards from the bullet trap:

There was a fair amount of variation in the multiple shots we chrono’d, ranging from about 380fps to 600+fps, but the average was about 500fps. That gives the 139gr lead ball about 80ft-pounds of muzzle energy — not a lot, but more than I would care to be shot with.
Well, more than I would care to be shot with directly, anyway. Because one of the shots I chronographed bounced off the surrounding wall of the bullet trap, and ricocheted right back and hit me in the leg. It didn’t hurt at all, just tapped me in the thigh. I picked the bullet up off the ground where it landed. Here it is next to another fresh ball:

Note that it is darkened from the combustion, and there’s a slight indentation where it was seated down on the powder chamber of the gun. Here’s a pic that better shows the flattened profile of the bullet:

And here’s what it looks like on the side that hit the building:

And yeah, that means that I missed hitting the opening of the bullet trap (covering door is about 3×6′). I would be embarrassed about that with most handguns at 15 yards, but certainly not with this thing, which was intended to be used at bad-breath distance.
Like I said: fun little project. Now I’ll add it into my collection of black powder guns for regular use.
Jim Downey
That takes balls.
I recently picked up a little Pedersoli Liegi Derriger kit. One of the other BBTI guys has one of these things, and I’ve always considered it a cool little piece of firearms history. Cap & ball firearms technology came along in the early part of the 1800s, supplanting flintlocks and earlier ignition systems. The Liegi design was very popular as a basic pocket/boot/muff small handgun, because it was relatively easy to load and carry, and lethal at close range.
The interesting thing about the Liegi is the loading system: you unscrew the barrel, load the powder charge in the chamber, place a round bullet on top of the powder, then screw the barrel back into place. It’s simple and fairly foolproof, and doesn’t even require a powder measure — you just fill the chamber with black powder and it’s the correct amount. Once the gun is loaded and the barrel is in place, you draw the hammer to half-cock, place a cap on the nipple, and the gun is ready. Here’s a short video showing all the steps:
In addition to doing the minor prep work on the walnut stock of the gun, I wanted to add some laser engraving on the side panels. Because it amused me, I decided to use the same basic pattern as I had used for the grips of a very modern handgun, my Customized Timberwolf G21. Here’s a pic of the finished product, and on the next page are pics of the process and comparisons to other small handguns I have:

Shooting big stuff.
Ever hear of a 4 Bore?
Here’s the first line from the Wikipedia entry:
Four bore or 4 bore is an almost obsolete black powder caliber of the 19th century, used for the hunting of large and potentially dangerous game animals.
The term “4 Bore” indicated that it would fire a sphere of lead weighing 4 ounces, or one-quarter of a pound of lead. This was an old measurement system from which we also get our shotgun gauge measurements: a 12 gauge shoots a sphere of 1/12th a pound of lead, etc. So, a 4 Bore shoots a sphere of lead that is three times the weight of what a 12 gauge would shoot. As in a ball 1.052″ diameter that weighs 4 ounces, or 1,750gr. Compare that to a typical 12 gauge slug, which weighs from one to 1.125 ounces. The 4 Bore ball is more than three times the weight.
And shooting one feels like it.
Well, depending on the black powder load, of course.
Here’s the one we shot, the Blunderbuss on the right:

And here’s looking down the muzzle:

As the maker of the gun notes:
This 4 bore Blunderbuss can be pretty intimidating when you’re looking down the end of one.
Especially when the end is TWO inches in diameter and the bore is more than one inch too!
The thought of shooting it was pretty intimidating, too.
The maker recommends a load of just 100gr of Fg black powder. So that’s what we started with. Here’s what that looked like, being shot by Jim K of the BBTI team:
Not bad, right? Yeah, it felt like shooting a typical 12 gauge loaded with slugs. Of course, the Blunderbuss doesn’t have a modern firearm design, with no mechanism to reduce recoil.
And here’s my friend Roger shooting it with the recommended load, in slow motion:
Now, Roger’s a big guy. Over 6’6″. And like all of us who shot the 4 Bore, he has decades of experience shooting all manner of long guns, from mild black powder muskets to modern heavy magnums. Now just watch what happens when we increased the load in the 4 Bore to 200gr of Fg black powder:
And here’s Keith of the BBTI team shooting the 4 Bore with that full 200gr load:
Impressive, eh? I don’t have video of my shooting it, but I do have the bruises to prove I did.
Well, now, think about this: historically, these guns were loaded with up to 500gr of black powder. Bloody hell.
OK, let’s talk ballistics.
See the orange thing in the foreground in most of the video? That’s a LabRadar ‘chronograph’. It said we got about 500 fps from the ‘light’ loads, and about 700 fps out of the ‘heavy’ loads. That would give us a muzzle energy of about 970 and 1900 foot-pounds, respectively.
Your typical 12 gauge slug has a ME of about 2600 ft/lbs.
So, what gives? Why does the 4 Bore look (and feel) like it had so much more power?
I’ve been thinking about this for the last several days, and I think the answer is that a heavier bullet gives you more perceived recoil.
I’ve discussed this previously: Velocity is great, but mass penetrates. In that post, I used the example of a whiffle-ball versus a baseball, where they both had the same “ME”, but where you’d feel a significant difference if you were hit by both.
And I think that the same thing is happening here. For what it’s worth, you’d need to push the 4 Bore ball to about 800 fps to get it to the same nominal ME as a 12 gauge shotgun slug. To get to *triple* the ME of a 12 gauge shotgun slug, you’d need to push the 4 Bore ball to about 1400 fps. My guess is that the historical 500gr load of black powder might accomplish that.
But I sure as hell wouldn’t want to shoot it.
Oh, and how accurate was the 4 Bore? Here’s our target from the full-power loads:

Not bad for no sights, at about 15 yards. And look at the size of those holes!
~~~~~~~~~~~~~~~~~~~~~~~~~~~~~~~
OK, let’s talk about the other gun in the pic at the top. It’s a Hand Mortar, designed to throw a small hand grenade further than the human arm could. We had this one just for a little fun, shooting tennis balls about 100 yards using 70gr of Fg black powder. Like this:
Here’s a slow motion version of my friend Tim shooting it:
And here’s another of my friend Charles:
Black powder is so much fun!
Jim Downey
Spinning wheel got to go round.*
I was surprised when one of the other BBTI guys said that he had found a reproduction wheellock on Gunbroker recently, and that it wasn’t even horribly expensive. This one:
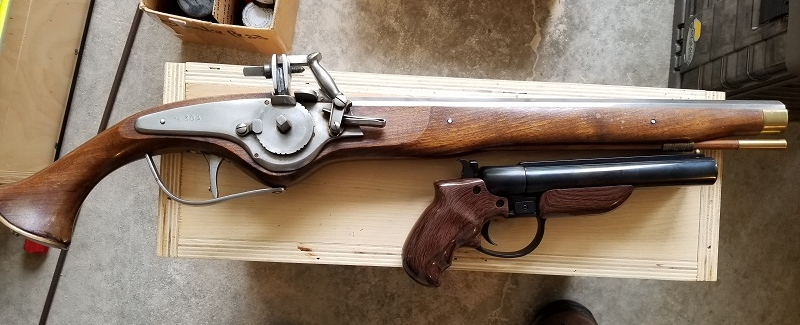
Wheellock with Diablo double-barrel pistol.
I was surprised, because there aren’t many reproduction wheellocks out there that I was aware of. It’s a quirky firearm design from the 16th century (Ian from Forgotten Weapons has an excellent primer on Wheellock history and operation in this video), which was superseded by reliable & cheaper flintlocks, and not too many people are familiar with them. But it seems that a firm by the name of Mendi was producing them in Spain in the 1980s. This one is stamped along the top of the barrel “Jacobi Iserlohn”, which is a firm selling historical firearms in Iserlohn, Germany. You might be able to make out the stamp in this image:

Jacobi Iserlohn.
We didn’t know much about the gun beyond what was stamped on it — it came with no paperwork or anything (which, being black powder, it didn’t need). As you can see in the image above, it says that it is “CAL 45”, and a normal .451 lead ball seemed to fit, so …
So we figured we’d try and figure it out and shoot it, of course. The first thing was to check the bore, see if the mechanism worked, etc. Most things checked out fine, though it looked like someone had substituted welding rods clamped between a piece of thick lead sheet for the historical pyrite used to generate sparks. See for yourself:

Welding rod?
Which would clamp in this (called the ‘dog’):

We adjusted the rods so they were equal length and extended far enough to engage the spinning wheel of the mechanism when the dog was lowered. So far, so good.
Next was to test the wheel mechanism. The way a wheellock works is that there’s a spring inside the stock, attached to the inside of the wheel usually by a chain or strap. Using a suitable crank (we didn’t have one that came with the gun, so we used a simple adjustable wrench), you crank the wheel until a ratchet inside locks it into place. We discovered that this gun only needed to be cranked about half a turn before the ratchet clicked. When you pull the trigger the ratchet is released, and the wheel spins.
We tried that, and it seemed to work.
OK, time to load the thing. We elected to start with a mild load typical for other black powder handguns we have in .44/.45 — 30gr of fffg. The lead ball seemed to fit tightly enough into the bore that we went without a patch. All of that went smoothly.
Last was to put some powder in the pan and see if we could shoot it. First, we cranked the wheel into place. Then we put some powder beside where the wheel was, next to the touch-hole. And gave it a try:
Remember, we had no idea what to expect.
At least we got sparks. Just sparks. The powder in the pan failed to ignite. We considered the matter, and decided that we had been too stingy with the powder, that it needed to more or less fill the pan all around where the wheel protruded.
The result:
Excellent! It fired! It hit the target! It didn’t blow up and kill us! Yay!
So each of us had a go:
That last one’s me. And let me share what it felt like.
Mostly, like shooting any similarly sized/powerful black powder handgun, with the gentle push of black powder. But when you pulled the trigger, you could feel a little bit of torque as the wheel released and spun for a moment. It was different than either a flintlock or cap & ball handgun, in that regard. And the delay between pulling the trigger and ignition was about what it’s like with a flintlock, perhaps a little longer.
All in all, it was pretty cool. And it wasn’t something I expected to ever have a chance to actually try, since most of the wheellocks I was aware of were either 300+ year antiques or fairly high-end (and rare) custom reproductions. Needless to say, if you do get a chance to try one of these things, definitely do it.
Jim Downey
* of course.
(Cross posted to my personal blog.)
Review: Diablo 12ga double barrel pistol.
Want some fun? Get an American Gun Craft 12ga double-barrel pistol.
Want a serious self/home defense gun? Get something else.
Oops. I gave away my review’s conclusion. But you should go ahead and read the rest of this, anyway.
* * *
When one of my friends sent me a link about the new American Gun Craft 12ga double-barrel pistol, I thought it looked like a lot of fun. A lot of people thought so, and the cool little pistol got a lot of attention.
For good reason. It looked well made, well designed, and easy to use.
And it is. Check it out:

Diablo 12ga
And this is what it looks like in the hand:

Seriously, this is a very high-quality gun. It’s very solidly made. The fit & finish is impressive. The bluing is rich, deep, and lovely. The rosewood handles fit perfectly, and are warm & comfortable in the hand. They’re polished so highly I at first thought that they were plastic. The trigger is smooth, crisp, and much better than I expected.
The design is simple, but there are little things about it that are quite nice. Such as when the gun is broken open, you can rest it on any flat surface with the barrels pointing up, and it is perfectly stable for loading. If you’re shooting by yourself, this would be very handy.
Since we didn’t know what to expect, we went with the manufacturer’s recommended load of black powder to start with. That’s just 40gr of ffg, with a recommended half ounce of shot. But all we had to shoot out of the gun were 12ga balls (.69 cal ball, about 500gr — say 1.2 ounce). So we expected it to be mild shooting.
It was:
Well, according to this video, that’s probably just about 250fps, and maybe 70ft/lbs of energy. That’s about the same power as a low-performing .22 round out of a 6″ barrel. And it felt like it.
So, since the amount of lead we were shooting was more than double the recommended amount, we doubled the amount of black powder, to 80gr of ffg. Here’s that:
Well, again according to this video, that’s probably about 560fps, and maybe 340ft/lbs of energy. That’s about the same power as a typical 9mm round out of a 6″ barrel. And it felt like it. There was a bit of recoil out of the heavy pistol, but it wasn’t at all hard to manage.
Given how well the gun was made, and the mildness of the first shots, we didn’t have any qualms about increasing the amount of powder to double what was recommended. And that was a fun load to shoot. Others have pushed that boundary MUCH further, as you’ll see in either this video (referenced above) or this very long review. By using much bigger loads and different types of powder, it is possible to get up to energy levels in the range of a .357 or even .44mag out of a 6″ barrel.
So yes, it would be a pretty reliable self/home defense gun, in those terms. And we were shooting it at applicable ranges for that use, with adequate accuracy.
But consider several factors here. First, black powder is very hygroscopic: it sucks up moisture out of the air. That can be a problem with a muzzle-loading gun, and was the reason why Old West gunfighters would commonly shoot off their loads each morning and load their pistols fresh. Because wet powder can underperfom very badly. So you wouldn’t want to load the Diablo and then just set it aside for future use.
Black powder is also a slow-burning and very smoky powder. Shooting it indoors would fill the room with very acrid smoke, and may very well spew burning bits of powder out into the room, causing fires.
Lastly, while the Diablo is indeed easy to load and shoot for a black powder gun, that still takes a hell of a lot more time than it would take to load two additional cartridges into a derringer. And almost every common modern self/home defense gun offers more rounds for use than a derringer.
So we’re back to what I said at the start:
Want some fun? Get an American Gun Craft 12ga double-barrel pistol.
Want a serious self/home defense gun? Get something else.
Jim Downey
The Martini-Henry .577/450
“OK, the Snider was fun. Let’s shoot that Martini-Rossi.”
“Martini & Rossi is a booze brand, dumbass. The rifle is a Martini-Henry.”
“Er … right.”
* * *
OK, I’m not saying that actually happened. But I will admit that historic rifles are not really my thing. Fortunately, my BBTI buddies are more knowledgeable.
The Martini-Henry was the single-shot, breech-loading rifle that succeeded the Snider-Enfield (initially in 1871; our rifle was stamped 1887). Designed from the start to shoot a metallic cartridge, it was quicker to load and fire, faster to reload, and more powerful than the Snider-Enfield. It shot a bottleneck cartridge based on the earlier .577 Snider-Enfield, known as the .577/450, which had a 480gr soft lead bullet of .450 diameter (hence the name) pushed to about 1350fps, for about 1900ft/lbs of energy (about 400ft/lbs more than the Snider-Enfield). Because of the increased velocity/energy and the better ballistic coefficient, it had an effective range out to 1800 yards (for ‘volley fire’ applications).
The Martini-Henry is overall a slimmer, more manageable gun than the Snider-Enfield. It’s about 5″ shorter overall, with a 33″ barrel, and weighs about the same.
The biggest design improvement was that the action functioned by the use of a lever. Pull the lever down, and the block drops down, allowing a feeding ramp to align with the chamber. Insert a cartridge, close the lever, and the block rises and the gun is ready to fire. Here are some images of it:

Martini-Henry from above.

Preparing to load.
And here’s the rifle being fired:
That’s with the full-power, traditional .577/450 loads. Which, while they’re black powder substitute (and hence a ‘rolling’ impulse), still have quite a bit of recoil.
However, there are cartridge adapters available which allow you to use common .45 Colt ammunition. It’s just a brass (or steel) sleeve with the shape of the .577/450 cartridge into which you insert a .45 Colt round. Here’s a brief clip showing that:
And here’s what it’s like to shoot the rifle with the adapter:
Much less recoil. And if you’re buying commercial ammo, much less cost.
Shooting the Martini-Henry is easy, and while there is a noticeable amount of recoil with the full .577/450 loads, it’s not bad at all. With the adapter and .45 Colt loads, the recoil is very mild. Hickock45 has a nice “woods walk” with a Martini-Henry of the same vintage here:
Definitely, if you get a chance to shoot one of these rifles, take advantage of it.
Jim Downey
Shooting an original .577 Snider-Enfield rifle.
Recently the BBTI crew got together to shoot some historic rifles. I’m not going to go into a lot of the details about each rifle, since there is plenty of information available about each online. But I thought I would share a few pics, some video, and my thoughts about each gun.
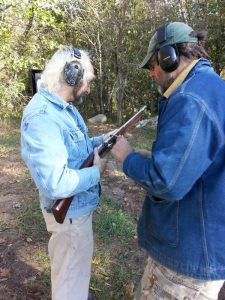
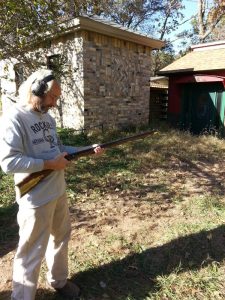
The first is an original British .577 Snider-Enfield rifle. This is the “Mark III” model, and dates back to 1866.
The .577 Snider-Enfield is a single-shot, breech-loading rifle. The Mark III has a lock on the side latch which secures the breech block in place. A side-hammer strikes a diagonal sloping firing pin to ignite the primer on the metallic cartridge. The barrel is about 36″ long, and the overall length of the rifle is 54″.
Here’s the rifle as seen from above:

.577 Snider-Enfield
Operation is simple: draw the hammer to half cock and unlatch the breech block and flip it open. Drop a cartridge into the “slide”, then push it forward into the chamber. Close the breech block and latch it. When you’re ready to fire, cock the hammer the rest of the way (it has a very short throw, so going to full cock doesn’t take much). Aim, fire. Here, see for yourself:
Recoil is fairly mild. The cartridges use a modern black powder substitute, and have the typical black powder smooth impulse rather than the sharp impulse of modern gunpowder. It shoots a 480gr soft lead bullet at about 1200fps, for an energy of about 1500ft/lbs (about half of what a modern hunting rifle has). Here’s what the cartridge looks like:

.577 Snider-Enfield cartridge
Note that the fired cartridge case is more straight-walled than the unfired cartridge. The cases stuck in the chamber, and had to be knocked loose with a ramrod to be extracted. But you expect some minor issues like that with a gun that is more than 150 years old.
Overall, it’s really a very pleasant piece of history to shoot. If you get a chance, do so.
Jim Downey
Much more black powder fun!

A couple of summers ago, I got together with some friends and we did a little black powder shooting. Well, since then we’ve talked about getting together again with even more great historical guns (reproductions) and another shooting buddy, and this past weekend we did just that.
Did I say more guns? Why, yes, I did:


Total of 21 shown, with one extra hiding in that brown case in the second pic.
I’m not going to try and give a real review of every one, but using the two pics above I will identify each gun, maybe add another pic or two of it in action, and provide some initial impressions of shooting it. So, without further ado, starting with the top image:
Top gun: Early Matchlock Caliver. .62 ball, 60gr FFg. A pleasure to shoot. This felt less bulky than the earlier guns, but you had to be careful to position the thin upper buttstock such that it was against the bicep, rather than tucked into your shoulder as with a modern style of gun. The lighter weight did make the recoil more noticeable.


Below that: Swedish Snaplock. .77 ball, 60gr FFg. Very similar to the Caliver in how it felt, though the mechanism is a type of flintlock. The larger ball would have probably benefited from more powder (the rule of thumb is about 1gr of powder per point of caliber, to start with), but it still had no problems penetrating the 3/4″ plywood at about 15 yards.
Under the Snaplock are three small Pedersoli handguns:
- Derringer Rider (Hardened). Uses just a #11 percussion cap to shoot a 4.5BB (standard .177 round ball). We couldn’t get this one to shoot — after the first shot, the BB was stuck in the barrel.
- Derringer Guardian. Uses just a 209 primer to shoot a 4.5BB (standard .177 round ball). This one shot fine, and was a fun little gun. Trying to hit anything at more than arm’s length was a challenge …
- Derringer Liegi. This uses a percussion cap and 10gr of FFFg powder to shoot a .451 ball. The trigger is retracted until the hammer is drawn to full cock. This was actually a lot of fun to shoot, and had a respectable amount of power behind it. At about 5 yards it shot about a yard high from what you initially expected, but with a little practice …
Some pics of the Guardian and Liegi being shot:


To the right of the Pedersoli handguns is a Hand Mortar. This has a .75 chamber with a 2.5″ bore. Which, it so happens, is perfect for shooting a tennis ball …


 Keith shot the first ball at our plywood target, using 75gr of FFg. The tennis ball bounced right back at us. So we reused it, this time increasing the load to 100gr of FFg, shooting it into an adjacent field. It lobbed about 60 yards. The last shot was with 120gr of FFg, and that sent the tennis ball 75+ yards. I expect that if you stuffed some wadding or such down into the .75 chamber, and tamped it appropriately, that you’d get much better performance. But we were laughing too much to think of trying that at the time.
Under the Mortar is a LeMat Cavalry revolver. The 9 chambers are .44, and we used a .451 ball with 40gr of FFFg for each. The center chamber can also shoot a 20ga shot load, but we decided not to fuss with that. We used the recommended #11 percussion caps, but #10 would have fit better. This gun was new, but the trigger was *extremely* hard to pull and cocking the hammer almost took two hands. It would probably benefit from a fluff & buff … but I don’t think I’ll run out to buy one to try it.
To the left of the LeMat is an Early Matchlock Arquebus. .58 ball, 60gr FFg. Surprisingly easy to shoot, and reliable under the pleasant autumn conditions we had. All of us found it easy to hit close to point of aim, even with the significant delay you have with a matchlock.

Below that: a Kentucky Flintlock Rifle. .50 (we used a .490 ball) with 60gr of FFg. This is the iconic flintlock for most people, and felt & shot well. Though curiously, the delay from ignition of the pan to the rifle firing seemed long to me, compared to my Mortimer (see below).
Moving to the second image of guns at the top of the post …
Starting at the top, on the left side of the image: simple Hand Gonne in brass. .62 ball with 60gr Fg. After pouring in the powder, you just drop the ball in without a patch … and have to pay attention that you don’t let it roll out again. We started the day shooting this, and all had entirely too much fun. Initially we used 40gr of Fg, and were able to pick up and reuse the ball, since it just bounced off the plywood target.
Below the Hand Gonne is my 1815 Mortimer flintlock. .535 ball with 60-80gr of FFg. I’ve written about this gun previously for my personal blog, and really enjoy shooting it. Even with the more powerful loads, there’s very little recoil … because the damned thing weighes a ton! But it is well broken in, shoots very well, and is accurate in my hands to at least 100 yards.
Under that is my new 1858 Remington Revolving Carbine. .454 ball with 30gr of FFFg. This was my first outing with this gun, and I just love it. We all were able to shoot about 4″ groups at 15 yards the first time. With a little practice, I am sure I can extend that considerably. Here’s a couple of images of it from this weekend:

 And some video:
Under that is a French Blunderbuss. .735 ball with 60gr Fg. This was the first time any of us had shot one of these muskets, and we were all pleasantly surprised at how accurate and reliable it is. I can now understand why it was considered such a valuable weapon for close combat.


Next down is the Kentucky Percussion Rifle. .50 (we used a .490 ball) with 60gr of FFg. This is the twin to the iconic flintlock up above, and shot nearly identically … except that the #11 percussion cap gave immediate ignition to the charge. A very nice shooting rifle.

Next to last on the left side of the second image is a Japanese Matchlock. .50 (we used a .490 ball) with 60gr of FFg. I had shot this one previously, but it was fun to revisit it and compare it to the other matchlocks we had. All of us found it easy and accurate to shoot.

At the bottom on the left is a 1766 Charleville musket. .68 ball with 80 grains of FFg. This gun had probably the longest delay of any of the flintlocks we shot, but was still very fun to shoot, went off reliably, and seemed very accurate.
On the top of the right side of the second collection of guns is another 209 primer only 4.5BB carbine: the White Hawk. This was *surprisingly* fun to shoot! It was easy to use, accurate, and the .177 pellet seemed to hit with more authority than you would expect, though we didn’t test it for power. All of us had to try this several time. I could really see this being a fun little thing to shoot in your basement or some such.

Below the White Hawk is a Howdah Hunter: a twin-barrel .50 percussion cap gun which we loaded using a .490 ball with 30gr of FFFg. While heavy and with a stiff pair of triggers (one for each barrel), this was easy to shoot than I expected. Recoil wasn’t bad, and accuracy was good.

Under the Howdah, hidden (unintentionally) in the gun case, is a home-made Hakenbushe (hook gun), a variation on the early hand gonne which had a ‘handle’ that was a steel spike, used for close defensive work after the gun had been fired. This one shot a .735 ball with 60gr of FFg, and like the other hand gonne above, didn’t use a patch. So you had to make sure not to tilt the barrel down, or the ball and powder would roll out.


Under that is a classic Hawken rifle. .50 call (.490 ball) with 60gr of FFg. This may be more popular than even the Kentucky long rifle, and it was a fun old friend to revisit.

Lastly, two nice flintlock pistols, only one of which we were able to actually shoot. That was the 1763 Charleville pistol, .68 ball with 40gr FFg. A classic cavalry pistol which was very easy to shoot.

The remaining flintlock is a Murdock Scottish highland pistol .52 cal. Unfortunately this one needed to have the touch-hole reworked a bit. So perhaps we’ll get to shoot it next time …
Jim Downey
Special thanks to my friends and cohorts: Jim, Keith, and Roger. I appreciate you sharing your guns and knowledge, but most of all your friendship!
-
Archives
- April 2024 (1)
- March 2024 (1)
- May 2023 (4)
- April 2023 (1)
- August 2022 (1)
- July 2022 (3)
- May 2021 (1)
- March 2021 (1)
- December 2020 (1)
- September 2020 (4)
- August 2020 (10)
- July 2020 (1)
-
Categories
- .22
- .223
- .22WMR
- .25 ACP
- .30 carbine
- .32 ACP
- .32 H&R
- .327 Federal Magnum
- .357 Magnum
- .357 SIG
- .38 Special
- .380 ACP
- .40 S&W
- .41 Magnum
- .44 Magnum
- .44 Special
- .45 ACP
- .45 Colt
- .45 Super
- .450 SMC
- .460 Rowland
- 10mm
- 6.5 Swedish
- 9mm Luger (9×19)
- 9mm Mak
- 9mm Ultra
- Anecdotes
- black powder
- Boberg Arms
- Data
- Discussion.
- General Procedures
- historic rifles
- Links
- Revolver
- Shotgun ballistics
- Uncategorized
-
RSS
Entries RSS
Comments RSS
