Making a 15th century Hand Gonne
Last Spring I made a 14th century style Hand Gonne from bronze stock using minimal tools and equipment, just to see what was possible. That project turned out to be a big success, and the resultant hand gonne has been popular among friends and when I taught last year’s workshops on “Primitive Black Powder Firearms” for the Liberal Gun Club‘s Annual Meeting in Las Vegas.
Well, last month a local auction site I follow had a sale of various firearms, part, and accessories. Included was what was billed as a ‘bucket of barrels’. Looking over the listing, it was clear it was mostly old shotgun barrels, a bunch of .22 barrels, and what looked to be a half dozen or so very old, and very rusty, black powder rifle barrels. Just for grins, I bid a small amount, and wound up winning. When I went to collect the barrels, I swear the auction house had added a number of other misc barrels, probably just to get rid of them. Here’s the bucket I brought home:

And after basic rust removal with phosphoric acid:

After examining what I actually had, it occurred to me that I might be able to use some of these to make another black powder firearm. The original black powder barrels were too far gone to safely use, but the shotgun barrels had potential.
In thinking it over, I decided to make a slightly later style of Hand Gonne, and again to see if I could do it with minimal tools, to demonstrate the possibilities if others wanted to make their own.
Now, before we go any further, let’s get a few important caveats in place, like last time:
- This is a description of how I made a black powder hand gonne for my own use
- I am not recommending that you make a black powder hand gonne
- If you do decide to make a black powder hand gonne, I am not recommending that you make it this way
- Any black powder hand gonne is potentially dangerous, and if you make one, the risk is entirely on you
- A black powder hand gonne is a firearm, and all the rules of safe handling and usage of a firearm apply
- Lastly: I selected a barrel from a single-shot shotgun, the style of which I have never owned, so as to reduce the likelihood that someone might think I was making an illegal short-barrel shotgun, and I plugged that barrel shortly after cutting it down.
OK, we clear about that? Good.
The tools and materials needed.
In thinking it through, I decided that the most basic tools needed for this project would be:
- Electric drill with a 3/8″ chuck (or larger), misc drill bits
- Hacksaw
- Basic hammer and/or ballpeen hammer
- Hand sledgehammer or small anvil
- Clamps or vise
- Metal files
- Wood chisels or gouges
- Propane torch or similar
- Measuring tape/yardstick/square or similar
Now, some additional tools that are common, and which I used to speed up the whole process:
- Belt sander
- Bench grinder
- Dremel or similar rotary tool with various small bits
- Side-cutting pliers
Pretty basic, right? So is the list of materials needed:
- Mild steel rod 13/16″
- Silver soldering supplies (solder, flux, propane or similar torch)
- Sandpaper (various grades, starting with 60grit)
- Brass strap, 1/8″ x 1″, sufficient for 3 straps 5″ long
- 10d common nail or 1/4″ steel rod
- #10 x 3/4″ brass screws
- 2″ x 2″ x 48″ hardwood for the stock (finish size 1.5″ x 1.5″)
- Stain/finish for the stock, if desired
Selecting the barrel to use.
After the first bronze hand gonnes were developed, it wasn’t long before people started making similar weapons using iron or mild steel. Such firearms would be lighter, stronger, and at least in theory easier to make.
So adapting an old shotgun barrel to make a 15th century style hand gonne made sense.
A 12ga shotgun is nominally supposed to have a 0.729″ inner diameter barrel. I wanted the new hand gonne to be about that size, so one of the old 12ga barrels was perfect. I looked over the options from my bucket of barrels, and selected one using the following criteria:
- Condition: surface rust was acceptable, but not severe pitting or signs of cracks
- From a style of shotgun I did not own (to avoid someone thinking I was doing something nefarious)
- With a suitable lower projection of hardware which would aid in mounting the barrel securely
The one I picked had been of a common design for single shot 12ga shotguns from the early 1900s. I do not now, nor had I ever, owned such a shotgun, so I was reasonably confident that no one would think I was trying to make an illegal shotgun. I also intended on plugging the breech soon after cutting it to length to render it unusable as a conventional shotgun. This style of shotgun barrel has a heavy lug welded on the bottom of the barrel which was part of the original design, and that would prove useful for making sure it was securely mounted to the stock. Here’s the one I chose:

And after cleaning (the one on the bottom):

And just to be on the safe side, I used calipers to check the actual diameter of the barrel so I could order lead balls for ammo. And I’m very glad I did — while 12ga is nominally 0.729″, the barrel was just under 0.700″. I ordered .69cal lead balls.
Barrel prep and plugging.
The first step was to remove the surface rust on both the inside and the outside of the barrel. On the outside this was accomplished with a wire wheel. On the inside I used some #2 coarse steel wool mounted on a mandrel (in this case, a long lag screw with the head cut off) in my drill:

Next, I needed to prep and plug the breech of the barrel. This plug would be secured using three different methods: friction, silver solder, and steel rivet.
I checked the ID (inner diameter) of the breech/chamber, and it was right at 0.800″, after cleaning. So I needed a piece of mild steel rod about that diameter. A piece of 13/16″ rod specs out to 0.8125″, so that’s what I got. A bit of sanding the interior of the breech/chamber with fine sandpaper, and then doing the same with the rod got them almost the same diameter. With a little gentle force I could insert the rod about half an inch into the breech. That was a good start.
What I did next was use my propane torch to heat up the breech end of the barrel. Since the barrel is hollow, when heated it would increase the ID slightly as the metal expanded due to the heat. I’d marked the rod at the 1.5″ mark, which I figured would be a sufficient length of plug. Once the breech end of the barrel was heated, I inserted the rod to the mark, then cut it off flush with the back of the breech:


As the breech of the barrel cooled, it would contract and cinch down on the plug. So long as there was no sign of the barrel splitting, I figured it would be secure. I checked using another piece of steel rod and a hand sledge, seeing if I could move the plug at all. I could not.
Next, I used basic silver soldering skills to fill the void at the very back of the breech:

After clean up, the solder joint looked and felt good:

Lastly, I drilled through the barrel and plug at about 0.75″ from the back of the breech (so halfway into the plug), and put a rivet through the entire barrel, using a common 10d (10 penny) nail. You can substitute a 1/4″ iron rod for this. After peening over the rivet ends, I smoothed those over with a file. Unfortunately, I seem to have forgotten to take an image of this step.
Preparing the stock.
I selected a piece of 2″ x 2″ x 48″ red oak from a local lumber yard, which had actual dimensions of 1.5″ x 1.5″ x 48″.
First I positioned and then marked where the barrel needed to be mounted:

Then I used gouges and chisels to carve a shallow gully for the barrel to rest in, with deeper areas for the small stud and the big lug on the bottom of the barrel:
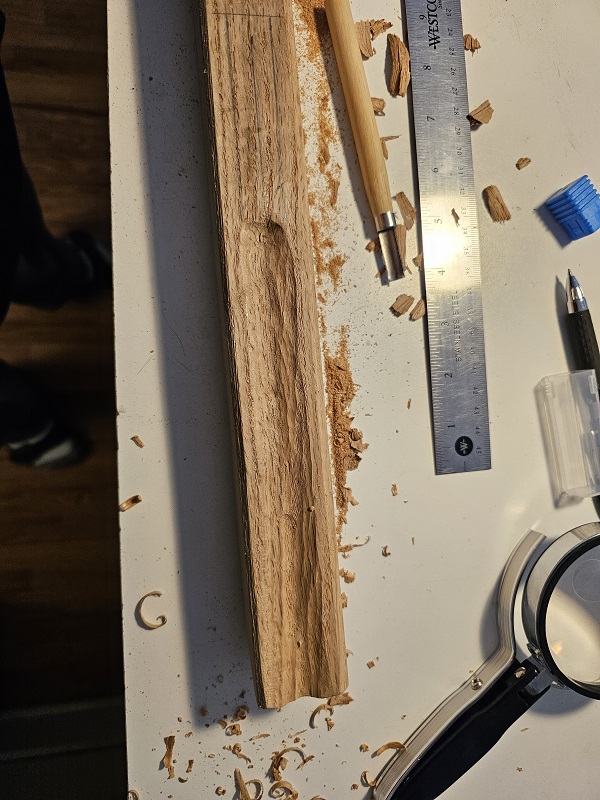


I periodically checked to see how the barrel would rest, until I got it to where I wanted. Then using a belt sander, I beveled the corners to almost an octagonal shape and shaped the front of the stock, and gave it a light finish sanding:


Lastly, I stained it:

Making the bands and mounting the barrel.
I decided that I wanted to use brass mounting straps for aesthetic reasons. This would hearken back to the bronze hand gonne, and indicate that it was supposed to be a transitional form. I used 1/8″ x 1″ straps.
1/8th” brass strap is stronger than you think. Well, at least it was stronger than I thought. I figured that it would be a fairly easy matter to hammer it into shape using some basic metalworking tools.
I was wrong.
Eventually I got it done, but it took multiple applications of heat from my propane torch, then hammering using different metal forms I had. But eventually I got the basic shape done:

After a little clean up and trimming:

I decided that I didn’t like the look of the raw oiled steel barrel with the rest of the gonne, so I cleaned it and then used a commercial gun blueing paste to darken it. Then I drilled the mounting holes and counter-sunk them:

I also positioned and then drilled the touch hole, so it was just in front of the front of the breech plug, and created a small ‘pan’ to hold gunpowder if I didn’t want to use fuse.
Then it was a simple matter to install the brass screws. I wanted to use solid brass rather than plated, for good color match. I thought they would be strong enough, but if they fail I can go to steel screws:


Proofing the hand gonne.
The usual recommended procedure to test a home-made black powder firearm for safety is to take it to the range, put a double load of powder into it with a lead ball, secure the firearm, and then fire it from a safe distance using a string or fuse or whatever is necessary. I’d come to prefer using cannon fuse for shooting the first hand gonne, so had it on hand for this purpose.
I got out to my range on a cool Monday morning, when I was reasonably sure that no one else would be there. I wanted to avoid putting anyone else at risk, on the off chance that my project didn’t work out and wasn’t safe. That is, if the thing blew up, I wanted everyone else to be clear.
I set up a large sheet of cardboard (about 2×4′), about 10 yards from the gonne. I put in 120gr of FFg black powder, twice the standard load I’ll shoot out of the thing, along with a .69cal lead ball (500gr). I then laid the gonne down on a picnic table, with a pair of leather gloves under the muzzle end to maintain a slight elevation. Then I positioned a metal ammo box beside the gonne as a protective barrier for my phone, with an inexpensive mirror positioned so the phone was protected but would record the first firing of the gonne . I positioned my usual range bag on the back of the stock to help hold it in place. Like this:

And here’s the slow-motion firing of the proof charge:
And this was the result:

The first thing I did was closely examine the gonne for any signs of damage or stress. It looked pristine, except for some dirt and gravel dust from falling on the ground. Then I checked the target. The first shot was partially in the bull’s eye (luck!). The second shot, also from a resting position on the table, with a ‘normal’ charge of 60gr of FFg, hit the upper right of the target:

I went ahead and shot it a third time, again with a normal charge, but this time holding it and shooting it as I normally would. Again, I noticed a fair amount of recoil, even given the substantial weight of the whole thing (I’d guess ~10 pounds or so). But it’s not the sort of thing that most people would mind at all. The third shot was on the lower left corner of the target:

Given the very basic design of this thing, it’s still respectable in terms of control and power. I didn’t chrono it, but based on previously checking black powder guns, I’d guess that the .69 ball was probably traveling about 800fps. That gives a muzzle energy of about about 700 ft/lbs, or about what a modern .357mag revolver with a 4″ barrel would do. Even dropping the velocity down to just 600fps, you’re getting the kind of performance you see out of a short barrel 9mm carbine. In other words, it’s an effective weapon, at least at moderate range. Not bad for a technology that is almost 600 years old.
Conclusions.
To repeat myself from the start:
- This is a description of how I made a black powder hand gonne for my own use
- I am not recommending that you make a black powder hand gonne
- If you do decide to make a black powder hand gonne, I am not recommending that you make it this way
- Any black powder hand gonne is potentially dangerous, and if you make one, the risk is entirely on you
- A black powder hand gonne is a firearm, and all the rules of safe handling and usage of a firearm apply
- Lastly: I selected a barrel from a single-shot shotgun, the style of which I have never owned, so as to reduce the likelihood that someone might think I was making an illegal short-barrel shotgun, and I plugged that barrel shortly after cutting it down.
As noted, after the ‘proof’ shot, I did a close inspection of the hand gonne. There were no signs that anything had shifted or been stressed. Same thing after the two subsequent ‘normal’ charges were shot. So my conclusion is that the gonne is safe, though of course I will keep a close eye on it going forward. My experience with the bronze version I made last year gives me some confidence that this one will hold up fine, but I don’t want to take that for granted.
And overall, I’d have to say that the project was a success. It is possible for an average person, using common, non-specialized tools and a little ingenuity, to make their own reproduction 15th century hand gonne with modern materials and an old shotgun barrel. My total cost out-of-pocket for this project was under $50, because rusty old shotgun barrels are pretty cheap.
Thanks for coming along for the ride. Feel free to share.
Jim Downey
Making a 14th century Hand Gonne
Last Fall I taught a day-long workshop on “Primitive Black Powder Firearms” for the Liberal Gun Club‘s Annual Meeting in Las Vegas. In addition to my own black powder guns, I borrowed a couple of items from friends to help fill out the historical selection, including this very nice reproduction of a 14th century .62 cal cast bronze hand gonne:

I had shot the gun previously with friends, and it never fails to put a smile on people’s faces. It’s so simple: pour gunpowder down the muzzle, roll in a lead ball (tolerances for these guns are very slack, and the ball will roll right back out if you’re not careful), add a little powder to the touch-hole on the top, and light it off when ready. Very basic. Very fun. People in the workshop loved it.
And I decided that I wanted to get one of these for my own collection.
The problem is, they’re almost impossible to find. I spent a couple of months poking around online, asking friends, and the closest I could come were a couple of simple hand gonnes made using steel. Nice, but not what I was looking for.
So I started to think about making my own, and I consulted with an old friend who does bronze casting for his jewelry business. Turned out that it was certainly possible to do such a project, but it was bigger than my friend’s casting set-up could handle. We set aside the idea for the time being.
But I thought some more about it, and figured that such a bronze hand gonne was so simple, that it should be possible to make one without casting. I could order a bar of the appropriate alloy of bronze, have a machine shop bore it out, and do the external work myself. I tried contacting some local machine shops, explained what I wanted done. Most never responded. The ones that did had no interest in the project. I was stymied again.
By then, however, I was invested in the project. Again, I thought through just how basic the hand gonne was, and I figured that if I ordered the correct components, I would be able to make one without a machine shop. In fact, as I thought it through, I realized that it would be possible to make one just using some very basic modern tools which almost anyone would have or could get at a modest price. So I set out to do just that.
And this is the result.
Now, before we go any further, let’s get a few important caveats in place:
- This is a description of how I made a black powder hand gonne for my own use
- I am not recommending that you make a black powder hand gonne
- If you do decide to make a black powder hand gonne, I am not recommending that you make it this way
- Any black powder hand gonne is potentially dangerous, and if you make one, the risk is entirely on you
- A black powder hand gonne is a firearm, and all the rules of safe handling and usage of a firearm apply
OK, we clear about that? Good.
The tools and materials needed.
So, in thinking it through, I decided that the most basic tools needed for this project would be:
- Electric drill with a 1/2″ chuck, misc drill bits
- Hacksaw
- Basic hammer
- Hand sledgehammer or small anvil
- Clamps or vise
- Metal files
- Metal chisel (‘cold chisel’, 1/2″ wide or so)
- Measuring tape/yardstick/square or similar
- Calipers
Now, some additional tools that are common, and which I used to speed up the whole process:
- Belt sander
- Bench grinder
- Dremel or similar rotary tool with various small bits
- Side-cutting pliers
Pretty basic, right? So is the list of materials needed:
- Bronze stock
- Sandpaper (various grades, starting with 60grit)
- 1/2″ iron bar stock
- 3″ common nails (x2)
- Epoxy
- Duct or box tape
- 1.75″ x 48″ hardwood dowel for the stock
- Stain/finish for the stock, if desired
In addition, I used a number of bits of scrap wood, foam, and wood screws I had in my workshop. You’ll see.
Selecting the bronze stock to use.
I knew that historically, early black powder guns were typically constructed of a type of bronze called gunmetal or red brass. This is a bronze alloy containing mostly copper, some tin and lead, and a little zinc. I spent some time looking over modern bronze alloys which were readily available, and settled on “Bearing Bronze 932” as being a reasonable approximation of common gunmetal.
The modern metal industry offers a range of different types of products. What I figured was that I could get a product called “hollowbar”, which is basically a thick-walled pipe. That would allow me to select both the overall diameter and the wall thickness. By choosing a 1.75″ O.D. hollowbar with a 0.625″ I.D., I would get a suitable length of bronze which didn’t need to have a bore drilled into it. In addition, I ordered a length of round bar stock with a nominal 0.625″ O.D. that I could use as a breech plug. Metal prices fluctuate regularly, but I was able to get both pieces shipped for about $160.
Both pieces of bronze arrived. As expected, they were “overcast” — meaning that they were slightly larger than the specs given. The hollowbar was 13″ long, and the bore down the center of it was at 0.585″. The round bar stock was likewise 13″, and the O.D. was 0.675″. That meant that I would need to ream out the bore to .62 cal and shave down the bar to fit the finished diameter of the breech.

Reaming out the bore.
I didn’t order a solid length of bar stock because that would have required that I have the ability to drill out the bore. Even making a smooth-bore hand gonne (with no rifling) would present a substantial technological challenge which would have required, at a minimum, a floor-mounted drill press if not an actual metal lathe.
However, by ordering the hollowbar, I would already have the basic geometry of the hand gonne provided. The hole down the center would already be established. It would just be a matter of getting the bore to the correct diameter to handle a .62 cal lead ball.
To do this, I decided that the best approach would be to use a length of 1/2″ iron rod (called a mandrel) with a piece of sandpaper at the end, driven by the hand drill. It would take time, and require frequent changes of the sandpaper, but it would give me the ability to ream out the bore with a reasonable amount of control.
This is easy to do. You just use one piece of tape applied to the back of your piece of sandpaper, with a tab of about an inch protruding past the edge of the paper. Then you apply another piece of tape to the tab, and use the overhang to secure it to the mandrel. Like so:


The next thing I needed to do is secure the hollowbar stock so that I could spend time reaming out the bore without the stock moving. I decided to make a simple sandwich of scrap wood, dense foam, and screws to hold everything in place:


Then it was just a matter of reaming out the bore slowly, frequently stopping to change the sandpaper, dump out the waste material, check the progress, and let both the drill and the hollowbar cool down. It took a total of about 8 hours over four days to do this.

But, in the end, a .62 cal lead ball would pass freely through the length of the hollowbar:
Now, one thing I want to note: when you repeatedly insert a mandrel with sandpaper from one end, that end will tend to get over-reamed. So I was careful to consistently do this from the end of the hollowbar that I intended to be where it would be mounted to the wood stock later (i.e.; not the muzzle end).
Making the socket.
The hand gonne would need to be mounted to a stock of some kind. Historically, these seem to have been just a simple stave of wood, with the hand gonne stuck on the end. That was also the style of the others I’d seen in person, so it was what I decided to do.
There were a number of ways that such mounting could be accomplished. I considered the options and settled on just creating a hollow at the end of hand gonne that would accept about a 2″ deep piece of the stock.
Therefore, to make the socket, I needed to remove additional material to a depth of about 2″. To do this, I used a drill with a 5/32″ bit (marked with tape to a 2″ depth) to create a starting set of holes in a circle:


Then I went to a 1/4″ bit to remove more of the bulk:

After this, I used the cold chisel to start to cut through the remaining material:

And then the Dremel rotary tool with a steel carving tip to remove the rest of the bulk and thin down the sides some:


I wasn’t worried about it being perfectly symmetrical or smooth at the bottom, since these areas would be hidden by the stock.
Making and installing the breech plug.
Since I was starting with a length of hollowbar, which had a hole down the center of the entire length, I needed to close up and secure the breech of the gun. The historic models and modern versions which are cast just have a closed-off breech to start with, so this step isn’t necessary.
Black powder is a low-pressure propellant, and I could have probably just gotten away with inserting a tight plug of bronze and then mounting the hand gonne to the stock. But I wanted something that would be more secure. More secure, yet still low tech (no brazing or anything). I decided that a couple of mild steel rivets through the outside of the hand gonne, and through the plug to the other side, would be sufficient. But this meant that the plug would need to be long enough put a couple of rivets through. I settled on a 2″ plug.
Using the calipers, I checked the bronze rod, and confirmed that it was larger than what I wanted. I also checked by trying to insert the end into the breech end of the hand gonne, just to be safe. It was still 0.675″, so I needed to file/sand it down:

Checking frequently, I continued that until the rod would barely start to insert into the breech. Then, using the hacksaw, I cut off a 2″ long piece of it:

I did some additional sanding, then inserted it, first by hand, then using the hammer and the iron rod I’d used as a mandrel to ream out the bore:


Shaping the outside.
OK, first things first: at this point, you could rivet the breech plug in place, drill the touch-hole, mount the hand gonne, and use it. The shaping I’m about to show/discuss is not necessary to having a functional black powder firearm.
But the historical record shows that most of these were shaped and/or decorated in some fashion. Likewise most of the reproductions I’ve seen. I decided to do something similar to the design of the one my friend owns, though going with an octagon form rather than a hexagon one.
Why bother? Mostly just for aesthetic reasons. But also, the entire bulk of the hollowbar isn’t necessary for the hand gonne to be strong enough to function. You do want to have some extra bulk/strength to contain the primary explosion of the black powder, in the area that is called the “chamber”. But as the lead ball/bullet starts to move down the barrel, the pressure drops off quickly. Meaning that the barrel walls don’t need to be quite so thick/strong. By removing the excess, you can cut down on the weight of the hand gonne by about a third. I also decided that I liked the flare at the muzzle often seen on these guns, and thought it would help connect it visually to that history.
Since the final shape of the hand gonne is largely an aesthetic decision, what follows is just a quick photo-essay of the steps I took to come up with my preferred design. Also, while I started out using a file, I almost immediately shifted over to using a belt sander to get the overall shape, then a bench grinder to rough out the barrel, followed by more use of the belt sander. Basic shaping was done using a 60grit belt, then finished with a 150grit belt.
First, I marked the end of the muzzle with the basic shape I wanted:

Then I put it back into the trough to hold it in place:

I chose an octagon shape for a simple reason: it would be easier to keep it aligned in the trough while working.


Once the overall shape was defined, I started to cut down the barrel bulk:


This all actually went faster than I expected, just a couple hours work with the belt sander & grinder, with frequent stops to check dimensions with the calipers.


Securing the breech plug and drilling the touch hole.
Once I had the exterior shape mostly finished, it was time to secure the breech plug with a couple of mild steel rivets and drill the touch-hole (how you fire the hand gonne).
The first step was to carefully measure and mark the locations of the rivets and the touch-hole. I did this by using a dowel from both the back of the socket and from the muzzle. I wanted the rivets to be evenly spaced about 1/3 the way from the front and the back of the breech plug, and the touch-hole to be positioned so that it was just in front of the breech plug.
Using a Sharpie, I marked the location of each of the holes. First I used a 7/64″ bit and drilled the touch hole, centered on that face of the octagon and angling slightly back into the chamber for the black powder. This would tend to force the jet of hot gas forward away from the shooter when the gonne was fired. I used a larger drill bit to start a larger hole just on the surface — the beginning of a simple ‘pan’ to hold a small amount of black powder.
Then I selected a drill bit the same diameter of the 3″ nails I was going to use for the rivets, and drilled through the exterior of the hand gonne, the breech plug, and out the other side of the hand gonne:

Next I used the Dremel tool with a small grinding head to deepen the ‘pan’ and slightly counter-sink the holes for the rivets. I cut off the head of the nails, and inserted them through the holes, cutting them off with about a 1/8″ protruding from either side. Then these were hammered (with a hand sledge under them, though if you have an anvil that will work better) so that the mild steel filled the counter-sunk area:


Next I dressed those areas again using the belt sander and 150grit paper:


Shaping and mounting the stock.
I’d hoped to find a suitable length of oak, ash, or hickory to use as the stock. I settled for a 1.75″ x 48″ poplar dowel I was able to select at a local lumbar yard.
The first thing was to shape the end to fit the socket:

Once I had it so that it fit, I needed to secure it. I decided that normal 5-minute epoxy would be sufficient for this purpose. So I did some additional undercutting of both the dowel and the socket walls (so that the epoxy would fill in those, and couldn’t just pull loose). Then I mixed the epoxy, poured it into the socket, and shoved the dowel into place. To hold everything in place for the 24 hours needed to let the epoxy cure, I used this high-tech set up:

Surprisingly, this worked, and the dowel rod was almost perfectly straight off the back of the hand gonne.
I had debated whether or not to leave the dowel round, or to put partial flats on it, or what. But once the epoxy had set, the round dowel just didn’t feel right, so I decided to go ahead and use the belt sander to shape the dowel into the same shape/dimensions as the hand gonne:


If you look carefully, you can see the slight skew of the hand gonne off to the left. It’s only 3 or 4 degrees, and really isn’t noticeable when you actually hold the thing, but it is there. I decided not to worry about it.
I wanted to have some basic surface protection for the stock, so used some dark walnut colored Danish Wood Oil I had available:

Proofing the hand gonne.
The usual recommended procedure to test a home-made black powder firearm for safety is to take it to the range, put a double load of powder into it with a lead ball, secure the firearm, and then fire it from a safe distance using a string or fuse or whatever is necessary. I’d ordered in some cannon fuse for just this purpose.
I got out to my range on a cool Friday morning, when I was reasonably sure that no one else would be there. I wanted to avoid putting anyone else at risk, on the off chance that my project didn’t work out and wasn’t safe. That is, if the thing blew up, I wanted everyone else to be clear.
I set up a large sheet of cardboard (about 2×4′), about 7 yards from the gonne. I put in 120gr of FFg black powder, twice the standard load I’ll shoot out of the thing, along with a .62cal lead ball (345gr). I then laid the gonne down on a picnic table, with a fold piece of cloth under the muzzle end to maintain a slight elevation. Then I positioned my black powder range box (minus the black powder casks) balancing on the stock just behind the gonne as a protective barrier. I positioned my usual range bag on the back of the stock to help hold it in place. And I set up an inexpensive mirror and my smart phone so the phone was protected but would record the first firing of the gonne. Like this:

I cut a 6″ length of cannon fuse, inserted it into the touch-hole. I started the camera recording, then lit the fuse. Then got about 10 yards away, on the other side of my vehicle. And this is what happened:
And here the relevant bit is in slow-motion (1/8th normal speed):
Mwahahahahaha! It works!!!
Here’s where the first shot hit:

Not bad! It was time for the second shot, using a normal charge of 60gr of FFg black powder:
I was stabilizing the gonne with one hand, while filming with the other. There was a decent amount of recoil, even with the standard charge.
I went ahead and shot it a third time, again with a normal charge, but this time holding it and shooting it as I normally would. Again, I noticed a fair amount of recoil, even given the substantial weight of the whole thing (I’d guess ~10 pounds or so). But it’s not the sort of thing that most people would mind at all.
And all three shots hit in roughly the same place at 7 yards:

Not bad.
Given the very basic design of this thing, it’s still respectable in terms of control and power. I didn’t chrono it, but based on previously checking black powder guns, I’d guess that the .62 ball was probably traveling about 800fps. That gives a muzzle energy of about 500 ft/lbs, or about what a modern .40S&W handgun would get with typical loads. In other words, it’s an effective weapon, at least at moderate range. Not bad for a technology that is almost 700 years old.
Conclusions.
To repeat myself from the start:
- This is a description of how I made a black powder hand gonne for my own use
- I am not recommending that you make a black powder hand gonne
- If you do decide to make a black powder hand gonne, I am not recommending that you make it this way
- Any black powder hand gonne is potentially dangerous, and if you make one, the risk is entirely on you
- A black powder hand gonne is a firearm, and all the rules of safe handling and usage of a firearm apply
But, after the ‘proof’ shot, I did a close inspection of the hand gonne. There were no signs that anything had shifted or been stressed. Same thing after the two subsequent ‘normal’ charges were shot. So my conclusion is that the gonne is safe, though of course I will keep a close eye on it going forward.
And overall, I’d have to say that the project was a success. It is possible for an average person, using common, non-specialized tools and a little ingenuity, to make their own reproduction 14th century hand gonne with modern materials. My total cost out-of-pocket for this project was under $250, and now I have a couple new tools as well as the gonne.
Thanks for coming along for the ride. Feel free to share.
Jim Downey
Shooting big stuff.
Ever hear of a 4 Bore?
Here’s the first line from the Wikipedia entry:
Four bore or 4 bore is an almost obsolete black powder caliber of the 19th century, used for the hunting of large and potentially dangerous game animals.
The term “4 Bore” indicated that it would fire a sphere of lead weighing 4 ounces, or one-quarter of a pound of lead. This was an old measurement system from which we also get our shotgun gauge measurements: a 12 gauge shoots a sphere of 1/12th a pound of lead, etc. So, a 4 Bore shoots a sphere of lead that is three times the weight of what a 12 gauge would shoot. As in a ball 1.052″ diameter that weighs 4 ounces, or 1,750gr. Compare that to a typical 12 gauge slug, which weighs from one to 1.125 ounces. The 4 Bore ball is more than three times the weight.
And shooting one feels like it.
Well, depending on the black powder load, of course.
Here’s the one we shot, the Blunderbuss on the right:

And here’s looking down the muzzle:

As the maker of the gun notes:
This 4 bore Blunderbuss can be pretty intimidating when you’re looking down the end of one.
Especially when the end is TWO inches in diameter and the bore is more than one inch too!
The thought of shooting it was pretty intimidating, too.
The maker recommends a load of just 100gr of Fg black powder. So that’s what we started with. Here’s what that looked like, being shot by Jim K of the BBTI team:
Not bad, right? Yeah, it felt like shooting a typical 12 gauge loaded with slugs. Of course, the Blunderbuss doesn’t have a modern firearm design, with no mechanism to reduce recoil.
And here’s my friend Roger shooting it with the recommended load, in slow motion:
Now, Roger’s a big guy. Over 6’6″. And like all of us who shot the 4 Bore, he has decades of experience shooting all manner of long guns, from mild black powder muskets to modern heavy magnums. Now just watch what happens when we increased the load in the 4 Bore to 200gr of Fg black powder:
And here’s Keith of the BBTI team shooting the 4 Bore with that full 200gr load:
Impressive, eh? I don’t have video of my shooting it, but I do have the bruises to prove I did.
Well, now, think about this: historically, these guns were loaded with up to 500gr of black powder. Bloody hell.
OK, let’s talk ballistics.
See the orange thing in the foreground in most of the video? That’s a LabRadar ‘chronograph’. It said we got about 500 fps from the ‘light’ loads, and about 700 fps out of the ‘heavy’ loads. That would give us a muzzle energy of about 970 and 1900 foot-pounds, respectively.
Your typical 12 gauge slug has a ME of about 2600 ft/lbs.
So, what gives? Why does the 4 Bore look (and feel) like it had so much more power?
I’ve been thinking about this for the last several days, and I think the answer is that a heavier bullet gives you more perceived recoil.
I’ve discussed this previously: Velocity is great, but mass penetrates. In that post, I used the example of a whiffle-ball versus a baseball, where they both had the same “ME”, but where you’d feel a significant difference if you were hit by both.
And I think that the same thing is happening here. For what it’s worth, you’d need to push the 4 Bore ball to about 800 fps to get it to the same nominal ME as a 12 gauge shotgun slug. To get to *triple* the ME of a 12 gauge shotgun slug, you’d need to push the 4 Bore ball to about 1400 fps. My guess is that the historical 500gr load of black powder might accomplish that.
But I sure as hell wouldn’t want to shoot it.
Oh, and how accurate was the 4 Bore? Here’s our target from the full-power loads:

Not bad for no sights, at about 15 yards. And look at the size of those holes!
~~~~~~~~~~~~~~~~~~~~~~~~~~~~~~~
OK, let’s talk about the other gun in the pic at the top. It’s a Hand Mortar, designed to throw a small hand grenade further than the human arm could. We had this one just for a little fun, shooting tennis balls about 100 yards using 70gr of Fg black powder. Like this:
Here’s a slow motion version of my friend Tim shooting it:
And here’s another of my friend Charles:
Black powder is so much fun!
Jim Downey
“Archive Status” update.
Following up to this post from August 24th, the BBTI site has been updated.
When you go there now, at the top of each page you’ll see this notice:
ATTENTION: Effective Sept 1, 2020, the BBTI Project is in “Archive Status.” No further tests will be conducted, but we will maintain this site and data for the use of the firearms community. Thank you.
In addition, we’ve removed the “Contact Us” and “Donate” options. There are costs associated the continuing to host the site, but I’d rather just pay those myself than give anyone the hope of making a donation towards future testing. I do want to thank those who have made contributions towards offsetting some of our expenses in the past. Likewise, thanks to those who contacted us with questions, corrections, and suggestions. It hasn’t always been possible to respond to each one, but your thoughts have been appreciated.
Cheers!
Jim Downey
The Future of BBTI
So, I have some important news to share.
After months of discussion, and soliciting the opinions and suggestions from a number of people involved in the firearms/shooting community, we’ve made some decisions about BBTI going forward.
As noted on the BBTI homepage, some 12 years ago when we started this project we said:
As we’ve noted previously, we have no illusions that our data is comprehensive. It is meant to be indicative – giving an indication to the general relationships between barrel length and velocity, or the effect of a cylinder gap, or how polygonal and traditionally rifled barrels perform. It would be impossible (for us, at least) to test all the different ammunition types available, or all the different firearms – particularly so when manufacturers of ammunition and firearms are constantly tweaking and improving their products. So use the data here to get an idea of what to expect, and perhaps as a jumping-off point for your own research.
And many people have done that. In fact, our project caused a fundamental change to the ammunition industry, which can now be seen on most boxes of ammunition (or on the manufacturer’s websites): information about the expected velocity and the test platform used for any given ammo. Before we started BBTI, the best you could hope for was a given velocity claim, but you wouldn’t have any idea how that was tested.
But somewhere along the line, people started to get the idea that we were an on-demand testing entity. Since we’ve published our data, we’ve had constant requests to test this particular ammo, that particular real world gun, and every cartridge/caliber imaginable. As noted in the statement above, that would just be impossible.
The fact of the matter is that all of the BBTI team members are busy professionals, with limited time and energy. To do a full test sequence is a significant investment of time and labor, and we feel that we’ve largely accomplished what we set out to do. After extensive discussion, we’ve decided that it is unlikely that we will find the time to conduct additional tests.
So, effective immediately, BBTI will now be considered an “Archive”. In the coming weeks we’ll do some revisions of the site to reflect this status. The data and all the graphs will remain available for free use, but we will no longer answer questions about the project or entertain requests for additional testing.
It’s been fun, folks. Thank you for your interest.
Jim Downey
Reprise: Clean Up Your Act — Get Rid of Your Dirty Magazines
Prompted by my friends over at the Liberal Gun Club, this is another in an occasional series of revisiting some of my old articles which had been published elsewhere over the years, perhaps lightly edited or updated with my current thoughts on the topic discussed. This is an article I wrote for Guns.com, and it originally ran 3/8/2012. Some additional observations at the end.
~~~~~~~~~~~~~~~~~~~~~~~~~~~~~~~~~~~~~~~~~~~~~~~~
OK, we’re all adults here. I think that the time has come to talk about something a little filthy, something that has plagued shooters for decades and something we need to put a stop to, for the good of all of us gun owners. The time has come to clean up our act and get rid of all of our dirty magazines.
No, not *that* kind of dirty magazine (jeez – get your mind out of the gutter!). I’m talking about the kind of magazine that goes into your firearm. Sheesh.
Now, be honest: when was the last time you inspected and cleaned out your magazines? I mean took them apart and cleaned them thoroughly inside and out? Examined the parts for unusual wear? And then lubed ‘em properly with gun lube before putting them back together?
Seriously, this is one of those details that a lot of people just never think about: that to function properly, a semi-auto firearm (or a select-fire one, for that matter) needs a working magazine and while the magazine is usually a pretty simple component of a pistol, it too needs to be cleaned and maintained regularly (just like any other mechanical component of your gun). Otherwise it can impede smooth functioning of your firearm, and that can lead to very bad things called “weapons malfunctions” and “failures to feed”. Which can lead to the dreaded “oops, I’m dead” problem in a self-defense situation.
Happily, almost all modern handguns magazines have been designed so that the average person can disassemble and then easily reassemble them, though over the years I have known plenty of people who either didn’t know this or didn’t care (or really just forget to check/clean their magazines regularly).
Magazine Components
Some terminology before we go any further. Your typical magazine has four main parts:
- Body – this is the overall housing.
- Spring – the internal part that pushes cartridges up into the pistol.
- Follower – a small metal or plastic plate on top of the spring which guides cartridges.
- Floor plate – the bit at the bottom of the body that holds the spring and follower in place.
One other part I want to mention, though it is not a ‘component’ is the (feed) lips. This is the upper part of the magazine body that helps to position cartridges properly within the pistol so that they can be transferred from the magazine into the chamber of the gun. Sometimes these can become pinched, which could lead to failure to feed.
Taking apart Your Magazine
The good news is you should be able to disassemble most if not all pistol magazine designs out there. The bad news is that methods for this vary according to the style of magazine (i.e. Glock versus Colt 1911 magazines), so you should definitely consult your manufacturer’s instructions before attempting to take one of your handgun magazines apart. In general though, here’s how you do it:
- Remove all the cartridges from your magazine.
- Examine the magazine, looking for obvious wearing or breakage (rare, but it happens).
- Look at the floor plate. There should be some variety of clip or clasp that keeps it in place and it might need a small part to be moved, or a little spring latch tripped (usually with a small rod or nail).
- Slide off the bottom of the body once you remove the floor plate. Be careful when doing this, since the spring inside the magazine will be under some pressure and may want to shoot out (finding this smaller piece once its been lost can be a challenge too).
- Take out the spring and follower from the bottom of the magazine. The follower may be mounted to the top of the spring, or it may be free and just held in place by spring tension. Try to pay attention to this as you remove the spring.
Cleaning
Now that your magazine is completely disassembled, you should be able to look up inside the body and see out the top where the lips are located. The interior sides of the body are where dirt can accumulate. This can interfere with the smooth movement of the follower. It can also retain moisture, and that can cause rusting. Here’s how you should proceed:
- Clean the inside of the body thoroughly, using your usual gun cleaners and tools.
- Look at the top of the body, where the lips are. Make sure that these are cleaned inside and out as well.
- Examine the spring, checking for built-up dirt or rust. Wipe down with a rag & some cleaner, then lubricate lightly.
- Do the same for the follower and floor plate.
- Lightly lubricate all surfaces.
Now you’re ready to reassemble the magazine. Just reverse the steps for taking it apart, being careful that the follower and spring go in correctly (this matters on many, but not all, magazines). Hold the spring in place and snap the floor plate back into position.
Check the magazine to make sure that the follower moves freely when under pressure, and that the empty magazine fits back into the gun properly, and locks into place. Now you’re ready to use it again.
Words of Wisdom
There are two additional items I want to mention. One, and this is a discussion that comes up frequently in firearms forums, is whether you will hurt the springs in a magazine by leaving the magazine full of ammunition. Everything I know about springs, and every engineer I’ve ever talked with about this, both say “no.” It should be perfectly safe to load a magazine fully, put it into proper storage, and then leave it for years without causing a problem.
And two, I no longer “top off” my magazines. “Topping off” is where you fill a magazine, place it into a pistol, then chamber a round, and then remove the magazine and place another cartridge into the magazine before replacing it. You’ll see a lot of people refer to a given gun as “10 + 1″ or “14 + 1″. This is what they mean, and it is tempting to do in order to have an extra cartridge.
I used to do this regularly and usually I didn’t have any problems with my various pistols when I did. But every once in a while I’d get a failure of a gun to cycle properly after the first shot. I discussed it with friends, and one buddy who is an armorer for a SWAT team said that he’d stopped “topping off” for his department, and that it eliminated these rare but occasional problems. His theory was that the additional pressure of a completely full magazine on the underside of the bolt/slide operating mechanism slowed it down just enough to mess up the timing of the gun when it was fired, and so presented a problem.
Since I’ve adopted the practice of regularly cleaning my gun and filling my magazine only to capacity, I haven’t had any feeding problems and, if only for my own peace of mind, I’ve just made it my routine. Personally, I’d much rather have a gun which will reliably shoot the second round than have ‘one extra’ round in the mag. Your preference, like your mileage, may vary.
~~~~~~~~~~~~~~~~~~~~~~~~~~~~~~~~~~~~~~~~~~~~~~~~
About eighteen months after I wrote the above, I ran into some unexpected problems with mags for my Glock 21, which I had upgraded to handle the .460 Rowland cartridge. The whole thing is discussed here, but basically what was happening was that the additional power/speed of the .460 Rowland was causing damage to the front of the body of the magazines I was using. To the best of my memory, this is the first time I had actually had this kind of problem with a firearm. Had I not had this article still kicking ar0und in my head, it might have taken me even longer to sort out what was going on. (Now that I have shifted over to using .45 Super instead of .460 Rowland, I haven’t had any subsequent problems with this.)
I don’t take apart and clean my magazines after every trip to the range. But I try to remember to do it after a couple of trips, and that seems sufficient.
I have also learned the wisdom of cleaning *new* mags when I first get them (or when I buy a new firearm) — they’re often surprisingly dirty, and on a couple of occasions I have found mild corrosion on either the spring or inside the body of the magazine, because they had been stored in improper conditions or there was a minor problem with their manufacturing process. So, it doesn’t hurt to check.
Jim Downey
Join the party.
All along, we’ve said that if someone wanted to take the time, trouble, and expense to do some additional research along the lines of our protocols, that we’d be happy to include their data on our site. This is particularly true if it helped expand the selection of “real world guns” associated with the data for a given caliber/cartridge. Well, for the first time someone has expressed an interest in doing just that, prompting us to come up with an outline of what standards we feel are required for making sure it relates to our previous tests.
The biggest problem is that ammo manufacturers may, and do, change the performance of their products from time to time. This is why we have on occasion revisited certain cartridges, doing full formal chop tests in order to check how specific lines of ammo have changed. That gives us a benchmark to compare other ammo after a period of several years have passed, and shows how new tests relate to the old data.
But without going to such an extent, how can we be reasonably sure that new data collected by others using their own firearms is useful in comparison to our published data?
After some discussion, we feel that so long as any new testing includes three or more of the specific types of ammo (same manufacturer, same bullet weight & design) we had tested previously, then that will give enough of a benchmark for fair comparison. (Obviously, in instances where we didn’t test that many different types of ammo in a given cartridge, adjustments would need to be made). With that in mind, here are the protocols we would require in order to include new data on our site (with full credit to the persons conducting the tests, of course):
- Full description and images of the test platform (firearm) used in the tests. This must specify the make, model number, barrel length, and condition of the firearm. Ideally, it will also include the age of the firearm.
- That a good commercial chronograph be used. Brand isn’t critical — there seems to be sufficient consistency between different models that this isn’t a concern. However, the brand and model should be noted.
- Chronographs must be positioned approximately 15 feet in front of the muzzle of the firearm used to test the ammo. This is what we started with in our tests, and have maintained as our standard through all the tests.
- That five or six data points be collected for each type of ammo tested. This can be done the way we did it, shooting three shots through two different chronographs, or by shooting six shots through one chronograph.
- All data must be documented with images of the raw data sheets. Feel free to use the same template we used in our tests, or come up with your own.
- Images of each actual box of ammo used in the test must be provided, which show the brand, caliber/cartridge, and bullet weight. Also including manufacturer’s lot number would be preferred, but isn’t always possible.
- A note about weather conditions at the time of the test and approximate elevation of the test site above sea level should be included.
We hope that this will allow others to help contribute to our published data, while still maintaining confidence in the *value* of that data. Please, if you are interested in conducting your own tests, contact us in advance just so we can go over any questions.
Jim Downey
.45 Super data now published.
At long last, we’ve now put up the page with the results of our .45 Super/.450 SMC tests earlier this year! We’ve also published the additional .45 ACP rounds tested at the same time, which doubles the amount of data for that cartridge available on our site.
As noted on the new .45 Super page:
.45 Super and .450 SMC (Short Magnum Cartridge) are two relatively recent variations on the classic .45 ACP cartridge. They were designed to gain more power from the cartridge than it was originally designed to produce, using modern smokeless powder and more robust case specifications. And these rounds achieve this goal, producing about 100% greater muzzle energy for a given bullet weight over standard pressure .45 ACP rounds, and about a 50% increase over .45 ACP +P (over-pressure) rounds.
Take a look at the Muzzle Energy graph for .45 Super:

One thing I notice right away is that in general, the energy curve for this cartridge is much more pronounced and consistent than the energy curve for .45 ACP loads (whether standard pressure or +P). In other words, this is a round which continues to see impressive gains in energy over a longer barrel length, rather than flattening out starting at 8 – 10″. That’s more like the behavior you see from a magnum revolver round. Even the .460 Rowland tends to not see much gain after about 10″ — with the result that while the .460 Rowland is clearly a superior round for shorter barrels over the .45 Super, most loadings of the .45 Super meet or exceed the energy of the .460 Rowland by the time you get to carbine-length barrels. And you don’t need to rechamber your gun to shoot it.
Seeing this performance out of the Cx4 Storm actually prompted me to act on something I had just been thinking about: to go out and buy one of the remaining new Cx4 Storms out there (Beretta decided to discontinue the gun in that caliber earlier this year). In a future blog post I’ll talk about the alterations I am making to that gun, and that I have made to a Glock G30S, to handle the additional power of the .45 Super cartridge.
For now, enjoy playing with the data. And please be sure to share it with others! Because while I have long been an advocate for the .460 Rowland — a cartridge I still like very much — I now think that the .45 Super is a better choice for most people. Further discussion of that next time.
Jim Downey
Does primer size make a difference?
Following the success of our .45 Super/.450 SMC tests this summer, I sat down to work up some reloads which would mimic the factory ammo we had tested.
Since both of these cartridges are fairly unknown, there isn’t a whole lot of good information out there to draw upon. But there is some, at least for the .45 Super, and late last year/earlier this year I had worked up some preliminary loads, starting with .45 ACP +P (overpressure) published load data. But that was done using .460 Rowland cases and shot through my converted Glock G21, which I knew could handle the extra power. When reloading, it pays to be careful and conservative.
After I had seen the results from the extensive .45 Super/.450 SMC tests (some of which has already been published), I had a pretty good idea of where the power band for these loads was, and how different guns could handle it. Since I had previously worked up loads for .460 Rowland as well as done a lot of .45 ACP reloading over the years, I figured that I could come up with some pretty reasonable load levels to match what we had seen in the factory ammo.
So I sat down, looked through all my results and what was available elsewhere, and came up with loads* for three different bullet weights I had on hand: 185gr XTP, and 200gr & 230gr FP. I chose to use Longshot powder, which I have used successfully for both .45 ACP and .460 Rowland loads. (This is not an endorsement of any of these products, and I have not been compensated from these manufacturers in any way. This is just stuff I have on hand and know has worked previously.) I loaded 50 rounds each in .45 Super cases, using standard Large Pistol Primers.
But as I was doing so, I also realized that I had a bunch of .450 SMC cases left from the tests. And I figured that it might be an interesting experiment to load those cases to the exact same specs, other than the difference in primer size. To give the cartridge the benefit of better ignition, I used Small Magnum Pistol primers. Again, I loaded 50 rounds of each bullet weight.
Again, other than the difference in primers, the reloads I worked up were identical.
OK, before I go any further, I want to toss in some caveats and explanations:
- This was an informal test, using only one chronograph and under less rigorous conditions than the formal BBTI tests. It was just me shooting a string of five shots, keeping mental track of what the numbers were for each, and then writing down a ballpark figure which seemed to best represent the overall performance. Also, I wasn’t using the BBTI light-frame which gives us more consistent chrono results.
- I was using my personal firearms, two of which (the Cx4 and Glock G30S) were brand new — this was their very first trip to the range. Yeah, I got them after seeing how similar guns performed in the .45 Super/.450 SMC tests earlier.
Now, about the guns used:
- Glock G30S with a Lone Wolf 23lb recoil spring and steel guide rod package. 3.77″ barrel
- Glock 21 converted to .460 Rowland (heavier recoil spring, compensator, and Lone Wolf .460 R barrel). 5.2″ barrel
- Beretta Cx4 carbine, standard right out of the case. But I am going to install a steel guide rod and heavy buffer in it. 16.6″ barrel
Results:
Ammo G30S G21 Cx4
.45 Super 185gr 1185 fps / 577 ft-lbs 1250 fps/ 642 ft-lbs 1550 fps / 987 ft-lbs
.450 SMC 185gr 1125 fps / 520 ft-lbs 1200 fps / 592 ft-lbs 1500 fps / 925 ft-lbs
.45 Super 200gr 1130 fps / 567 ft-lbs 1225 fps / 667 ft-lbs 1420 fps / 896 ft-lbs
.450 SMC 200gr 1090 fps / 528 ft-lbs 1180 fps / 619 ft-lbs 1420 fps / 896 ft-lbs
.45 Super 230gr 1080 fps / 596 ft-lbs 1160 fps / 687 ft-lbs 1310 fps / 877 ft-lbs
.450 SMC 230gr 1060 fps / 676 ft-lbs 1130 fps / 652 ft-lbs 1310 fps / 877 ft-lbs
Interesting, eh? What seems to be happening is that full ignition of the powder takes longer with the .450 SMC loads. That would explain why there’s more of a discrepancy with the lighter bullets and shorter barrels, so the bullet clears the barrel faster — some of the powder hasn’t yet ignited with the Small Magnum Primer. But with the heavier bullets and longer barrel of the Cx4, there more time for more of the powder to ignite, reducing or eliminating the difference in performance.
That’s my take on it. If you have another one, please comment.
Also, I want to note just how well I managed to emulate the performance of the factory ammo. Compare the numbers above with what I have already published for the Glock 21 and Cx4 used in the tests earlier. And it isn’t published yet, but the G30S numbers are also right on-the-money for how the G36 used in the tests earlier performed (the two guns have the same barrel length). In all instances, my reloads* performed within 10-15 fps of the factory loads.
Jim Downey
*So, what exactly were those loads specs? OK, here’s the data, but provided with the understanding that you should WORK UP YOUR OWN LOADS starting below these amounts, and accepting that you do so on your own responsibility. Also note that any changes in bullet weight, bullet brand, or powder type may/will alter the results you can expect. AGAIN: you use this data on your own responsibility. Be safe.
All bullet weights had a 1.250″ O.A.L.
All were given a slight taper crimp.
185gr XTP rounds had 11.0gr of Longshot powder.
200gr FP rounds had 10.5gr of Longshot powder.
230gr FP rounds had 10.0gr of Longshot powder.
The illusion of precision.
Got an email which is another aspect of the problem I wrote about recently. The author was asking that we get more fine-grained in our data, by making measurements of barrel lengths by one-eighth and one-quarter inch increments. Here’s a couple of relevant excerpts:
what more is really needed, is barrel lengths between 1-7/8 and 4-1/2″.
because of the proliferation of CCW and pocket pistols, and unresolved
questions about short barrel lengths that go all over between 2 and 3.75″,
and snubby revolvers that may be even shorter.* * *
with that amount of precision, not only would you have data covering all
lengths of short barrels, but you could fabricate mathematical curves that
would predict velocities for any possible barrel length, metric or
otherwise, given the particular ammo.
It’s not an unreasonable thought, on the surface. Our data clearly shows that the largest gains in bullet velocity always come in length increases of very short barrels for all cartridges/calibers. So why not document the changes between, say, a 4.48″ barrel and a 4.01″ one? That’s the actual difference between a Glock 17 and a Glock 19, both very popular guns which are in 9mm. Or between a S&W Model 60 with a 2.125″ barrel and a S&W Model 360PD with a 1.875″ barrel?
Ideally, it’d be great to know whether that half or quarter inch difference was really worth it, when taking into consideration all the other factors in choosing a personal defense handgun.
The problem is that there are just too many different variables which factor into trying to get really reliable information on that scale.
Oh, if we wanted to, we could do these kinds of tests, and come up with some precise numbers, and publish those numbers. But it would be the illusion of precision, not actually useful data. That’s because of the limits of what we can accurately measure and trust, as well as the normal variations which occur in the manufacturing process … of the guns tested; of the ammunition used; of the chronograph doing the measurements; even, yes, changes in ambient temperature and barometric pressure.
That’s because while modern manufacturing is generally very, very good, nothing is perfect. Changes in tolerance in making barrels can lead to variation from one gun to the next. Changes in tolerance in measuring the amount of gunpowder which goes into each cartridge (as well as how tight the crimp is, or even tweaks in making the gunpowder itself) mean that no two batches of ammunition are exactly alike. And variations in making chronographs — from the sensors used, to slight differences in positioning, to glitches in the software which operate them — mean that your chronograph and mine might not agree on even the velocity of a bullet they both measure.
All of those little variations add up. Sometimes they will compound a problem in measuring. Sometimes they will cancel one another out. But there’s no way to know which it is.
This is why we’ve always said to consider our data as being indicative, not definitive. Use it to get a general idea of where your given choice of firearm will perform in terms of bullet velocity. Take a look at general performance you can expect from a brand or line of ammunition. Compare how this or that particular cartridge/caliber does versus another one you are considering.
But keep in mind that there’s no one perfect combination. You’re always going to be trading off a bunch of different factors in choosing a self-defense tool.
And never, ever forget that what matters most — FAR AND ABOVE your choice of gun or ammunition — is whether or not you can use your firearm accurately and reliably when you need to. Practice and training matters much more than whether or not you get an extra 25, or 100, or even 500 fps velocity out of whatever bullet is traveling downrange. Because if you can’t reliably hit your target under stress, no amount of muzzle energy is going to do you a damn bit of good.
Jim Downey
If you want more information about how accuracy and precision can be problematic, this Wikipedia entry is a good place to start.
Do you want good data, or useable data?
Got a question I haven’t seen for a while. Here it is, with my answer (and a little bit of additional explanation) to follow:
Thanks for the site! You do not post the altitude and temperature of your results (unless I missed that). Can you let us know what your reference points are? Also, what effect would altitude and temperature variation have on your results?
Here’s the answer I gave:
Well, it’s been a while since anyone asked about that … thanks!
We did discuss this early on, and decided pretty quickly that while both of those would indeed have an effect (as would the changes in barometric pressure), that it would be so small as to not matter for the degree of accuracy of our testing equipment and the limited number of rounds tested. If you were trying to get really good data, everything would have to be much more rigorous and controlled … and we would never ever have gotten the data that we did. So as I remind people: consider the results to be *indicative*, not definitive. In other words, don’t try to read too much into variances of a few feet-per-second, or convince yourself that such minor differences really matter.
Hope that helps to give a little perspective.
Oh, and I can answer one of your questions: almost all the testing was done at an elevation of approximately 744′ above sea level, according to commercial GPS systems.
I think that’s pretty clear, but I want to emphasize one part of it: that if we had set out to provide really rigorous and statistically-significant data, the chances are that we would never have even gotten past the first test sequence. And that means there would be NO BBTI.
As it is, we have tested something in excess of 25,000 rounds over the last 7 years. At a personal cost of more than $50,000. And that doesn’t begin to include the amount of labor which has gone into the project. To get really solid data which was statistically significant, we probably would have needed to do at LEAST three or four times as many rounds fired. With three or four times the amount of time testing. And crunching the data. And cost out of pocket.
Which would have meant that we probably would never have gotten through a single test sequence.
So it’s a matter of perspective. Do you want some data which is reasonably solid, and gives a pretty good idea of what is going on with different cartridges over different barrel lengths? Or do you want very accurate, high rigorous data which would never have been produced?
Hmm … let me think about that … 😉
Jim Downey
PS: We haven’t forgotten about the .45 Super/.450 SMC tests — it’s just been a busy summer. Look for it soon.
Some “Super” performance out of a Cx4 Storm.
This is the third in a series of informal blog posts about the .45 ACP/Super/.450 SMC testing sequence we conducted over the Memorial Day weekend. You can find the previous posts here and here.
Today we’re going to look at the results out of a stock Beretta Cx4 Storm in (obviously) .45 ACP. I have previously reviewed the Cx4 Storm in .45 ACP for Guns.com, and it is a great little pistol caliber carbine with a 16.6″ barrel. Here is Keith shooting the one we used for this recent testing:

I want to re-iterate that the Cx4 was completely stock, with no modifications or additions whatsoever for these tests.
As I said with the previous posts about these tests, it’ll be a while before we have all the data crunched and the website updated, but I thought I would share some preliminary thoughts and information through a series of informal posts.
Quick note about the data below: All the ammo used, with the exception of the four * items, were part of our overall test sequence and had three shots made over the Oehler chronograph (which is a double-unit, and automatically records and then averages the two readings), representing a total of 6 data points. I’m just giving the overall averages here; the full data will be available on the website later. The four * ammunition types only include two shots/four data points through the Cx4. That’s because we only had one box of each of this ammo, and were wanting to get data which would be of the greatest use to the largest number of people.
Ammo Cx4 Storm
Buffalo Bore
.45 ACP Low Recoil Std P 185gr FMJ-FN 997 fps / 408 ft-lbs
.45 ACP Std P 230gr FMJ-RN 933 fps / 444 ft-lbs
.45 ACP +P 185gr JHP 1361 fps / 760 ft-lbs
.45 ACP +P 230gr JHP 1124 fps / 645 ft-lbs
.45 Super 185gr JHP 1555 fps / 993 ft-lbs
.45 Super 200gr JHP 1428 fps / 905 ft-lbs
.45 Super 230gr FMJ 1267 fps / 819 ft-lbs
.45 Super 230gr JHP 1289 fps / 848 ft-lbs
.45 Super 255gr Hard Cast 1248 fps / 881 ft-lbs
Double Tap
.45 ACP +P 160gr Barnes TAC-XP 1315 fps / 614 ft-lbs
.450 SMC 185gr JHP 1618 fps / 1075 ft-lbs
.450 SMC 185gr Bonded Defense JHP 1556 fps / 994 ft-lbs
.450 SMC 230gr Bonded Defense JHP 1298 fps / 860 ft-lbs
Hornady
Critical Defense .45 ACP Std P 185gr FTX 1161 fps / 553 ft-lbs
Critical Duty .45 ACP +P 220gr Flexlock 1018 fps / 506 ft-lbs
Underwood
.45 Super 170gr CF 1421 fps / 762 ft-lbs
.45 Super 185gr XTP JHP 1578 fps / 1022 ft-lbs
.45 Super 230gr GD JHP 1264 fps / 815 ft-lbs
*Federal HST .45 ACP Std P 230gr JHP 882 fps / 397 ft-lbs
*G2 Research RIP .45 ACP Std P 162gr JHP 979 fps / 344 ft-lbs
*LeHigh Defense .45 Super 170gr JHP 1289 fps / 627 ft-lbs
*Liberty Civil Defense .45 ACP +P 78gr JHP 2180 fps / 822 ft-lbs
Something in particular I want to note: that in comparison to .45 ACP loads (whether standard pressure or +P), a number of the .45 Super/.450 SMC loads gain significantly more from the longer barrel. Compare these numbers to the previous posts of handguns, and you can see what I mean. You typically only gain about 10 – 15% in terms of velocity from the .45 ACP loads in going to a carbine — and this is very much in keeping with our previous testing of that cartridge. But you see upwards of a 30% gain in velocity out of some of the .45 Super/.450 SMC loads … and that translates to a 50% increase in muzzle energy!
A heavy, large projectile hitting with 900 – 1,000 foot-pounds of energy is nothing to sneeze at. Particularly when it comes with very little felt recoil out of this little carbine. That means you can get quick and accurate follow-up shots, which is always an advantage when hunting or using a gun for self/home defense.
As noted previously, we noticed no unusual wear on the Cx4 Storm, though a steady diet of such ammo could increase wear on the gun over time. And the Beretta didn’t have any problems whatsoever feeding, shooting, or ejecting any of the rounds. Where we had experienced some problems with the same ammo out of some of the handguns, there wasn’t a hiccup with the Cx4 Storm.
Look for more results, images, and thoughts in the days to come.
Jim Downey
Ammo test results for a pair of 1911s
This is the second in a series of informal blog posts about the .45 ACP/Super/.450 SMC testing sequence we conducted over the Memorial Day weekend. You can find the previous post here.
Today we’re going to see what the results are for a couple of different high-end 1911 platform guns. The first is an Ed Brown Kobra Carry (reviewed here), a Commander-sized (4.25″ barrel) single stack designed as a concealed-carry gun. We made no modifications of it for the more powerful loads. Here it is during our testing:

The second is a Wilson Combat Hunter set up for the .460 Rowland cartridge with a 5.5″ barrel. Here’s my review of it, and here it is on the day of testing:

As I said with the other two posts about these tests, it’ll be a while before we have all the data crunched and the website updated, but I thought I would share some preliminary thoughts and information through a series of informal posts.
Quick note about the data below: All the ammo used, with the exception of the four * items, were part of our overall test sequence and had three shots made over the Oehler chronograph (which is a double-unit, and automatically records and then averages the two readings), representing a total of 6 data points. I’m just giving the overall averages here; the full data will be available on the website later. The four * ammunition types only include two shots/four data points through the Ed Brown Kobra Carry, since it is a typical length for a self-defense gun. That’s because we only had one box of each of this ammo, and were wanting to get data which would be of the greatest use to the largest number of people.
Ammo Ed Brown Kobra Carry Wilson Combat Hunter
Buffalo Bore
.45 ACP Low Recoil Std P 185gr FMJ-FN 798 fps / 261 ft-lbs 791 fps / 256 ft-lbs
.45 ACP Std P 230gr FMJ-RN 811 fps / 335 ft-lbs 819 fps / 342 ft-lbs
.45 ACP +P 185gr JHP 1130 fps / 524 ft-lbs 1139 fps / 532 ft-lbs
.45 ACP +P 230gr JHP 952 fps / 462 ft-lbs 970 fps / 480 ft-lbs
.45 Super 185gr JHP 1257 fps / 648 ft-lbs 1312 fps / 706 ft-lbs
.45 Super 200gr JHP 1175 fps / 613 ft-lbs 1216 fps / 656 ft-lbs
.45 Super 230gr FMJ 1067 fps / 581 ft-lbs 1105 fps / 623 ft-lbs
.45 Super 230gr JHP 1084 fps / 600 ft-lbs 1109 fps / 627 ft-lbs
.45 Super 255gr Hard Cast 1061 fps / 637 ft-lbs 1074 fps / 653 ft-lbs
Double Tap
.45 ACP +P 160gr Barnes TAC-XP 1121 fps / 446 ft-lbs 1162 fps / 479 ft-lbs
.450 SMC 185gr JHP 1310 fps / 704 ft-lbs 1350 fps / 748 ft-lbs
.450 SMC 185gr Bonded Defense JHP 1254 fps / 645 ft-lbs 1294 fps / 687 ft-lbs
.450 SMC 230gr Bonded Defense JHP 1103 fps / 621 ft-lbs 1108 fps / 626 ft-lbs
Hornady
Critical Defense .45 ACP Std P 185gr FTX 969 fps / 385 ft-lbs 976 fps / 391 ft-lbs
Critical Duty .45 ACP +P 220gr Flexlock 932 fps / 424 ft-lbs 936 fps / 427 ft-lbs
Underwood
.45 Super 170gr CF 1249 fps / 588 ft-lbs 1259 fps / 598 ft-lbs
.45 Super 185gr XTP JHP 1285 fps / 678 ft-lbs 1339 fps / 736 ft-lbs
.45 Super 230gr GD JHP 1071 fps / 585 ft-lbs 1099 fps / 616 ft-lbs
*Federal HST .45 ACP Std P 230gr JHP 815 fps / 339 ft-lbs
*G2 Research RIP .45 ACP Std P 162gr JHP 961 fps / 332 ft-lbs
*LeHigh Defense .45 Super 170gr JHP 1165 fps / 512 ft-lbs
*Liberty Civil Defense .45 ACP +P 78gr JHP 1843 fps / 588 ft-lbs
As with the other guns I’ve posted about, the general trends are pretty clear with the power rising as you go from standard pressure to +P to Super/.450 SMC, and topping out at about 750 foot-pounds of energy in a couple of loads. And it is interesting to note that the 185gr loads seem to be the “sweet spot” in terms of power across the board.
Of course, pure power is just one component for what makes a good ammunition choice. Bullet design & penetration is extremely important when considering a self-defense load. Shootability in your gun is also critical — because if you can’t recover quickly from shot to shot, then you may limit your ability in a stressful situation. Likewise, if the ammo doesn’t function reliably, or damages your gun, that is also a huge factor.
Most of the ammo we tested functioned very well in both 1911 platforms. Interestingly, while we had experienced FTFs (failure-to-fire) with a number of the different Double-Tap rounds in both the Bobergs and the Glocks, we didn’t experience any such problems with either 1911.
The larger platform of the Wilson Combat Hunter handled the recoil very well, even from the hottest loads. Recoil was a little more noticeable with the Ed Brown, but only by a slight amount. As I noted with the Glock 21 converted for the .460 Rowland, I was impressed that The Wilson Combat Hunter didn’t have any problems cycling even the lightest loads reliably.
Another note: we were unable to detect any damage or unusual wear to either gun, though it is possible a steady diet of loads of that power could cause some over the long term.
Lastly, I ran some .460 Rowland Buffalo Bore 230gr JHP cartridges through the Wilson Combat Hunter, since we had only had one type of ammo for that gun when we did the .460 Rowland tests. That had been Cor-Bon Hunter 230gr JHP. The Cor-Bon tested at 1213 fps / 751 ft-lbs, and the Buffalo Bore tested at 1349 fps / 929 ft-lbs of energy.
Look for more results, images, and thoughts in the days to come.
Jim Downey
“How can I use your data?”
We get a fair number of questions to the BBTI email account ( info@ballisticsbytheinch.com ), which I try to answer as quickly as my time will allow. Most are about specific points in our data, or why we did this or that in our procedures (answers to most such can be found in our FAQ). But every once in a while a question comes along which pushes me to re-think things from another vantage point. The following is one such from “drglenn”, and I thought I would share it and my answer:
Found your website interesting, but I am uncertain how I can use this data reliably for me. Perhaps you can offer some guidance. Clearly, barrel length data can be used relatively to compare any single caliber/brand/bullet mass to itself. This is useful to see muzzle velocities/energy as a function of barrel length which might help the consumer in determining just how much more value they will get by purchasing a longer barreled firearm. What I found frustratingly non-useful is an inability to compare bullet mass to velocity/energy across brands – or even within a single brand – of stock ammo. This, no doubt, is a function of powder composition, cartridge air-space volume, and quantity of said powder. One might reasonably assume that, every other parameter being equal, a bullet with more mass, will have a lower muzzle velocity. One might also reasonably assume that since E=1/2mv^2, that velocity is much more significant than bullet mass in determining energy (i.e., all else being equal, if you could double the velocity, you would get 4x the energy, while doubling the mass will only yield twice the energy). Apparently, this useful bit of physics becomes completely useless as each manufacturer uses different powder formulations and quantities for their ammo. So, while I may be able to determine that, across the board, a certain mass bullet or higher, in a certain caliber, regardless of manufacturer, may be subsonic, it would be a crap-shoot in guessing which mass and which manufacturer should have the highest muzzle energy in a given barrel length.
Suggestions for best use of your data would be appreciated!
Sorry, I’m not quite sure what you’re asking. You’re correct that because of proprietary powder formulations, there’s no easy comparison between different manufacturers or even between different ‘lines’ of product from a given manufacturer. In fact, the situation is even much worse than you state, because the manufacturers are *constantly* tweaking their formulations in an effort to claim more of the market. And then there’s the whole matter of terminal ballistic performance depending on the actual bullet design and composition. Toss in the fact that firearms manufacturers are also constantly making minor alterations to their models and production methods, and yeah, it’s impossible to say with any certainty that this or that combination of gun and ammo will give a reliable result. In short, there is no “perfect” solution to the very complex problems of ballistics — one of the reasons why it has a long history of attracting some of the finest minds in physics.
But you can gain insight in what to expect within certain parameters using our data. You can see that while most semi-auto handgun ammunition performs best in a certain range of barrel lengths — usually from 3″ to 8″ –, that ‘magnum’ rounds intended primarily for revolvers will continue to gain velocity/energy over a much longer range of barrel lengths, and so is more suitable for a carbine. You can tell that most ammo formulated to be “low recoil” means that it has less overall velocity/energy, since you can’t break the laws of physics. You can see that some manufacturers may claim performance standards which aren’t supported by our tests, and some are right on the money. You can argue with your friends over a beer whether it is better to use a slow heavier bullet or a lighter one which goes much faster.
In short, our data is a tool for helping analysis and decision-making, nothing more. It’s certainly not perfect. It’s not even comprehensive within a given caliber/cartridge. And it is in some sense rendered obsolete each and every time the manufacturers tweak their production materials or methods. Which is why we always tell people to consider it indicative, not definitive. Use it if it makes sense for your needs, don’t if it doesn’t. And always – ALWAYS – know that testing your own ammo out of your specific gun is the only way to know for sure how it will perform.
Hope this helps.
Jim Downey
Ammo test results in two versions of the Glock 21
This is the first in a series of informal blog posts about the .45 ACP/Super/.450 SMC testing sequence we conducted over the Memorial Day weekend.
Here’s a pic of getting set the first day of shooting:

It’ll be a while before we have all the data crunched and the website updated, but I thought I would share some preliminary thoughts and information through a series of informal posts. In this post, we’ll see how two different versions of a Gen 4 Glock 21 performed with the ammo. The first version was with the Glock in the standard .45 ACP configuration, the second was with my .460 Rowland conversion kit in place.
The standard configuration has a 4.61″ octagonal polygonal rifling, while the conversion barrel is 5.2″ overall with conventional rifling, threaded, and with a compensator. The .460 conversion also has a heavier recoil spring.
Quick note about the data below: All the ammo used, with the exception of the four * items, were part of our overall test sequence and had three shots made over the Oehler chronograph (which is a double-unit, and automatically records and then averages the two readings), representing a total of 6 data points. I’m just giving the overall averages here; the full data will be available on the website later. The four * ammunition types only include two shots/four data points through the standard Glock 21 configuration — we only had one box of each of this ammo, and were wanting to get data from a range of guns.
Ammo Glock 21 Standard Glock 21 .460 Rowland
Buffalo Bore
.45 ACP Low Recoil Std P 185gr FMJ-FN 801 fps / 263 ft-lbs 792 fps / 257 ft-lbs
.45 ACP Std P 230gr FMJ-RN 829 fps / 350 ft-lbs 826 fps / 348 ft-lbs
.45 ACP +P 185gr JHP 1132 fps / 526 ft-lbs 1168 fps / 560 ft-lbs
.45 ACP +P 230gr JHP 951 fps / 461 ft-lbs 974 fps / 484 ft-lbs
.45 Super 185gr JHP 1279 fps / 671 ft-lbs 1299 fps / 693 ft-lbs
.45 Super 200gr JHP 1178 fps / 616 ft-lbs 1203 fps / 642 ft-lbs
.45 Super 230gr FMJ 1069 fps / 583 ft-lbs 1085 fps / 601 ft-lbs
.45 Super 230gr JHP 1094 fps / 611 ft-lbs 1116 fps / 635 ft-lbs
.45 Super 255gr Hard Cast 1063 fps / 639 ft-lbs 1061 fps / 637 ft-lbs
Double Tap
.45 ACP +P 160gr Barnes TAC-XP 1103 fps / 432 ft-lbs 1103 fps / 432 ft-lbs
.450 SMC 185gr JHP 1328 fps / 724 ft-lbs 1351 fps / 749 ft-lbs
.450 SMC 185gr Bonded Defense JHP 1301 fps / 695 ft-lbs 1314 fps / 709 ft-lbs
.450 SMC 230gr Bonded Defense JHP 1097 fps / 614 ft-lbs 1132 fps / 654 ft-lbs
Hornady
Critical Defense .45 ACP Std P 185gr FTX 984 fps / 397 ft-lbs 979 fps / 393 ft-lbs
Critical Duty .45 ACP +P 220gr Flexlock 945 fps / 436 ft-lbs 943 fps / 434 ft-lbs
Underwood
.45 Super 170gr CF 1239 fps / 579 ft-lbs 1253 fps / 592 ft-lbs
.45 Super 185gr XTP JHP 1329 fps / 725 ft-lbs 1348 fps / 746 ft-lbs
.45 Super 230gr GD JHP 1075 fps / 590 ft-lbs 1081 fps / 596 ft-lbs
*Federal HST .45 ACP Std P 230gr JHP 813 fps / 337 ft-lbs
*G2 Research RIP .45 ACP Std P 162gr JHP 942 fps / 319 ft-lbs
*LeHigh Defense .45 Super 170gr JHP 1146 fps / 495 ft-lbs
*Liberty Civil Defense .45 ACP +P 78gr JHP 1768 fps / 580 ft-lbs
The general trends are pretty clear with the power rising as you go from standard pressure to +P to Super/.450 SMC, and topping out at about 750 foot-pounds of energy in a couple of loads. And it is interesting to note that the 185gr loads seem to be the “sweet spot” in terms of power across the board.
Of course, pure power is just one component for what makes a good ammunition choice. Bullet design & penetration is extremely important when considering a self-defense load. Shootability in your gun is also critical — because if you can’t recover quickly from shot to shot, then you may limit your ability in a stressful situation. Likewise, if the ammo doesn’t function reliably, or damages your gun, that is also a huge factor.
Most of the ammo we tested functioned very well in the Glock in either configuration. This isn’t surprising to anyone who has much familiarity with Glocks which typically will handle just about any ammo under all conditions. We did experience FTFs (failure-to-fire) with a number of the different Double-Tap rounds. Those seemed to have been due to light strikes on the primer, which could have been due to improper primer seating, ‘hard’ primers, or some other factor.
The larger platform of the Glock 21 handled the recoil very well, even from the hottest loads. I was impressed that even with the .460 Rowland conversion in place, with the additional weight of the compensator and the heavy recoil spring, the Glock didn’t have any problems cycling even the lightest loads reliably.
One other note: as discussed in my blog post about the .460 Rowland conversion, full-power .460 Rowland loads tend to cause damage to the magazines. As far as we could tell, the same isn’t true of the full-power .45 Super/.450 SMC loads. Just one magazine (a new one) was used for all these tests, and there was no detectable damage. Nor was there any other damage detected to the gun otherwise, though it is possible a steady diet of loads of that power could cause some over the long term.
Look for more results, images, and thoughts in the days to come.
Jim Downey
First date with the Boberg XR45-S
Over the weekend I posted about picking up my new Boberg XR45-S. This afternoon I took it out for a first “getting to know you” session. More about that in a moment.
First, I want to share a couple of things I discovered in getting the Boberg out of the box, taken apart, and cleaned. This wasn’t strictly necessary, of course, because it came from the factory properly cleaned and lubed. But I’m very much a hands-on learner, and wanted to see what I was dealing with.
The gun is very user-friendly. To take it down for field stripping, you just rack the slide back, turn a lever, then move the slide forward. You don’t need any special tools, or an extra hand, or the strength of the pure. In that sense, it is very much in the modern design, as easy as a Glock. BUT without the need to dry-fire the gun first (which always makes me twitch, and may be the only thing I really dislike about the Glock design.)
Once the slide comes away from the frame, there are only 4 parts which come apart (other than the slide itself). There are no little fiddly bits to get lost or to spring out of sight when you’re not looking. You don’t have to disassemble the gun in a paper bag so that you don’t lose anything. It’s easy, obvious, and once you’ve done it following the owner’s manual, I doubt you’ll ever need to refer to the manual again. You can’t ask for more than that.
So, dis-assembly, cleaning, and re-assembly is all a breeze. Nice!
Having done so, I went through my box of misc. holsters to see what the Boberg might fit into. Because the XR45 is so new there are damned few holster-makers out there who have a holster listed to fit it. And I discovered something VERY interesting: the slide has almost the exact same dimensions as the Glock 21 (and similar Glock models). I first found this out in trying it in this little plastic holster: Glock Sport Combat Holster. I got out my calipers and did some measuring, and found that there was less than a millimeter difference in the width of the slide on the Glock 21 and the Boberg. They also have very similar profiles. And if you measure from the deepest pocket on the backstrap of either gun (where the web of your hand settles in) to the front of the trigger guard, there is less than 2 millimeters difference. Meaning that the Boberg fits almost perfectly into an open-muzzle holster for a Glock 21. Good to know!
OK, so what about going out shooting with the Boberg today?
Overall, I was very happy with how it performed on a first outing. I had a couple of minor glitches with improper feeding and ejection, but I am going to hold off on making any decisions about that until I give it at least another range session to break in. It does seem to fling spent cases somewhere into the next county, and I’m going to have to get used to that since I like to recover those cases and reload them. My very mild reloads wouldn’t cycle properly (the ones I took out are *really* mild), so I learned to take somewhat hotter loads. And the trigger is really l o n g … longer than either J-frame I own, and about like the little DAO Rohrbaugh I have. The gun seems to shoot a little to the left for me, but I won’t adjust the sights until I’m more familiar with it. Even so, I was able to consistently ding a 6″ spinner at 10 yards, which is all I expect from a pocket pistol.
How did it handle the different ammos I tried? Quite well, all in all.
I took my Glock 21 (5″ barrel) along for comparison, and shot over a single chronograph. Here are the average numbers:
Glock 21 Boberg
CorBon DPX 185gr +P 1060FPS 1030FPS
Winchester SXZ Training 230gr 850FPS 795FPS
Speer GDHP 230gr 840FPS 760FPS
CorBon JHP 230gr +P 980FPS 900FPS
The CorBon ammo is in line with what we tested formally. So that was good to see.
All together, I put about 100 rounds through the Boberg this afternoon, and wasn’t experiencing any real soreness or tiredness from all that shooting, which is unusual for such a small gun and full power loads. And just for comparison, I shot my .38Sp J-frame with 158gr LSWCHP +P from Buffalo Bore, which is my preferred SD loading for that gun, and the recoil was worse than with the Boberg. That’s for a ME comparison of 386 ft/lbs for the J-frame to 436 ft/labs for the Boberg with the 185gr CorBon loading.
So, that’s that. Already, the Boberg is equal to the J-frame, in my eyes. I shoot it as well. It has the same, or greater, amount of power. Reloading is faster. And it holds 6+1 to start. I still want to put it through its paces before I trust it as a carry gun, and there will be times when I still prefer to have the revolver, but already I can see that the Boberg is going to be a very nice addition to my collection.
More to come.
Jim Downey
Six shooter.
Well, well, well, BBTI made it to six years of shooting fun and research!
Yup, six years ago today we posted the first iteration of Ballistics By The Inch, and included data for 13 different handgun cartridges. Since then we’ve continued to expand on that original research, including some extensive testing on how much of an effect the cylinder gap on revolvers has, what performance differences you can expect from polygonal over traditional land & groove rifling, and added another 9 cartridges, as well as going back and including a very large selection of real world guns in all the different cartridges. This blog has had 100,000+ visitors and the BBTI site itself has had something like 25 – 30 million visits (the number is vague because of changes in hosting and record-keeping over time).
We’ve had an impact. I’ve seen incoming links from all around the world, in languages I didn’t even recognize. There’s probably not a single firearms discussion group/blog/site out there which hasn’t mentioned us at some point, and our data is regularly cited in discussions about the trade-offs you make in selecting one cartridge or barrel length over another. I’ve answered countless emails asking about specific points in our data, and have been warmly thanked in return for the work we’ve done. And on more than a few occasions people have pointed out corrections which need to be made, or offered suggestions on how we could improve the site, sometimes providing the results from their own crunching of our data.
When we started, it was fairly unusual to see much solid information on ammo boxes about how the ammunition performed in actual testing. Now that information is common, and expected. Manufacturer websites regularly specify real performance data along with what kind of gun was used for that testing. And the data provided has gotten a lot more … reliable, let’s say. We’ve been contacted by both ammo and firearms manufacturers, who have asked if they can link to our data to support their claims of performance — the answer is always “yes” so long as they make it clear that our data is public and not an endorsement of their product. And we’ve never taken a dime from any of those companies, so we can keep our data unbiased.
And we’re not done. We have specific plans in the works to test at least one more new cartridge (and possibly revisit an old favorite) in 2015. I try to regularly post to the blog additional informal research, as well as sharing some fun shooting and firearms trials/reviews. There’s already been one firearms-related patent issued to a member of the BBTI team, and we’ll likely see several more to come. Because we’re curious guys, and want to share our discoveries and ideas with the world.
So, onward and upward, as the saying goes. Thanks to all who have cited us, written about us, told their friends about us. Thanks to all who have taken the time to write with questions and suggestions. And thanks to all who have donated to help offset the ongoing costs of hosting and testing — it makes a difference, and is appreciated.
Jim Downey
Questions, we get questions …
I thought I would share a question I got in email today, and my generalized answer, since it is something which comes up surprisingly often.
I love this data! Would it be possible to fund the testing of additional cartridges? I’m looking for more .XYZ load tests.
Our baseline costs for testing a particular cartridge (out to 18″ barrel length) runs a couple hundred dollars for the barrel blank, then perhaps another hundred to get the smithing work done on it to fit the T/C platform. Then add in the actual cost of ammo, with a minimum of probably 100 rounds (3 shots at each inch of barrel, additional rounds for each ‘real world gun’, and then another box or two for repeats when something goes buggy with the data). So realistically, to actually fund a test sequence is a minimum of close to $500 for just one ammo load, and another $100+ for each additional ammo. Add in equipment and site hosting costs, and that’s how we’ve managed to spend something on the order of $50k so far for the data on the site. Which doesn’t include any labor costs, of course, since we only do this because we were curious about the data, not as any kind of testing business.
Which is to say that we’re always happy to accept donations and feedback on what sorts of things people would like to see, but as of yet no one has been willing to step up and finance an entire test sequence for something we’re curious enough to want to sink the time into. (Each test sequence takes 100 man-hours of labor or more … from our vacation/weekend/fun time.)
We don’t *currently* have any plans to retest the .XYZ anytime soon. Actually, we don’t have plans to do any specific tests at all in the near term. But we are looking at revisiting most or all of the cartridges tested to date at some point in the future, just to see how ammo quality/selection may have changed over a 5 or 10 year period.
Jim Downey
Now, about those thunderbolts…
Some weeks back I put up a post about my preliminary experiences with a .460 Rowland conversion for my Glock 21 Gen 4. In it I mentioned how much I like the resultant gun, but also how I was having some problems with magazine wear when shooting full-force .460 loads.
Well, after thinking a lot more about it, as well as discussing it with people online and with the other BBTI members when they were here for the recent tests (one of whom has been a Glock armorer for 15+ years) a couple different strategies emerged for me to test. Briefly, those were:
- See whether putting in a heavier mag spring would help
- See whether the problem was due to the case length of the .460 Rowland cartridges (they’re 1/16″ longer than .45 ACP).
- See whether the problem was due to the *power* of the cartridges rather than the length of the cases.
To test the first, it was a simple matter to get a more powerful mag spring and test it in one of the magazines. I picked up a Wolff magazine spring from Midway and did so.
To test whether it was the simple case length of the .460 Rowland cases, I made up some .460 Rowland rounds using .45 ACP reloading standards.
To test whether it was the *power* of the .460 loads but not the case length was another matter. Here’s where we get to the Don’t Try This At Home part of today’s blog post: I made up a number of .45 ACP rounds which were loaded to .460 Rowland specs.
Let me repeat that again: Don’t Try This At Home. These are wildcat rounds, and potentially dangerous. Shooting them in a gun not rated for .460 Rowland stresses could very well result in catastrophic failure of your gun, of the “KABOOM!” variety. Even shooting them in a gun designed to handle .460 Rowland power was risky, since the .45 ACP cases do not have the same strength as the .460 Rowland cases. I made up just 10 rounds of each of these loadings, and was careful to make sure I shot them all, so that they didn’t accidentally wind up in a .45 not strong enough to take the punishment.
Here are each of the loadings I made up, just for reference, along with their approximate chrono results:
- 185gr XTP bullet, .45 ACP case, .460 Rowland power 1480fps
- 200gr RNFP bullet, .45 ACP case, .460 Rowland power 1440fps
- 230gr RNFP bullet, .45 ACP case, .460 Rowland power 1350fps
- 250gr LFN bullet, .45 ACP case, .460 Rowland power 1250fps
- 230gr RNFP bullet, .45 ACP case, .45 ACP power 920fps
- 230gr RNFP bullet, .460 Rowland case, .45 ACP power 925fps
- 185gr XTP bullet, .460 Rowland case, .460 Rowland power 1490fps
- 200gr RNFP bullet, .460 Rowland case, .460 Rowland power 1420fps
- 230gr RNFP bullet, .460 Rowland case, .460 Rowland power 1355fps
- 250gr LFN bullet, .460 Rowland case, .460 Rowland power 1265fps
No, I’m not going to give the specific powder amounts for any of those. I used Hodgdon Longshot powder, and you can look up the specs if you want to know more.
In addition, I had these factory loads on hand for comparison, along with their approximate chrono results:
11. 185gr DPX .45 ACP +P 1110fps
12. 230gr GDHP .45 ACP 850fps
13. 230gr JHP .45 ACP +P1040fps
14. 230gr JHP .460 Rowland 1380fps
15. 255gr LFN .460 Rowland1260fps

.460 Rowland loads
OK, a couple of comments before I go further: those are “approximate” chrono readings because I wasn’t being anywhere near as careful as we are when we do formal BBTI testing. To wit: I was just using one chrono; I wasn’t worried about getting the exact same number of readings (so long as I got three or four, I wasn’t too worried about it); and I didn’t do anything to control for consistent lighting or suchlike. But they should all be in the right ballpark.
So, looking over all those, you will see what I see: that there was a remarkable consistency in power levels, whether you’re looking at my reloads or factory loads, and between those rounds which used either .45 ACP cases or .460 Rowland cases. That tells me that following the published data for .460 Rowland reloads, and making some intelligent decisions on how to adapt those to the .45 ACP cases for purposes of this experiment, was by and large successful. Meaning that I can use those loads to fairly evaluate what makes a difference on the basic problem I was investigating: what is causing the magazine damage and how to resolve it.
So, what conclusions did I draw from all this?
First, the more powerful magazine spring seemed to help with consistent loading. I will be swapping out all the Glock 21 mag springs I have. This makes intuitive sense, since the slide is moving faster when shooting the more powerful rounds.
That doing a little customizing on the magazines also seems to help a great deal. Here’s a pic showing an unaltered magazine and one I have taken a Dremel tool to:

Glock 21 magazines
Note that these are just the magazine ‘boxes’ — the guts (spring, follower, etc) have all been removed for clarity.
With the altered magazine and stronger spring, any problems I had with Failure To Feed was minimized.
And most important, it is the *power* of the round, not the case length, which seems to cause damage to the unaltered magazines. Shooting the .460 Rowland power loads in the .45 ACP cases demonstrated this. Conversely, shooting the .45 ACP power loads in the .460 Rowland cases didn’t cause any magazine damage at all.
Two additional notes I want to add: the first is that I had pretty consistent problems with the heavy Lead Flat Nose rounds in all configurations. They kept getting jammed up in transitioning from the magazine into the chamber. I’ll probably continue to experiment with this in the future, but I’m not too worried about it, since many guns run into some ammo specific problems.
The second is that once again I was really impressed at just how well this reconfigured Glock 21 did with .45 ACP loads. Seriously, with the .460 Rowland conversion in place, there was very minimal recoil (more than a .22, but not much) and it was VERY easy to control and shoot the gun well. I suspect that going forward the vast majority of the shooting I will do with this will be using standard .45 ACP reloads, saving the much more powerful .460 Rowland rounds for occasional practice. In this sense, I am thinking of the .45/.460 relationship the way I think about .38/.357 — it seems to be a perfectly appropriate analogy.
Now that I have all this sorted, I can go ahead and write up a formal review. But I thought I would share a little of the process of how I got to this point.
Jim Downey
How long is too long?
We’ve long known that many pistol calibers/cartridges are optimized for fairly short barrels — you see real benefits in increasing barrel length out to 6″ or 8″ or so, with diminishing returns beyond that. (The exception to this is the ‘magnum’ rounds: .44mag, .357mag, etc.) It’s not that you don’t see any benefit in a longer barrel, but the gain tends to flatten out. Take a look at the muzzle energy graph for the 9mm Luger (9×19) and this is quickly apparent:

Take a look at the left side of that graph. There’s some indication that the bullets are actually slowing down in the last couple of inches of an 18″ barrel. Whether or not this is just a glitch in our earlier test data, or an indication that friction is starting to win out over the remaining energy from the expanding gas of a fired cartridge is something I’ve always wondered about. Clearly, at some point a bullet will start to slow down, even stop; anyone who has ever fired a squib load and had to hammer the bullet out of a barrel knows that this can indeed happen. But at what point would this effect start to be clear?
Good question. And not one we really wanted to spend the money on to find out. See, the barrel blanks we’ve used all along came in an 18″ length standard for pistol calibers/cartridges. Longer barrels were available from different sources, but there was a big jump up in price for those, and it just didn’t make much sense to get into that.
However …
When we started to set up to do the so-called “Glock Tests” we had to find a different source for our barrel blanks, since our other supplier couldn’t provide a polygonal barrel (the kind of barrel Glock uses, though they are not unique in this). We sourced the barrels from Lothar Walther. And as it turned out, their barrel blanks are longer than 18″. Specifically, we received a 26″ barrel with traditional land-and-groove rifling and a 24″ barrel with polygonal rifling. Here they are:

9mm barrel blanks
So …
Well, we didn’t want to spend the time and money doing full chop tests from 26/24 inches down to 18″. But we did decide to just go ahead and get some benchmark data at the full length, just for shits and grins. And here is the data for those lengths, along with data from 18″, 17″, and 16″ lengths for comparison:
PNW Arms STD P 115gr SCHP
Trad: 1074 fps 1161 fps 1163 fps 1171 fps
Poly: 1064 fps 1131 fps 1131 fps 1135 fps
Federal STD P 115gr Hi-Shok
Trad: 1305 fps 1330 fps 1333 fps 1330 fps
Poly: 1323 fps 1331 fps 1336 fps 1135 fps
CorBon +P 115gr DPX
Trad: 1117 fps 1232 fps 1249 fps 1236 fps
Poly: 1057 fps 1186 fps 1195 fps 1208 fps
Black Hills +P 115gr JHP
Trad: 1494 fps 1508 fps 1512 fps 1498 fps
Poly: 1496 fps 1521 fps 1515 fps 1518 fps
Federal STD P 147gr JHP
Trad: 1036 fps 1061 fps 1084 fps 1085 fps
Poly: 1046 fps 1088 fps 1098 fps 1088 fps
So, there ya go: in each and every case, there is a noticeable decrease in velocity in going from an 18″ barrel to either the 24″ or 26″ barrel. And keep in mind that the protocols for this test were 10 shots of each ammo at each barrel length over two chrono units, rather than just 3 shots as we had done for previous chop tests.
Not too surprising, but nice to see actual data.
We hope to have the full data sets, with charts & graphs, up on the website soonish (maybe next week?). Watch here and on our FaceBook page for a posting when it is available.
Jim Downey
-
Archives
- April 2024 (1)
- March 2024 (1)
- May 2023 (4)
- April 2023 (1)
- August 2022 (1)
- July 2022 (3)
- May 2021 (1)
- March 2021 (1)
- December 2020 (1)
- September 2020 (4)
- August 2020 (10)
- July 2020 (1)
-
Categories
- .22
- .223
- .22WMR
- .25 ACP
- .30 carbine
- .32 ACP
- .32 H&R
- .327 Federal Magnum
- .357 Magnum
- .357 SIG
- .38 Special
- .380 ACP
- .40 S&W
- .41 Magnum
- .44 Magnum
- .44 Special
- .45 ACP
- .45 Colt
- .45 Super
- .450 SMC
- .460 Rowland
- 10mm
- 6.5 Swedish
- 9mm Luger (9×19)
- 9mm Mak
- 9mm Ultra
- Anecdotes
- black powder
- Boberg Arms
- Data
- Discussion.
- General Procedures
- historic rifles
- Links
- Revolver
- Shotgun ballistics
- Uncategorized
-
RSS
Entries RSS
Comments RSS
