Making a 15th century Hand Gonne
Last Spring I made a 14th century style Hand Gonne from bronze stock using minimal tools and equipment, just to see what was possible. That project turned out to be a big success, and the resultant hand gonne has been popular among friends and when I taught last year’s workshops on “Primitive Black Powder Firearms” for the Liberal Gun Club‘s Annual Meeting in Las Vegas.
Well, last month a local auction site I follow had a sale of various firearms, part, and accessories. Included was what was billed as a ‘bucket of barrels’. Looking over the listing, it was clear it was mostly old shotgun barrels, a bunch of .22 barrels, and what looked to be a half dozen or so very old, and very rusty, black powder rifle barrels. Just for grins, I bid a small amount, and wound up winning. When I went to collect the barrels, I swear the auction house had added a number of other misc barrels, probably just to get rid of them. Here’s the bucket I brought home:

And after basic rust removal with phosphoric acid:

After examining what I actually had, it occurred to me that I might be able to use some of these to make another black powder firearm. The original black powder barrels were too far gone to safely use, but the shotgun barrels had potential.
In thinking it over, I decided to make a slightly later style of Hand Gonne, and again to see if I could do it with minimal tools, to demonstrate the possibilities if others wanted to make their own.
Now, before we go any further, let’s get a few important caveats in place, like last time:
- This is a description of how I made a black powder hand gonne for my own use
- I am not recommending that you make a black powder hand gonne
- If you do decide to make a black powder hand gonne, I am not recommending that you make it this way
- Any black powder hand gonne is potentially dangerous, and if you make one, the risk is entirely on you
- A black powder hand gonne is a firearm, and all the rules of safe handling and usage of a firearm apply
- Lastly: I selected a barrel from a single-shot shotgun, the style of which I have never owned, so as to reduce the likelihood that someone might think I was making an illegal short-barrel shotgun, and I plugged that barrel shortly after cutting it down.
OK, we clear about that? Good.
The tools and materials needed.
In thinking it through, I decided that the most basic tools needed for this project would be:
- Electric drill with a 3/8″ chuck (or larger), misc drill bits
- Hacksaw
- Basic hammer and/or ballpeen hammer
- Hand sledgehammer or small anvil
- Clamps or vise
- Metal files
- Wood chisels or gouges
- Propane torch or similar
- Measuring tape/yardstick/square or similar
Now, some additional tools that are common, and which I used to speed up the whole process:
- Belt sander
- Bench grinder
- Dremel or similar rotary tool with various small bits
- Side-cutting pliers
Pretty basic, right? So is the list of materials needed:
- Mild steel rod 13/16″
- Silver soldering supplies (solder, flux, propane or similar torch)
- Sandpaper (various grades, starting with 60grit)
- Brass strap, 1/8″ x 1″, sufficient for 3 straps 5″ long
- 10d common nail or 1/4″ steel rod
- #10 x 3/4″ brass screws
- 2″ x 2″ x 48″ hardwood for the stock (finish size 1.5″ x 1.5″)
- Stain/finish for the stock, if desired
Selecting the barrel to use.
After the first bronze hand gonnes were developed, it wasn’t long before people started making similar weapons using iron or mild steel. Such firearms would be lighter, stronger, and at least in theory easier to make.
So adapting an old shotgun barrel to make a 15th century style hand gonne made sense.
A 12ga shotgun is nominally supposed to have a 0.729″ inner diameter barrel. I wanted the new hand gonne to be about that size, so one of the old 12ga barrels was perfect. I looked over the options from my bucket of barrels, and selected one using the following criteria:
- Condition: surface rust was acceptable, but not severe pitting or signs of cracks
- From a style of shotgun I did not own (to avoid someone thinking I was doing something nefarious)
- With a suitable lower projection of hardware which would aid in mounting the barrel securely
The one I picked had been of a common design for single shot 12ga shotguns from the early 1900s. I do not now, nor had I ever, owned such a shotgun, so I was reasonably confident that no one would think I was trying to make an illegal shotgun. I also intended on plugging the breech soon after cutting it to length to render it unusable as a conventional shotgun. This style of shotgun barrel has a heavy lug welded on the bottom of the barrel which was part of the original design, and that would prove useful for making sure it was securely mounted to the stock. Here’s the one I chose:

And after cleaning (the one on the bottom):

And just to be on the safe side, I used calipers to check the actual diameter of the barrel so I could order lead balls for ammo. And I’m very glad I did — while 12ga is nominally 0.729″, the barrel was just under 0.700″. I ordered .69cal lead balls.
Barrel prep and plugging.
The first step was to remove the surface rust on both the inside and the outside of the barrel. On the outside this was accomplished with a wire wheel. On the inside I used some #2 coarse steel wool mounted on a mandrel (in this case, a long lag screw with the head cut off) in my drill:

Next, I needed to prep and plug the breech of the barrel. This plug would be secured using three different methods: friction, silver solder, and steel rivet.
I checked the ID (inner diameter) of the breech/chamber, and it was right at 0.800″, after cleaning. So I needed a piece of mild steel rod about that diameter. A piece of 13/16″ rod specs out to 0.8125″, so that’s what I got. A bit of sanding the interior of the breech/chamber with fine sandpaper, and then doing the same with the rod got them almost the same diameter. With a little gentle force I could insert the rod about half an inch into the breech. That was a good start.
What I did next was use my propane torch to heat up the breech end of the barrel. Since the barrel is hollow, when heated it would increase the ID slightly as the metal expanded due to the heat. I’d marked the rod at the 1.5″ mark, which I figured would be a sufficient length of plug. Once the breech end of the barrel was heated, I inserted the rod to the mark, then cut it off flush with the back of the breech:


As the breech of the barrel cooled, it would contract and cinch down on the plug. So long as there was no sign of the barrel splitting, I figured it would be secure. I checked using another piece of steel rod and a hand sledge, seeing if I could move the plug at all. I could not.
Next, I used basic silver soldering skills to fill the void at the very back of the breech:

After clean up, the solder joint looked and felt good:

Lastly, I drilled through the barrel and plug at about 0.75″ from the back of the breech (so halfway into the plug), and put a rivet through the entire barrel, using a common 10d (10 penny) nail. You can substitute a 1/4″ iron rod for this. After peening over the rivet ends, I smoothed those over with a file. Unfortunately, I seem to have forgotten to take an image of this step.
Preparing the stock.
I selected a piece of 2″ x 2″ x 48″ red oak from a local lumber yard, which had actual dimensions of 1.5″ x 1.5″ x 48″.
First I positioned and then marked where the barrel needed to be mounted:

Then I used gouges and chisels to carve a shallow gully for the barrel to rest in, with deeper areas for the small stud and the big lug on the bottom of the barrel:
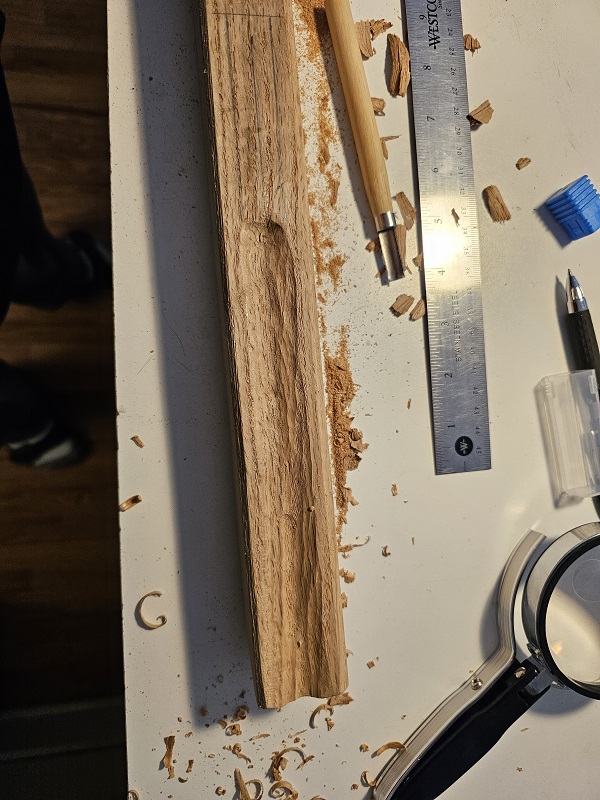


I periodically checked to see how the barrel would rest, until I got it to where I wanted. Then using a belt sander, I beveled the corners to almost an octagonal shape and shaped the front of the stock, and gave it a light finish sanding:


Lastly, I stained it:

Making the bands and mounting the barrel.
I decided that I wanted to use brass mounting straps for aesthetic reasons. This would hearken back to the bronze hand gonne, and indicate that it was supposed to be a transitional form. I used 1/8″ x 1″ straps.
1/8th” brass strap is stronger than you think. Well, at least it was stronger than I thought. I figured that it would be a fairly easy matter to hammer it into shape using some basic metalworking tools.
I was wrong.
Eventually I got it done, but it took multiple applications of heat from my propane torch, then hammering using different metal forms I had. But eventually I got the basic shape done:

After a little clean up and trimming:

I decided that I didn’t like the look of the raw oiled steel barrel with the rest of the gonne, so I cleaned it and then used a commercial gun blueing paste to darken it. Then I drilled the mounting holes and counter-sunk them:

I also positioned and then drilled the touch hole, so it was just in front of the front of the breech plug, and created a small ‘pan’ to hold gunpowder if I didn’t want to use fuse.
Then it was a simple matter to install the brass screws. I wanted to use solid brass rather than plated, for good color match. I thought they would be strong enough, but if they fail I can go to steel screws:


Proofing the hand gonne.
The usual recommended procedure to test a home-made black powder firearm for safety is to take it to the range, put a double load of powder into it with a lead ball, secure the firearm, and then fire it from a safe distance using a string or fuse or whatever is necessary. I’d come to prefer using cannon fuse for shooting the first hand gonne, so had it on hand for this purpose.
I got out to my range on a cool Monday morning, when I was reasonably sure that no one else would be there. I wanted to avoid putting anyone else at risk, on the off chance that my project didn’t work out and wasn’t safe. That is, if the thing blew up, I wanted everyone else to be clear.
I set up a large sheet of cardboard (about 2×4′), about 10 yards from the gonne. I put in 120gr of FFg black powder, twice the standard load I’ll shoot out of the thing, along with a .69cal lead ball (500gr). I then laid the gonne down on a picnic table, with a pair of leather gloves under the muzzle end to maintain a slight elevation. Then I positioned a metal ammo box beside the gonne as a protective barrier for my phone, with an inexpensive mirror positioned so the phone was protected but would record the first firing of the gonne . I positioned my usual range bag on the back of the stock to help hold it in place. Like this:

And here’s the slow-motion firing of the proof charge:
And this was the result:

The first thing I did was closely examine the gonne for any signs of damage or stress. It looked pristine, except for some dirt and gravel dust from falling on the ground. Then I checked the target. The first shot was partially in the bull’s eye (luck!). The second shot, also from a resting position on the table, with a ‘normal’ charge of 60gr of FFg, hit the upper right of the target:

I went ahead and shot it a third time, again with a normal charge, but this time holding it and shooting it as I normally would. Again, I noticed a fair amount of recoil, even given the substantial weight of the whole thing (I’d guess ~10 pounds or so). But it’s not the sort of thing that most people would mind at all. The third shot was on the lower left corner of the target:

Given the very basic design of this thing, it’s still respectable in terms of control and power. I didn’t chrono it, but based on previously checking black powder guns, I’d guess that the .69 ball was probably traveling about 800fps. That gives a muzzle energy of about about 700 ft/lbs, or about what a modern .357mag revolver with a 4″ barrel would do. Even dropping the velocity down to just 600fps, you’re getting the kind of performance you see out of a short barrel 9mm carbine. In other words, it’s an effective weapon, at least at moderate range. Not bad for a technology that is almost 600 years old.
Conclusions.
To repeat myself from the start:
- This is a description of how I made a black powder hand gonne for my own use
- I am not recommending that you make a black powder hand gonne
- If you do decide to make a black powder hand gonne, I am not recommending that you make it this way
- Any black powder hand gonne is potentially dangerous, and if you make one, the risk is entirely on you
- A black powder hand gonne is a firearm, and all the rules of safe handling and usage of a firearm apply
- Lastly: I selected a barrel from a single-shot shotgun, the style of which I have never owned, so as to reduce the likelihood that someone might think I was making an illegal short-barrel shotgun, and I plugged that barrel shortly after cutting it down.
As noted, after the ‘proof’ shot, I did a close inspection of the hand gonne. There were no signs that anything had shifted or been stressed. Same thing after the two subsequent ‘normal’ charges were shot. So my conclusion is that the gonne is safe, though of course I will keep a close eye on it going forward. My experience with the bronze version I made last year gives me some confidence that this one will hold up fine, but I don’t want to take that for granted.
And overall, I’d have to say that the project was a success. It is possible for an average person, using common, non-specialized tools and a little ingenuity, to make their own reproduction 15th century hand gonne with modern materials and an old shotgun barrel. My total cost out-of-pocket for this project was under $50, because rusty old shotgun barrels are pretty cheap.
Thanks for coming along for the ride. Feel free to share.
Jim Downey
-
Archives
- April 2024 (1)
- March 2024 (1)
- May 2023 (4)
- April 2023 (1)
- August 2022 (1)
- July 2022 (3)
- May 2021 (1)
- March 2021 (1)
- December 2020 (1)
- September 2020 (4)
- August 2020 (10)
- July 2020 (1)
-
Categories
- .22
- .223
- .22WMR
- .25 ACP
- .30 carbine
- .32 ACP
- .32 H&R
- .327 Federal Magnum
- .357 Magnum
- .357 SIG
- .38 Special
- .380 ACP
- .40 S&W
- .41 Magnum
- .44 Magnum
- .44 Special
- .45 ACP
- .45 Colt
- .45 Super
- .450 SMC
- .460 Rowland
- 10mm
- 6.5 Swedish
- 9mm Luger (9×19)
- 9mm Mak
- 9mm Ultra
- Anecdotes
- black powder
- Boberg Arms
- Data
- Discussion.
- General Procedures
- historic rifles
- Links
- Revolver
- Shotgun ballistics
- Uncategorized
-
RSS
Entries RSS
Comments RSS
