Making a 15th century Hand Gonne
Last Spring I made a 14th century style Hand Gonne from bronze stock using minimal tools and equipment, just to see what was possible. That project turned out to be a big success, and the resultant hand gonne has been popular among friends and when I taught last year’s workshops on “Primitive Black Powder Firearms” for the Liberal Gun Club‘s Annual Meeting in Las Vegas.
Well, last month a local auction site I follow had a sale of various firearms, part, and accessories. Included was what was billed as a ‘bucket of barrels’. Looking over the listing, it was clear it was mostly old shotgun barrels, a bunch of .22 barrels, and what looked to be a half dozen or so very old, and very rusty, black powder rifle barrels. Just for grins, I bid a small amount, and wound up winning. When I went to collect the barrels, I swear the auction house had added a number of other misc barrels, probably just to get rid of them. Here’s the bucket I brought home:

And after basic rust removal with phosphoric acid:

After examining what I actually had, it occurred to me that I might be able to use some of these to make another black powder firearm. The original black powder barrels were too far gone to safely use, but the shotgun barrels had potential.
In thinking it over, I decided to make a slightly later style of Hand Gonne, and again to see if I could do it with minimal tools, to demonstrate the possibilities if others wanted to make their own.
Now, before we go any further, let’s get a few important caveats in place, like last time:
- This is a description of how I made a black powder hand gonne for my own use
- I am not recommending that you make a black powder hand gonne
- If you do decide to make a black powder hand gonne, I am not recommending that you make it this way
- Any black powder hand gonne is potentially dangerous, and if you make one, the risk is entirely on you
- A black powder hand gonne is a firearm, and all the rules of safe handling and usage of a firearm apply
- Lastly: I selected a barrel from a single-shot shotgun, the style of which I have never owned, so as to reduce the likelihood that someone might think I was making an illegal short-barrel shotgun, and I plugged that barrel shortly after cutting it down.
OK, we clear about that? Good.
The tools and materials needed.
In thinking it through, I decided that the most basic tools needed for this project would be:
- Electric drill with a 3/8″ chuck (or larger), misc drill bits
- Hacksaw
- Basic hammer and/or ballpeen hammer
- Hand sledgehammer or small anvil
- Clamps or vise
- Metal files
- Wood chisels or gouges
- Propane torch or similar
- Measuring tape/yardstick/square or similar
Now, some additional tools that are common, and which I used to speed up the whole process:
- Belt sander
- Bench grinder
- Dremel or similar rotary tool with various small bits
- Side-cutting pliers
Pretty basic, right? So is the list of materials needed:
- Mild steel rod 13/16″
- Silver soldering supplies (solder, flux, propane or similar torch)
- Sandpaper (various grades, starting with 60grit)
- Brass strap, 1/8″ x 1″, sufficient for 3 straps 5″ long
- 10d common nail or 1/4″ steel rod
- #10 x 3/4″ brass screws
- 2″ x 2″ x 48″ hardwood for the stock (finish size 1.5″ x 1.5″)
- Stain/finish for the stock, if desired
Selecting the barrel to use.
After the first bronze hand gonnes were developed, it wasn’t long before people started making similar weapons using iron or mild steel. Such firearms would be lighter, stronger, and at least in theory easier to make.
So adapting an old shotgun barrel to make a 15th century style hand gonne made sense.
A 12ga shotgun is nominally supposed to have a 0.729″ inner diameter barrel. I wanted the new hand gonne to be about that size, so one of the old 12ga barrels was perfect. I looked over the options from my bucket of barrels, and selected one using the following criteria:
- Condition: surface rust was acceptable, but not severe pitting or signs of cracks
- From a style of shotgun I did not own (to avoid someone thinking I was doing something nefarious)
- With a suitable lower projection of hardware which would aid in mounting the barrel securely
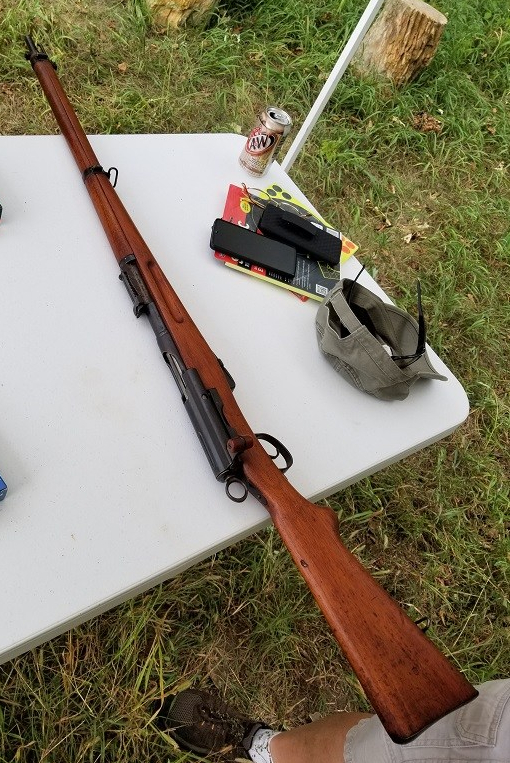
The one I picked had been of a common design for single shot 12ga shotguns from the early 1900s. I do not now, nor had I ever, owned such a shotgun, so I was reasonably confident that no one would think I was trying to make an illegal shotgun. I also intended on plugging the breech soon after cutting it to length to render it unusable as a conventional shotgun. This style of shotgun barrel has a heavy lug welded on the bottom of the barrel which was part of the original design, and that would prove useful for making sure it was securely mounted to the stock. Here’s the one I chose:

And after cleaning (the one on the bottom):

And just to be on the safe side, I used calipers to check the actual diameter of the barrel so I could order lead balls for ammo. And I’m very glad I did — while 12ga is nominally 0.729″, the barrel was just under 0.700″. I ordered .69cal lead balls.
Barrel prep and plugging.
The first step was to remove the surface rust on both the inside and the outside of the barrel. On the outside this was accomplished with a wire wheel. On the inside I used some #2 coarse steel wool mounted on a mandrel (in this case, a long lag screw with the head cut off) in my drill:

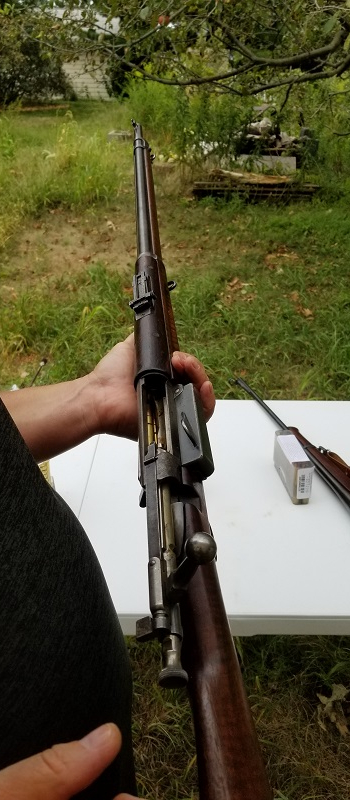
Next, I needed to prep and plug the breech of the barrel. This plug would be secured using three different methods: friction, silver solder, and steel rivet.
I checked the ID (inner diameter) of the breech/chamber, and it was right at 0.800″, after cleaning. So I needed a piece of mild steel rod about that diameter. A piece of 13/16″ rod specs out to 0.8125″, so that’s what I got. A bit of sanding the interior of the breech/chamber with fine sandpaper, and then doing the same with the rod got them almost the same diameter. With a little gentle force I could insert the rod about half an inch into the breech. That was a good start.
What I did next was use my propane torch to heat up the breech end of the barrel. Since the barrel is hollow, when heated it would increase the ID slightly as the metal expanded due to the heat. I’d marked the rod at the 1.5″ mark, which I figured would be a sufficient length of plug. Once the breech end of the barrel was heated, I inserted the rod to the mark, then cut it off flush with the back of the breech:


As the breech of the barrel cooled, it would contract and cinch down on the plug. So long as there was no sign of the barrel splitting, I figured it would be secure. I checked using another piece of steel rod and a hand sledge, seeing if I could move the plug at all. I could not.
Next, I used basic silver soldering skills to fill the void at the very back of the breech:

After clean up, the solder joint looked and felt good:

Lastly, I drilled through the barrel and plug at about 0.75″ from the back of the breech (so halfway into the plug), and put a rivet through the entire barrel, using a common 10d (10 penny) nail. You can substitute a 1/4″ iron rod for this. After peening over the rivet ends, I smoothed those over with a file. Unfortunately, I seem to have forgotten to take an image of this step.
Preparing the stock.
I selected a piece of 2″ x 2″ x 48″ red oak from a local lumber yard, which had actual dimensions of 1.5″ x 1.5″ x 48″.
First I positioned and then marked where the barrel needed to be mounted:

Then I used gouges and chisels to carve a shallow gully for the barrel to rest in, with deeper areas for the small stud and the big lug on the bottom of the barrel:
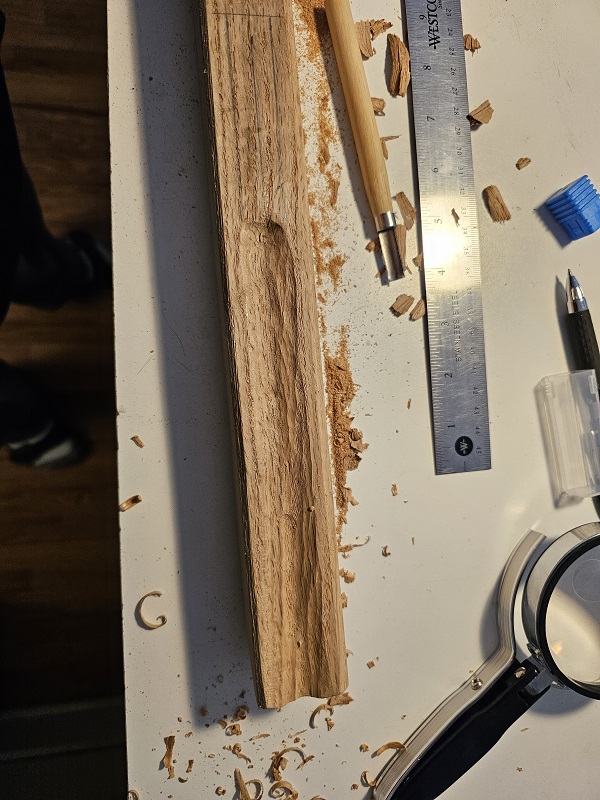


I periodically checked to see how the barrel would rest, until I got it to where I wanted. Then using a belt sander, I beveled the corners to almost an octagonal shape and shaped the front of the stock, and gave it a light finish sanding:


Lastly, I stained it:

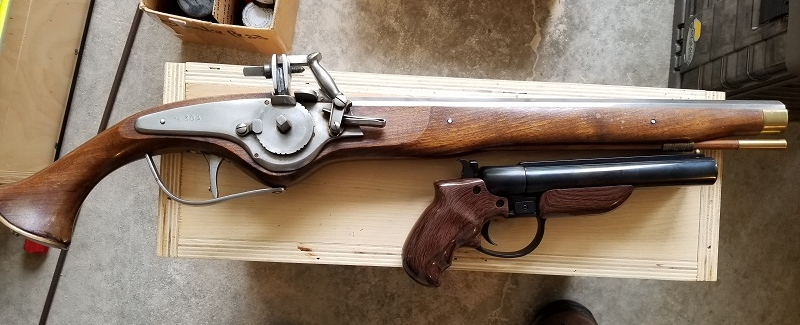
Making the bands and mounting the barrel.
I decided that I wanted to use brass mounting straps for aesthetic reasons. This would hearken back to the bronze hand gonne, and indicate that it was supposed to be a transitional form. I used 1/8″ x 1″ straps.
1/8th” brass strap is stronger than you think. Well, at least it was stronger than I thought. I figured that it would be a fairly easy matter to hammer it into shape using some basic metalworking tools.
I was wrong.
Eventually I got it done, but it took multiple applications of heat from my propane torch, then hammering using different metal forms I had. But eventually I got the basic shape done:

After a little clean up and trimming:

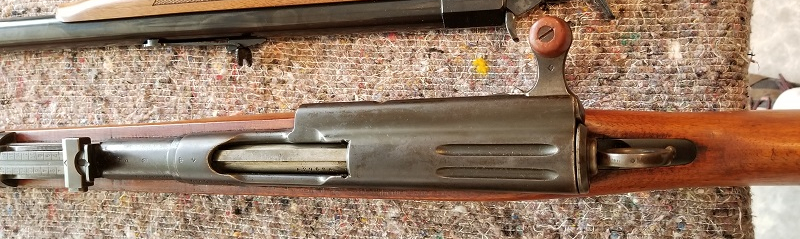
I decided that I didn’t like the look of the raw oiled steel barrel with the rest of the gonne, so I cleaned it and then used a commercial gun blueing paste to darken it. Then I drilled the mounting holes and counter-sunk them:

I also positioned and then drilled the touch hole, so it was just in front of the front of the breech plug, and created a small ‘pan’ to hold gunpowder if I didn’t want to use fuse.
Then it was a simple matter to install the brass screws. I wanted to use solid brass rather than plated, for good color match. I thought they would be strong enough, but if they fail I can go to steel screws:


Proofing the hand gonne.
The usual recommended procedure to test a home-made black powder firearm for safety is to take it to the range, put a double load of powder into it with a lead ball, secure the firearm, and then fire it from a safe distance using a string or fuse or whatever is necessary. I’d come to prefer using cannon fuse for shooting the first hand gonne, so had it on hand for this purpose.
I got out to my range on a cool Monday morning, when I was reasonably sure that no one else would be there. I wanted to avoid putting anyone else at risk, on the off chance that my project didn’t work out and wasn’t safe. That is, if the thing blew up, I wanted everyone else to be clear.
I set up a large sheet of cardboard (about 2×4′), about 10 yards from the gonne. I put in 120gr of FFg black powder, twice the standard load I’ll shoot out of the thing, along with a .69cal lead ball (500gr). I then laid the gonne down on a picnic table, with a pair of leather gloves under the muzzle end to maintain a slight elevation. Then I positioned a metal ammo box beside the gonne as a protective barrier for my phone, with an inexpensive mirror positioned so the phone was protected but would record the first firing of the gonne . I positioned my usual range bag on the back of the stock to help hold it in place. Like this:

And here’s the slow-motion firing of the proof charge:
And this was the result:

The first thing I did was closely examine the gonne for any signs of damage or stress. It looked pristine, except for some dirt and gravel dust from falling on the ground. Then I checked the target. The first shot was partially in the bull’s eye (luck!). The second shot, also from a resting position on the table, with a ‘normal’ charge of 60gr of FFg, hit the upper right of the target:

I went ahead and shot it a third time, again with a normal charge, but this time holding it and shooting it as I normally would. Again, I noticed a fair amount of recoil, even given the substantial weight of the whole thing (I’d guess ~10 pounds or so). But it’s not the sort of thing that most people would mind at all. The third shot was on the lower left corner of the target:

Given the very basic design of this thing, it’s still respectable in terms of control and power. I didn’t chrono it, but based on previously checking black powder guns, I’d guess that the .69 ball was probably traveling about 800fps. That gives a muzzle energy of about about 700 ft/lbs, or about what a modern .357mag revolver with a 4″ barrel would do. Even dropping the velocity down to just 600fps, you’re getting the kind of performance you see out of a short barrel 9mm carbine. In other words, it’s an effective weapon, at least at moderate range. Not bad for a technology that is almost 600 years old.
Conclusions.
To repeat myself from the start:
- This is a description of how I made a black powder hand gonne for my own use
- I am not recommending that you make a black powder hand gonne
- If you do decide to make a black powder hand gonne, I am not recommending that you make it this way
- Any black powder hand gonne is potentially dangerous, and if you make one, the risk is entirely on you
- A black powder hand gonne is a firearm, and all the rules of safe handling and usage of a firearm apply
- Lastly: I selected a barrel from a single-shot shotgun, the style of which I have never owned, so as to reduce the likelihood that someone might think I was making an illegal short-barrel shotgun, and I plugged that barrel shortly after cutting it down.
As noted, after the ‘proof’ shot, I did a close inspection of the hand gonne. There were no signs that anything had shifted or been stressed. Same thing after the two subsequent ‘normal’ charges were shot. So my conclusion is that the gonne is safe, though of course I will keep a close eye on it going forward. My experience with the bronze version I made last year gives me some confidence that this one will hold up fine, but I don’t want to take that for granted.
And overall, I’d have to say that the project was a success. It is possible for an average person, using common, non-specialized tools and a little ingenuity, to make their own reproduction 15th century hand gonne with modern materials and an old shotgun barrel. My total cost out-of-pocket for this project was under $50, because rusty old shotgun barrels are pretty cheap.
Thanks for coming along for the ride. Feel free to share.
Jim Downey
“Heavy” .25acp? Isn’t that a contradiction??
Last year Buffalo Bore came out with two loadings of what they called HEAVY 25 ACP Pistol and Handgun Ammo, saying that it was standard pressure but heavy-for-caliber and which met the FBI penetration criteria. We got some, and decided to do an informal test recently to see if it performed as promised.
First off, .25acp is not my preferred choice for a self-defense round out of any platform. When we tested the cartridge, the available SD ammo all came in at between 60 and 70 ft/lbs of muzzle energy (M.E.) That’s … not much. And penetration tests others had conducted were unimpressive. Sure, a .25 can kill, and Vasily Blokhin executed thousands of prisoners with one (well, several), but that hardly qualifies as self defense. Given the options, I’d almost always pick something better for protection.
But sometimes, you gotta go with what you got. And if all you have is a .25acp, at least you want the best ammo for it. That’s why BB came out with these two new loadings.
Since this was just an informal test, we only had a radar chronograph, and these two handguns to try:

That’s a Beretta 21A Bobcat on top, and a Bernadelli Baby .25 below it. The Beretta has a 2.4″ barrel, the Bernadelli a 2.0″ one. The Beretta is small, but the Bernadelli is tiny — I could only get my middle finger on the grip, holding the gun between that and my thumb with my index finger on the trigger.
Here’s the ammo:

That’s BB’s 60 gr. Hard Cast FN and the 50 gr. FMJ-RN loads, and you’ll find Buffalo Bore’s claims on those pages for how the loads performed out of four different handguns, including a Beretta Bobcat.
So, how did it go? Pretty well. Here are my data notes:

That’s an average of 841fps for the Hard Cast out of the Beretta, and 758fps out of the Bernadelli. The FMJ was 871fps out of the Beretta and 807fps from the Bernadelli. That’s right in the ballpark of what Buffalo Bore claims. Unsurprising, since Buffalo Bore has consistently performed as claimed, in my experience.
It’s also important to note that both loadings seem to meet the FBI’s penetration protocol. This indicates that it should be lethal if shot placement is good.
.25acp still wouldn’t be my choice for self defense. But particularly with the Buffalo Bore ammo, you could do worse.
Jim Downey
Goodbye Tavor TS12, Hello KS7.
Two years ago, I closed a blog post with this:
Overall, I’m very happy with the Tavor TS12. Altogether I ran about 75 shells through it in an hour, half the light target loads, the other half full-power, high-brass slugs and 00Buck. It’s been decades since I shot a 12 gauge that much in that short a period of time, and my shoulder isn’t the slightest bit sore.
Yeah, the TS12 is a keeper.
Well, it was, up until this week.
Why? What happened?
This:

That’s a friend’s brand-new Kel Tec KS7.
Let me explain: one of the other BBTI guys got this, and brought it out to try … specifically, with 12ga minishells. Both Aguila slugs and Federal 4B defensive loads.
We ran a BUNCH of minishells through it. Not one single misfire, mis-feed, or problem. It just ate ’em all and asked for more. At 25 yards, we shot the sh!t out of targets for the better part of an hour.
And here’s the thing: with the minishells, the gun held 12+1 rounds (12 in the tube, one in the chamber). Recoil was modest, operation was simple and intuitive (as is the case with most pump shotguns), and the basic fiber-optic sight was more than adequate for the distances we were shooting (and for any expected use I would have).
By the time we were done, I knew I wanted one of these, if for no other reason than it would be much easier for my Good Lady Wife to handle if need arose. She had shot the Tavor, but never really took to it, and it was heavier and a little more for her to wrangle than she was really comfortable with.
Now, don’t get me wrong — I like the Tavor TS12. A lot. I still think that it is a hell of a gun, and it handles the full-power, full size 12ga rounds with aplomb. So I had zero qualms about offering it to an old friend, at a decent price, and then rolling that sale over into this:

I could have just kept the Tavor, of course, but I tend to have guns for specific uses, and the 12 shot KS7 filled the same niche as the 15 shot Tavor: home defense. I’ll probably put a light on it, but no optic — it’s just not needed with the standard fiber optic sight — though I may change my mind on that as time goes on. We’ll see.
In looking over reviews of the KS7 before I made the final purchase, one of the things that I read was that while using minishells was fine, loading minishells was a little more tricky than loading standard-sized shells, particularly under stress. And I think that’s a perfectly fair point; loading the slugs in particular was a little tricky.
So my solution will be to load the gun with minishells, but keep standard sized shells in a bandoleer for reloads (if they’re needed). It’s exactly what I planned for the Tavor if I ever needed it, so it’s no change at all for me.
One last thing: why not just get a KSG? That’s the double-tube 12ga predecessor from Kel Tec.
I’ve shot the KSG. Nice gun. But fully loaded, the KSG is closer to the Tavor in terms of weight and overall size. The real advantage of the KS7 is that it is thin, light, and basic. But I think it does come down to personal preference and intended use. YMMV.
Jim Downey
ETA: got a request for pics of the sight on the KS7. Here ya go:


An informal .32 H&R Magnum test, and a lesson relearned.
I’m not a fan of the .32acp for self-defense. But the .32 H&R mag or the .327 Federal mag are both respectable options, even out of a short barrel revolver. Since the 100gr Buffalo Bore Heavy 32 H&R Magnum +P ammo load wasn’t available when we did the .32 H&R tests, we weren’t sure how it would perform. And we decided to do some informal testing to find out, learning another lesson in the process that I thought I’d share.
We had both 5 shot and 6 shot versions of the Charter Arms Undercoverette snub nose:


Charter Arms sometimes has “hit or miss” quality control, but generally they seem to work just fine.
Anyway, we did chrono ammo out of both guns, and it performed in accord with the Buffalo Bore claims on their website:
- 1,054 fps – Taurus Ultra Light 2-inch barrel
That’s right at 250 ft/pounds of muzzle energy. Like I said, respectable. I sure as hell wouldn’t want to be shot by it.
However …

Take a close look at the primers.
Here’s another pic:

See how the primers stick up above the base of the case?
Yeah. Those are from the 5 shot version of the revolver. And each time, the primer protruded enough to lock up the cylinder, making the nice little revolver into a single-shot gun. And it happened every time.
It did not, however, happen with the 6 shot version. Same ammo. Same box. Completely different results. Oh, they chrono’d the same. But in one gun they rendered the firearm completely non-functional after the first shot.
So, the lesson: ALWAYS TEST YOUR CARRY AMMO IN YOUR CARRY GUN.
Yeah, I know you probably know this. I certainly know it, and always tell people to do it. But I’ve rarely seen such a clear object lesson showing it.
Why the difference? I don’t know. Could be that the recoil impulse in the 12oz version (the 5 shot) is just that much more powerful than in the 15oz version. That’s about the only thing I can think of.
Jim Downey
Review: M&P FPC.
Sometimes, smaller *is* better:

Yup, that’s the new Smith & Wesson M&P FPC (Folding Pistol Carbine), which I got to shoot recently.
I’m a big fan of Pistol Caliber Carbines, and am on record loving my Kel Tec Sub2000 folding carbine in 9mm. That gun has served me well for the last 20 years or so, and I’m not ready to get rid of it.
But the new M&P FPC is tempting. And if I didn’t already have my Sub2k already tricked-out/upgraded to my personal preferences, I’d jump on getting one immediately.
OK, so there’s my bottom line. Now, let’s talk about what I like particularly about the M&P FPC, and how it compares to the Sub2k.
The M&P FPC is something of an extension of the M&P line of pistols. It can use the same magazines as both the original version and the 2.0 version. The fire controls are the same, as are the grip modules. Anyone familiar with the M&P pistols will find themselves at home with this new carbine.
As is typically the case with Smith & Wesson products, everything is well made, and fit & finish are fine. We had no problems with the gun right out of the box. The gun folds and unfolds quickly, and even a novice user gets the hang of that mechanism after one or two tries. Location of the charging handle and folding release are logical and easy to use.
We slapped a basic Sig Sauer Romeo red dot on it and sighted it in. After that, it was easy to shoot out the bullseye of a target at 25 yards (max distance on the range we used). Seriously, all three of us shooting it could basically make one ragged hole when shooting supported, and do almost as well shooting unsupported while standing. The ergonomics are great on this PCC.
Recoil was also better than I expected. Both guns use a direct-blowback action, but the FPC has a nice recoil buffer built in, making it a soft-shooting gun that will please even someone who is recoil shy. That’s one regard in which it is better than my Sub2000.
Also, since the gun folds horizontally (off to the left), rather than flipping up like the Sub2000, you can mount an optic on it and not worry about it getting in the way (or being knocked off zero). Another improvement over the Kel Tec.
The bolt holds open after the last round. My Sub2k doesn’t.
The charging handle on the FPC doesn’t reciprocate, so there’s less of a chance to snag clothing (or beards!). My Sub2000 charging handle rarely snags, but it can (and has) on occasion.
There’s a clever mag holder on the FPC that holds two additional mags in the buttstock, and it is easy to remove a new mag and load it into the gun. My Sub2k has no such holder.
The trigger is good on the M&P. I had to upgrade the trigger on my Sub2000 with an after-market product.
As I mentioned, it’s easy to shoot well, and the ergonomics are good. I had no problems getting a good sight picture while wearing earmuffs, while that is still a problem with my Kel Tec. And while the Sub2000 still feels short in my hands (after adding a stock extension), the M&P felt fine.
The M&P FPC is wider than the Kel Tec Sub2000, due to the folding mechanism. The difference is 2.5″ for the M&P, 1.75″ for the Sub2k, so it’s not insignificant. The M&P is also slightly heavier bare, and significantly so with two additional fully-loaded 23 round magazines. But the weight is well balanced.
And the M&P comes in a nice, nondescript padded carrying case.
It’s a great little carbine. If I didn’t already have my Sub2000 operating just as I like, I’d be tempted. And to be honest, I’m tempted nonetheless.
Jim Downey
Making a 14th century Hand Gonne
Last Fall I taught a day-long workshop on “Primitive Black Powder Firearms” for the Liberal Gun Club‘s Annual Meeting in Las Vegas. In addition to my own black powder guns, I borrowed a couple of items from friends to help fill out the historical selection, including this very nice reproduction of a 14th century .62 cal cast bronze hand gonne:

I had shot the gun previously with friends, and it never fails to put a smile on people’s faces. It’s so simple: pour gunpowder down the muzzle, roll in a lead ball (tolerances for these guns are very slack, and the ball will roll right back out if you’re not careful), add a little powder to the touch-hole on the top, and light it off when ready. Very basic. Very fun. People in the workshop loved it.
And I decided that I wanted to get one of these for my own collection.
The problem is, they’re almost impossible to find. I spent a couple of months poking around online, asking friends, and the closest I could come were a couple of simple hand gonnes made using steel. Nice, but not what I was looking for.
So I started to think about making my own, and I consulted with an old friend who does bronze casting for his jewelry business. Turned out that it was certainly possible to do such a project, but it was bigger than my friend’s casting set-up could handle. We set aside the idea for the time being.
But I thought some more about it, and figured that such a bronze hand gonne was so simple, that it should be possible to make one without casting. I could order a bar of the appropriate alloy of bronze, have a machine shop bore it out, and do the external work myself. I tried contacting some local machine shops, explained what I wanted done. Most never responded. The ones that did had no interest in the project. I was stymied again.
By then, however, I was invested in the project. Again, I thought through just how basic the hand gonne was, and I figured that if I ordered the correct components, I would be able to make one without a machine shop. In fact, as I thought it through, I realized that it would be possible to make one just using some very basic modern tools which almost anyone would have or could get at a modest price. So I set out to do just that.
And this is the result.
Now, before we go any further, let’s get a few important caveats in place:
- This is a description of how I made a black powder hand gonne for my own use
- I am not recommending that you make a black powder hand gonne
- If you do decide to make a black powder hand gonne, I am not recommending that you make it this way
- Any black powder hand gonne is potentially dangerous, and if you make one, the risk is entirely on you
- A black powder hand gonne is a firearm, and all the rules of safe handling and usage of a firearm apply
OK, we clear about that? Good.
The tools and materials needed.
So, in thinking it through, I decided that the most basic tools needed for this project would be:
- Electric drill with a 1/2″ chuck, misc drill bits
- Hacksaw
- Basic hammer
- Hand sledgehammer or small anvil
- Clamps or vise
- Metal files
- Metal chisel (‘cold chisel’, 1/2″ wide or so)
- Measuring tape/yardstick/square or similar
- Calipers
Now, some additional tools that are common, and which I used to speed up the whole process:
- Belt sander
- Bench grinder
- Dremel or similar rotary tool with various small bits
- Side-cutting pliers
Pretty basic, right? So is the list of materials needed:
- Bronze stock
- Sandpaper (various grades, starting with 60grit)
- 1/2″ iron bar stock
- 3″ common nails (x2)
- Epoxy
- Duct or box tape
- 1.75″ x 48″ hardwood dowel for the stock
- Stain/finish for the stock, if desired
In addition, I used a number of bits of scrap wood, foam, and wood screws I had in my workshop. You’ll see.
Selecting the bronze stock to use.
I knew that historically, early black powder guns were typically constructed of a type of bronze called gunmetal or red brass. This is a bronze alloy containing mostly copper, some tin and lead, and a little zinc. I spent some time looking over modern bronze alloys which were readily available, and settled on “Bearing Bronze 932” as being a reasonable approximation of common gunmetal.
The modern metal industry offers a range of different types of products. What I figured was that I could get a product called “hollowbar”, which is basically a thick-walled pipe. That would allow me to select both the overall diameter and the wall thickness. By choosing a 1.75″ O.D. hollowbar with a 0.625″ I.D., I would get a suitable length of bronze which didn’t need to have a bore drilled into it. In addition, I ordered a length of round bar stock with a nominal 0.625″ O.D. that I could use as a breech plug. Metal prices fluctuate regularly, but I was able to get both pieces shipped for about $160.
Both pieces of bronze arrived. As expected, they were “overcast” — meaning that they were slightly larger than the specs given. The hollowbar was 13″ long, and the bore down the center of it was at 0.585″. The round bar stock was likewise 13″, and the O.D. was 0.675″. That meant that I would need to ream out the bore to .62 cal and shave down the bar to fit the finished diameter of the breech.

Reaming out the bore.
I didn’t order a solid length of bar stock because that would have required that I have the ability to drill out the bore. Even making a smooth-bore hand gonne (with no rifling) would present a substantial technological challenge which would have required, at a minimum, a floor-mounted drill press if not an actual metal lathe.
However, by ordering the hollowbar, I would already have the basic geometry of the hand gonne provided. The hole down the center would already be established. It would just be a matter of getting the bore to the correct diameter to handle a .62 cal lead ball.
To do this, I decided that the best approach would be to use a length of 1/2″ iron rod (called a mandrel) with a piece of sandpaper at the end, driven by the hand drill. It would take time, and require frequent changes of the sandpaper, but it would give me the ability to ream out the bore with a reasonable amount of control.
This is easy to do. You just use one piece of tape applied to the back of your piece of sandpaper, with a tab of about an inch protruding past the edge of the paper. Then you apply another piece of tape to the tab, and use the overhang to secure it to the mandrel. Like so:


The next thing I needed to do is secure the hollowbar stock so that I could spend time reaming out the bore without the stock moving. I decided to make a simple sandwich of scrap wood, dense foam, and screws to hold everything in place:


Then it was just a matter of reaming out the bore slowly, frequently stopping to change the sandpaper, dump out the waste material, check the progress, and let both the drill and the hollowbar cool down. It took a total of about 8 hours over four days to do this.

But, in the end, a .62 cal lead ball would pass freely through the length of the hollowbar:
Now, one thing I want to note: when you repeatedly insert a mandrel with sandpaper from one end, that end will tend to get over-reamed. So I was careful to consistently do this from the end of the hollowbar that I intended to be where it would be mounted to the wood stock later (i.e.; not the muzzle end).
Making the socket.
The hand gonne would need to be mounted to a stock of some kind. Historically, these seem to have been just a simple stave of wood, with the hand gonne stuck on the end. That was also the style of the others I’d seen in person, so it was what I decided to do.
There were a number of ways that such mounting could be accomplished. I considered the options and settled on just creating a hollow at the end of hand gonne that would accept about a 2″ deep piece of the stock.
Therefore, to make the socket, I needed to remove additional material to a depth of about 2″. To do this, I used a drill with a 5/32″ bit (marked with tape to a 2″ depth) to create a starting set of holes in a circle:


Then I went to a 1/4″ bit to remove more of the bulk:

After this, I used the cold chisel to start to cut through the remaining material:

And then the Dremel rotary tool with a steel carving tip to remove the rest of the bulk and thin down the sides some:


I wasn’t worried about it being perfectly symmetrical or smooth at the bottom, since these areas would be hidden by the stock.
Making and installing the breech plug.
Since I was starting with a length of hollowbar, which had a hole down the center of the entire length, I needed to close up and secure the breech of the gun. The historic models and modern versions which are cast just have a closed-off breech to start with, so this step isn’t necessary.
Black powder is a low-pressure propellant, and I could have probably just gotten away with inserting a tight plug of bronze and then mounting the hand gonne to the stock. But I wanted something that would be more secure. More secure, yet still low tech (no brazing or anything). I decided that a couple of mild steel rivets through the outside of the hand gonne, and through the plug to the other side, would be sufficient. But this meant that the plug would need to be long enough put a couple of rivets through. I settled on a 2″ plug.
Using the calipers, I checked the bronze rod, and confirmed that it was larger than what I wanted. I also checked by trying to insert the end into the breech end of the hand gonne, just to be safe. It was still 0.675″, so I needed to file/sand it down:

Checking frequently, I continued that until the rod would barely start to insert into the breech. Then, using the hacksaw, I cut off a 2″ long piece of it:

I did some additional sanding, then inserted it, first by hand, then using the hammer and the iron rod I’d used as a mandrel to ream out the bore:


Shaping the outside.
OK, first things first: at this point, you could rivet the breech plug in place, drill the touch-hole, mount the hand gonne, and use it. The shaping I’m about to show/discuss is not necessary to having a functional black powder firearm.
But the historical record shows that most of these were shaped and/or decorated in some fashion. Likewise most of the reproductions I’ve seen. I decided to do something similar to the design of the one my friend owns, though going with an octagon form rather than a hexagon one.
Why bother? Mostly just for aesthetic reasons. But also, the entire bulk of the hollowbar isn’t necessary for the hand gonne to be strong enough to function. You do want to have some extra bulk/strength to contain the primary explosion of the black powder, in the area that is called the “chamber”. But as the lead ball/bullet starts to move down the barrel, the pressure drops off quickly. Meaning that the barrel walls don’t need to be quite so thick/strong. By removing the excess, you can cut down on the weight of the hand gonne by about a third. I also decided that I liked the flare at the muzzle often seen on these guns, and thought it would help connect it visually to that history.
Since the final shape of the hand gonne is largely an aesthetic decision, what follows is just a quick photo-essay of the steps I took to come up with my preferred design. Also, while I started out using a file, I almost immediately shifted over to using a belt sander to get the overall shape, then a bench grinder to rough out the barrel, followed by more use of the belt sander. Basic shaping was done using a 60grit belt, then finished with a 150grit belt.
First, I marked the end of the muzzle with the basic shape I wanted:

Then I put it back into the trough to hold it in place:

I chose an octagon shape for a simple reason: it would be easier to keep it aligned in the trough while working.


Once the overall shape was defined, I started to cut down the barrel bulk:


This all actually went faster than I expected, just a couple hours work with the belt sander & grinder, with frequent stops to check dimensions with the calipers.


Securing the breech plug and drilling the touch hole.
Once I had the exterior shape mostly finished, it was time to secure the breech plug with a couple of mild steel rivets and drill the touch-hole (how you fire the hand gonne).
The first step was to carefully measure and mark the locations of the rivets and the touch-hole. I did this by using a dowel from both the back of the socket and from the muzzle. I wanted the rivets to be evenly spaced about 1/3 the way from the front and the back of the breech plug, and the touch-hole to be positioned so that it was just in front of the breech plug.
Using a Sharpie, I marked the location of each of the holes. First I used a 7/64″ bit and drilled the touch hole, centered on that face of the octagon and angling slightly back into the chamber for the black powder. This would tend to force the jet of hot gas forward away from the shooter when the gonne was fired. I used a larger drill bit to start a larger hole just on the surface — the beginning of a simple ‘pan’ to hold a small amount of black powder.
Then I selected a drill bit the same diameter of the 3″ nails I was going to use for the rivets, and drilled through the exterior of the hand gonne, the breech plug, and out the other side of the hand gonne:

Next I used the Dremel tool with a small grinding head to deepen the ‘pan’ and slightly counter-sink the holes for the rivets. I cut off the head of the nails, and inserted them through the holes, cutting them off with about a 1/8″ protruding from either side. Then these were hammered (with a hand sledge under them, though if you have an anvil that will work better) so that the mild steel filled the counter-sunk area:


Next I dressed those areas again using the belt sander and 150grit paper:


Shaping and mounting the stock.
I’d hoped to find a suitable length of oak, ash, or hickory to use as the stock. I settled for a 1.75″ x 48″ poplar dowel I was able to select at a local lumbar yard.
The first thing was to shape the end to fit the socket:

Once I had it so that it fit, I needed to secure it. I decided that normal 5-minute epoxy would be sufficient for this purpose. So I did some additional undercutting of both the dowel and the socket walls (so that the epoxy would fill in those, and couldn’t just pull loose). Then I mixed the epoxy, poured it into the socket, and shoved the dowel into place. To hold everything in place for the 24 hours needed to let the epoxy cure, I used this high-tech set up:

Surprisingly, this worked, and the dowel rod was almost perfectly straight off the back of the hand gonne.
I had debated whether or not to leave the dowel round, or to put partial flats on it, or what. But once the epoxy had set, the round dowel just didn’t feel right, so I decided to go ahead and use the belt sander to shape the dowel into the same shape/dimensions as the hand gonne:


If you look carefully, you can see the slight skew of the hand gonne off to the left. It’s only 3 or 4 degrees, and really isn’t noticeable when you actually hold the thing, but it is there. I decided not to worry about it.
I wanted to have some basic surface protection for the stock, so used some dark walnut colored Danish Wood Oil I had available:

Proofing the hand gonne.
The usual recommended procedure to test a home-made black powder firearm for safety is to take it to the range, put a double load of powder into it with a lead ball, secure the firearm, and then fire it from a safe distance using a string or fuse or whatever is necessary. I’d ordered in some cannon fuse for just this purpose.
I got out to my range on a cool Friday morning, when I was reasonably sure that no one else would be there. I wanted to avoid putting anyone else at risk, on the off chance that my project didn’t work out and wasn’t safe. That is, if the thing blew up, I wanted everyone else to be clear.
I set up a large sheet of cardboard (about 2×4′), about 7 yards from the gonne. I put in 120gr of FFg black powder, twice the standard load I’ll shoot out of the thing, along with a .62cal lead ball (345gr). I then laid the gonne down on a picnic table, with a fold piece of cloth under the muzzle end to maintain a slight elevation. Then I positioned my black powder range box (minus the black powder casks) balancing on the stock just behind the gonne as a protective barrier. I positioned my usual range bag on the back of the stock to help hold it in place. And I set up an inexpensive mirror and my smart phone so the phone was protected but would record the first firing of the gonne. Like this:

I cut a 6″ length of cannon fuse, inserted it into the touch-hole. I started the camera recording, then lit the fuse. Then got about 10 yards away, on the other side of my vehicle. And this is what happened:
And here the relevant bit is in slow-motion (1/8th normal speed):
Mwahahahahaha! It works!!!
Here’s where the first shot hit:

Not bad! It was time for the second shot, using a normal charge of 60gr of FFg black powder:
I was stabilizing the gonne with one hand, while filming with the other. There was a decent amount of recoil, even with the standard charge.
I went ahead and shot it a third time, again with a normal charge, but this time holding it and shooting it as I normally would. Again, I noticed a fair amount of recoil, even given the substantial weight of the whole thing (I’d guess ~10 pounds or so). But it’s not the sort of thing that most people would mind at all.
And all three shots hit in roughly the same place at 7 yards:

Not bad.
Given the very basic design of this thing, it’s still respectable in terms of control and power. I didn’t chrono it, but based on previously checking black powder guns, I’d guess that the .62 ball was probably traveling about 800fps. That gives a muzzle energy of about 500 ft/lbs, or about what a modern .40S&W handgun would get with typical loads. In other words, it’s an effective weapon, at least at moderate range. Not bad for a technology that is almost 700 years old.
Conclusions.
To repeat myself from the start:
- This is a description of how I made a black powder hand gonne for my own use
- I am not recommending that you make a black powder hand gonne
- If you do decide to make a black powder hand gonne, I am not recommending that you make it this way
- Any black powder hand gonne is potentially dangerous, and if you make one, the risk is entirely on you
- A black powder hand gonne is a firearm, and all the rules of safe handling and usage of a firearm apply
But, after the ‘proof’ shot, I did a close inspection of the hand gonne. There were no signs that anything had shifted or been stressed. Same thing after the two subsequent ‘normal’ charges were shot. So my conclusion is that the gonne is safe, though of course I will keep a close eye on it going forward.
And overall, I’d have to say that the project was a success. It is possible for an average person, using common, non-specialized tools and a little ingenuity, to make their own reproduction 14th century hand gonne with modern materials. My total cost out-of-pocket for this project was under $250, and now I have a couple new tools as well as the gonne.
Thanks for coming along for the ride. Feel free to share.
Jim Downey
Lookin’ Sharp(s).
As anyone who has read much of this blog probably knows, I (and the other BBTI guys) like weird guns. Anything that is innovative, or unusual, or uses a transitional technology, is likely to catch my eye.
One of those I got to try this past weekend is a reproduction Sharps Pepperbox. It was designed by Christian Sharps (of Sharps Rifle fame) in the middle 1800s , and proved to be a popular little hide-away gun in early .22. .30, and .32 rimfire cartridges.
In the 1960s Uberti produced a little .22short reproduction with a brass frame and plastic grips. Here’s one recently listed on Gunbroker which has an excellent description of both the reproduction and the original: Uberti Sharps Pepperbox 4 Barrel Derringer.
And here are some pics of the one we shot this weekend:


As you can see, the barrel assembly just slides forward to allow access to the breech. You put the hammer at half cock, then depress the button latch at the front of the gun, and it slides forward. Then you can drop four rounds of .22short into the barrels:


The assembly then just slides back into position, and locks. When you draw the hammer back, the firing pin (mounted on the hammer) rotates one-quarter of the way around, to strike each cartridge in turn.
Though a modern .22short has a surprising amount of energy, out of such a short barrel you’re looking at a modest 40-50 ft-lbs of muzzle energy. Would I care to be shot by one, let alone 4? Nope. And even the original loads using black powder, which would probably generate no more than about half that M.E., such a little hide-away gun would likely give a person on the other end of the barrels pause, because the risk of disability or death from infection would be significant.
Shooting the pepperbox was easy, and had no perceived recoil. Hitting a target at more than about five or six feet was another matter. Most of us tried it at about 10′, and were lucky to get one or two rounds into a 8″ circle. You might be able to improve on that with practice, but still, this was a gun meant for up close use:

It really is a cool little design, and a fun range toy. Shoot one if you ever get the chance.
Jim Downey
Shooting big stuff.
Ever hear of a 4 Bore?
Here’s the first line from the Wikipedia entry:
Four bore or 4 bore is an almost obsolete black powder caliber of the 19th century, used for the hunting of large and potentially dangerous game animals.
The term “4 Bore” indicated that it would fire a sphere of lead weighing 4 ounces, or one-quarter of a pound of lead. This was an old measurement system from which we also get our shotgun gauge measurements: a 12 gauge shoots a sphere of 1/12th a pound of lead, etc. So, a 4 Bore shoots a sphere of lead that is three times the weight of what a 12 gauge would shoot. As in a ball 1.052″ diameter that weighs 4 ounces, or 1,750gr. Compare that to a typical 12 gauge slug, which weighs from one to 1.125 ounces. The 4 Bore ball is more than three times the weight.
And shooting one feels like it.
Well, depending on the black powder load, of course.
Here’s the one we shot, the Blunderbuss on the right:

And here’s looking down the muzzle:

As the maker of the gun notes:
This 4 bore Blunderbuss can be pretty intimidating when you’re looking down the end of one.
Especially when the end is TWO inches in diameter and the bore is more than one inch too!
The thought of shooting it was pretty intimidating, too.
The maker recommends a load of just 100gr of Fg black powder. So that’s what we started with. Here’s what that looked like, being shot by Jim K of the BBTI team:
Not bad, right? Yeah, it felt like shooting a typical 12 gauge loaded with slugs. Of course, the Blunderbuss doesn’t have a modern firearm design, with no mechanism to reduce recoil.
And here’s my friend Roger shooting it with the recommended load, in slow motion:
Now, Roger’s a big guy. Over 6’6″. And like all of us who shot the 4 Bore, he has decades of experience shooting all manner of long guns, from mild black powder muskets to modern heavy magnums. Now just watch what happens when we increased the load in the 4 Bore to 200gr of Fg black powder:
And here’s Keith of the BBTI team shooting the 4 Bore with that full 200gr load:
Impressive, eh? I don’t have video of my shooting it, but I do have the bruises to prove I did.
Well, now, think about this: historically, these guns were loaded with up to 500gr of black powder. Bloody hell.
OK, let’s talk ballistics.
See the orange thing in the foreground in most of the video? That’s a LabRadar ‘chronograph’. It said we got about 500 fps from the ‘light’ loads, and about 700 fps out of the ‘heavy’ loads. That would give us a muzzle energy of about 970 and 1900 foot-pounds, respectively.
Your typical 12 gauge slug has a ME of about 2600 ft/lbs.
So, what gives? Why does the 4 Bore look (and feel) like it had so much more power?
I’ve been thinking about this for the last several days, and I think the answer is that a heavier bullet gives you more perceived recoil.
I’ve discussed this previously: Velocity is great, but mass penetrates. In that post, I used the example of a whiffle-ball versus a baseball, where they both had the same “ME”, but where you’d feel a significant difference if you were hit by both.
And I think that the same thing is happening here. For what it’s worth, you’d need to push the 4 Bore ball to about 800 fps to get it to the same nominal ME as a 12 gauge shotgun slug. To get to *triple* the ME of a 12 gauge shotgun slug, you’d need to push the 4 Bore ball to about 1400 fps. My guess is that the historical 500gr load of black powder might accomplish that.
But I sure as hell wouldn’t want to shoot it.
Oh, and how accurate was the 4 Bore? Here’s our target from the full-power loads:

Not bad for no sights, at about 15 yards. And look at the size of those holes!
~~~~~~~~~~~~~~~~~~~~~~~~~~~~~~~
OK, let’s talk about the other gun in the pic at the top. It’s a Hand Mortar, designed to throw a small hand grenade further than the human arm could. We had this one just for a little fun, shooting tennis balls about 100 yards using 70gr of Fg black powder. Like this:
Here’s a slow motion version of my friend Tim shooting it:
And here’s another of my friend Charles:
Black powder is so much fun!
Jim Downey
My new (bull)puppy.
Last August, I got to shoot a new IWI Tavor TS12 shotgun. You can find the full review here, but here was my conclusion:
Final thoughts: it’s a hell of a package. I’m not sure I’d use it for “sport shooting”, but for fun at the range or as a home defense gun, yeah, it’d be fantastic, though a little pricey.
Well, after thinking about it for a few months, I decided to go ahead and get one. Here it is:

I put a Crimson Trace CT-1000 optic on it:

And took it out to the range this morning to break it in.
IWI recommends minimum shot weight and velocity for the gun, for it to operate properly. I started out with some standard target loads of 2.75″ #8 shot, 1.125oz, 1200fps. I set the gas regulator to the “L” (light) setting for these light loads. The first couple of test loads operated correctly. So I loaded all three tubes to capacity, just to run through them as quickly as I could. Everything was flawless.
Time to try some heavier loads. I went to full-power 00Buckshot. These were 2.75″ 9 pellet 1325fps loads. I kept the gas regulator on the “L” setting, since some reviewers suggested this was a good idea for the initial break-in. But the gun cycled too quickly, and caught the spent cases in the mechanism. I reset the gas regulator to “H” (heavy) and tried again. All the subsequent 00Buck and slug rounds fired & cycled perfectly.
To this point I was just getting a feel for how the gun felt, operated, etc. Because while I had tried my friend’s gun previously, it was just with half a dozen rounds in a “what’s this weird thing like to shoot” go. Now I wanted to see what it would take to become proficient with my own gun.
My initial thoughts were, in no particular order:
- The trigger was mushy. To be expected with a bullpup.
- Recoil was mild, if the gas regulator was set correctly.
- Getting down behind the optic took some practice, and I was happy for the riser on the CT-1000.
- Getting used to the paddle-catch to change tubes took a bit of practice.
- But damn, that’s a quick way to burn through ammo.
I set up some cardboard (about 18×18″) and a sheet of 11×17″ paper at 25 yards to see how well the optic would indicate where the pellets hit from 00Buck. I had the “Improved Cylinder” choke in the gun, and was getting patterns of about 14″.
Next I put up a larger piece of cardboard (24×48″) at 50 yards to see how well the optic would do with basic Brenneke slugs. These are some old Remington 2.75″ 1oz 1560fps rounds I had. I hadn’t done anything yet with the optic other than just mount it and turn it on, so this was just a test.
Here were the first three shots, shot freehand while standing:

That’s a 4″ group. Out of a brand new gun, with a brand new optic, the first time I’d shot slugs out of it. Since 50 yards is about twice the distance I would ever imagine using this gun for, I’ll take it.
Next up: 00Buckshot at the same 50 yards. Here’s that result:

I didn’t run back and forth, just fired 5 rounds with the optic at the same position I had used for the slugs. At 9 pellets each, about half were on the cardboard, and notably most were on the lower half of the board. But once again, this is about twice the range I would ever really envisage this gun would be used at, even for hunting, and about 4x the range I might use it for home defense. Again, acceptable.
Lastly, I reset the gas regulator to “L”, and loaded it full with the target loads. I figured it was time to see what fun I could have at speed on the falling plates on my range. Here’s a run at 15 yards:
I’m sure I’ll get much faster with it, with practice. But as you can see, even being completely new to the gun, it’s easy to achieve a surprising amount of speed with it. You can definitely go through a lot of ammo with one of these guns, there’s no doubt about it.
Overall, I’m very happy with the Tavor TS12. Altogether I ran about 75 shells through it in an hour, half the light target loads, the other half full-power, high-brass slugs and 00Buck. It’s been decades since I shot a 12 gauge that much in that short a period of time, and my shoulder isn’t the slightest bit sore.
Yeah, the TS12 is a keeper. And I really like the Crimson Trace optic.
Jim Downey
“Archive Status” update.
Following up to this post from August 24th, the BBTI site has been updated.
When you go there now, at the top of each page you’ll see this notice:
ATTENTION: Effective Sept 1, 2020, the BBTI Project is in “Archive Status.” No further tests will be conducted, but we will maintain this site and data for the use of the firearms community. Thank you.
In addition, we’ve removed the “Contact Us” and “Donate” options. There are costs associated the continuing to host the site, but I’d rather just pay those myself than give anyone the hope of making a donation towards future testing. I do want to thank those who have made contributions towards offsetting some of our expenses in the past. Likewise, thanks to those who contacted us with questions, corrections, and suggestions. It hasn’t always been possible to respond to each one, but your thoughts have been appreciated.
Cheers!
Jim Downey
Spinning wheel got to go round.*
I was surprised when one of the other BBTI guys said that he had found a reproduction wheellock on Gunbroker recently, and that it wasn’t even horribly expensive. This one:
Wheellock with Diablo double-barrel pistol.
I was surprised, because there aren’t many reproduction wheellocks out there that I was aware of. It’s a quirky firearm design from the 16th century (Ian from Forgotten Weapons has an excellent primer on Wheellock history and operation in this video), which was superseded by reliable & cheaper flintlocks, and not too many people are familiar with them. But it seems that a firm by the name of Mendi was producing them in Spain in the 1980s. This one is stamped along the top of the barrel “Jacobi Iserlohn”, which is a firm selling historical firearms in Iserlohn, Germany. You might be able to make out the stamp in this image:

Jacobi Iserlohn.
We didn’t know much about the gun beyond what was stamped on it — it came with no paperwork or anything (which, being black powder, it didn’t need). As you can see in the image above, it says that it is “CAL 45”, and a normal .451 lead ball seemed to fit, so …
So we figured we’d try and figure it out and shoot it, of course. The first thing was to check the bore, see if the mechanism worked, etc. Most things checked out fine, though it looked like someone had substituted welding rods clamped between a piece of thick lead sheet for the historical pyrite used to generate sparks. See for yourself:

Welding rod?
Which would clamp in this (called the ‘dog’):

We adjusted the rods so they were equal length and extended far enough to engage the spinning wheel of the mechanism when the dog was lowered. So far, so good.
Next was to test the wheel mechanism. The way a wheellock works is that there’s a spring inside the stock, attached to the inside of the wheel usually by a chain or strap. Using a suitable crank (we didn’t have one that came with the gun, so we used a simple adjustable wrench), you crank the wheel until a ratchet inside locks it into place. We discovered that this gun only needed to be cranked about half a turn before the ratchet clicked. When you pull the trigger the ratchet is released, and the wheel spins.
We tried that, and it seemed to work.
OK, time to load the thing. We elected to start with a mild load typical for other black powder handguns we have in .44/.45 — 30gr of fffg. The lead ball seemed to fit tightly enough into the bore that we went without a patch. All of that went smoothly.
Last was to put some powder in the pan and see if we could shoot it. First, we cranked the wheel into place. Then we put some powder beside where the wheel was, next to the touch-hole. And gave it a try:
Remember, we had no idea what to expect.
At least we got sparks. Just sparks. The powder in the pan failed to ignite. We considered the matter, and decided that we had been too stingy with the powder, that it needed to more or less fill the pan all around where the wheel protruded.
The result:
Excellent! It fired! It hit the target! It didn’t blow up and kill us! Yay!
So each of us had a go:
That last one’s me. And let me share what it felt like.
Mostly, like shooting any similarly sized/powerful black powder handgun, with the gentle push of black powder. But when you pulled the trigger, you could feel a little bit of torque as the wheel released and spun for a moment. It was different than either a flintlock or cap & ball handgun, in that regard. And the delay between pulling the trigger and ignition was about what it’s like with a flintlock, perhaps a little longer.
All in all, it was pretty cool. And it wasn’t something I expected to ever have a chance to actually try, since most of the wheellocks I was aware of were either 300+ year antiques or fairly high-end (and rare) custom reproductions. Needless to say, if you do get a chance to try one of these things, definitely do it.
Jim Downey
* of course.
(Cross posted to my personal blog.)
The Fightin’ Swedes/Swiss.
Two last battle rifles today: the Swedish Ag m/42B in 6.5×55 and the Swiss Schmidt-Rubin Model 1911 rifle.
Swedish Automatgevär m/42
We should have done our homework on this.
Why? Because we had no idea about how to operate it. I’ll save you the several videos of us fumbling with it, trying to figure out what the hell made the thing work. Instead, go watch this video of how the mechanism works, if you’re interested.
At least none of us mashed our thumbs, which even Ian at Forgotten Weapons was nervous about (watch his second video there).
Anyway, the Swedish AG m/42B is a direct gas-impingement self-loading rifle introduced in 1942. It’s a little odd in design, but makes sense once you understand it (which I really didn’t until I did research for this post). And it’s fairly simple and robust, so was able to stay in use until the 1960s. Here are a couple of additional images of it:
Swedish Automatgevär m/42B

Swedish Automatgevär m/42B
Those odd knob things? That’s the dust cover/bolt carrier, and it’s how you operate the loading mechanism safely. Go watch the video above — trying to explain it is … complicated.
Note the simple range adjustment dial for the sight there on the left (bottom) in front of the receiver. Nice, easy to use. Because that’s one of the great things about this rifle — the 6.5×55 Swedish cartridge is a very flat-shooting round, and the rifle has an effective range out to 800 meters. The rifle is also relatively heavy, so that combined with a simple integrated muzzle break means that it has very light recoil. See for yourself:
This was really a pleasure to shoot, and while I’m not into rifles that much, I could easily see myself having one of these guns.
Schmidt-Rubin Model 1911 rifle
Model 1911
The Schmidt-Rubin was a heavy battle rifle, designed for the long tradition of Swiss sharpshooting. As part of a series of rifles beginning with the Model 1889, the Model 1911 entered service in 1911 (surprise!). Firing a new more powerful cartridge (7.5×55) than the previous models, it had an aimed range out to 600 meters, and a volley range to 2000 meters. It has a straight-pull bolt action (no need to rotate the bolt to unlock it) which is slick and fast.
Schmidt-Rubin Model 1911
It’s easy to operate, easy to shoot well. It was also famously accurate, and is still valued as both a hunting and long distance target rifle. With a 175gr bullet at 2650fps out of the long 30″ barrel generating about 2700ft/lbs of energy, it is perfectly suitable for either. Since the Model 1911 weighs about ten pounds, recoil is modest.
As I’ve said several times with these historic rifle reviews, if you get a chance to shoot either the Swiss Schmidt-Rubin or the Swedish Ag m/42B, do so.
But if it’s the Ag? Watch your thumbs.
Jim Downey
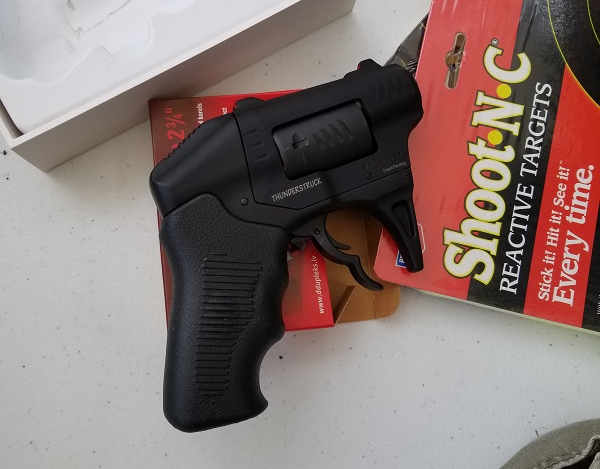
Review: S333 Thunderstruck.
This is the Standard Manufacturing S333 Thunderstruck revolver:

It’s an innovative, 8-round revolver which fires two rounds of .22WMR (.22mag) with one pull of the trigger.
OK, if you like this not-so-little handgun, you might not want to read this review. Just move along and save yourself some time.
No, really.
If you have to think about it, here’s another pic to give you some time:
The actual S333
* * *
For those who’ve stuck around …
… good lord, don’t buy one of these things as a self/home defense gun. If you want it just because it’s kinda geeky and weird, then cool. If you want to actually use it, go spend your money on almost anything else. Seriously.
Why do I say this?
Because, for the ostensible use of the gun as a self/home defense tool, it is almost entirely unsuited. Yeah, that’s my biased opinion, on having shot the thing.
Oh, you want details? Reasons for this opinion? Fair enough.
When I first heard of it, I saw that it was .22WMR, out of a 1.25″ barrel. Now, since it is being shot out of a revolver, you can add in the length of the cylinder, and come up with an overall barrel length of about 3″.
.22WMR out of a 3″ barrel isn’t exactly useless. I mean, it beats harsh words. And, in fairness, it beats your typical .22lr. A little. You can expect about 100-110ft/lbs of energy from it. The best-performing .22lr from the same length barrel is about 90ft/lbs. Same for .25ACP.
And, if you think in terms of having two such bullets fired simultaneously, that gets you up to about 200-220ft/lbs of energy. Not impressive, but I wouldn’t want to be shot by it. I mean, it’s better than .32ACP.
Well, it would be if for one big problem: keyholing.
See, with such a very short barrel, the .22WMR bullets aren’t stabilized. They come out of the barrel, and tumble. If the bullet tumbles upon leaving the barrel, it will quickly lose energy to aerodynamic forces. And likewise, if it hits something more solid, it will also lose energy more quickly. Which will really mess up their effectiveness in penetrating deep enough into an attacker in order to be effective. Because, remember, this is supposed to be a self/home defense gun.
See for yourself:

keyholed!
Yeah, of the 8 bullets I fired (from about 5 yards, aiming at the center of the target), 7 have keyholed.
This is something that almost every review video I watched also noted. The S333 keyholes at least 50% of the time, and usually more.
So let’s go back to the comparison with .32ACP. Keyholing can happen with any caliber and almost any gun, but it tends to be rare in well-designed guns and properly matched ammunition. So, usually, you can rely on fairly consistent penetration out of .32ACP. Which, according to independent testing by Brass Fetcher, will give you 7-10″ of penetration in 20% ballistic gel. And .22WMR will do about as well.
But not if it keyholes. Which it does, out of the S333.
Now, Standard Manufacturing has said that this is something that they’re working to correct. So perhaps later versions of the gun will not have this problem.
I still wouldn’t want it. Why?
The S333 is as large and weighs (18oz) as much as many common compact 9mm semi-auto handguns. It’s larger and weighs more than most small .380 semi-auto handguns. It’s larger and weighs more than most small frame .38/.357 revolvers. Any of those alternatives offer much more potent cartridges, even in comparison to two simultaneous .22WMR rounds. And with the S333, you have four shots — your typical small revolver will be 5 or 6, and small semi-auto guns are typically 6 or more.
The S333 is also awkward and difficult to shoot. The unusual “two finger” trigger really changes how you can grip the revolver, changing how you aim and control it. It’s also a very long and very hard trigger pull — something in excess of 12 pounds, by most reports. If, like most people, you want to use a second hand to support your shooting hand (which is even more necessary when you only hold the gun with your thumb and two small fingers), about the best thing you can do is grip the wrist of the shooting hand in a modified “cup & saucer” style grip. Otherwise, the fingers of your supporting hand will be in the way of the trigger coming all the way back, which is necessary for it to fire.
Here, see what I mean with this short video of me shooting it:
I think the awkwardness of the grip and the two-finger trigger explains why most people tend to shoot the revolver high and to the right when they first encounter it. All three of us at BBTI did. Almost every review video I watched had the same thing.
I’m sure you could learn to adapt to this, and develop a secure and reliable method of shooting the gun with practice. But as a “grab it and use it” self-defense gun, it’s a problem.
One minor note while the video above is fresh in mind: did you notice the amount of flash in two of the shots? Yeah, that’s another factor of such short barrels with the .22WMR. That was while shooting it on a typical partly cloudy day in the middle of the morning. Not a major problem, but something to register.
One last thing: price. As you can see on the first pic, this particular S333 sold for $419.99, which is just under the MSRP. So while it isn’t really pricey, it isn’t cheap. In fact, it seems to be a very solid and well-made gun. The fit and finish were good. The minor problems we had with it were probably just because it was brand new (it hadn’t been fired previously). The trigger is, as noted, long and very heavy, but reasonably smooth if a little mushy. So, overall, if you wanted one of these just because it’s unique and quirky, then I think it’s a reasonably-priced gun.
But if you are looking at it as a self/home defense gun? Or even as a “back-up” for that use?
I think you have much better options.
Jim Downey
Two Classic Battle Rifles.
You can probably guess which ones I mean. Yeah, that’s how big of an impact they had on history.
The M1903 Springfield and the Lee-Enfield (specifically, the SMLE No.1 Mk III). Both bolt-action guns (actually, both derived from the G98 Mauser design). Both shooting powerful .30 caliber cartridges with an effective aimed range in excess of 500 yards. And both having played an important role in World War I and World War II.
Of course, there are some real differences between these cousins. Let’s talk about that after a brief look at each one:
The M1903 Springfield was the successor to the Krag-Jørgensen rifle, bringing greater power and rate of fire into the hands of US soldiers than the earlier rifle offered. The .30-06 cartridge was “high power”: a 150gr bullet at almost 3,000fps, for about 2,800ft/lbs of energy. Which was about 50% more power and a better ballistic coefficient than the Krag had, and that translated into a greater effective fighting range.

M1903 Springfield
The M1903 held 5 rounds, inserted via stripper clips for speed. The Mauser style bolt handle was lower on the gun, again for speed. It was slick, solid, and accurate. Here it is in operation last weekend:
One particular thing I want to note: the difficulty that he has with the sight is common, and it’s something that hickock45 comments on at about 1:30 in his video review of it.
The M1903 Springfield entered service in 1903 (hence the designation), was the primary battle rifle in WWI, played a major role in WWII, and continued to be used as a sniper rifle (and in some other applications) through into even the Vietnam War.
The Lee-Enfield was the successor to the Martini-Henry (and variants) in the British army, coming into use in the mid 1890s. The new smokeless version of .303 British cartridge had ballistics very similar to the US .30-06, but was slightly shorter overall. This, combined with a short throw on the bolt-action, allowed for a very rapid rate of aimed fire by a trained rifleman of up to 35 rounds per minute. The magazine of the SMLE held 10 rounds, fed by 5-round ‘chargers’ similar to the stripper-clips used in the M1903. Like the Krag, the Lee-Enfield had a magazine cut-off which would allow it to function purely as a single-shot.

Lee-Enfield SMLE No. 1 Mk III
We didn’t try to manipulate the bolt-action for rapid fire, but this was a common tactic in the British forces, and they could routinely fire up to 35 rounds per minute while keeping the rifle shouldered for aimed fire. This kind of sustained rate of fire made the Lee-Enfield a formidable weapon which remained in use in subsequent variants through the Korean War.
So, what were the differences between these two classic battle rifles?
Well, range and rate of fire, for the most part. The M1903 Springfield had a greater range with excellent accuracy, enough to be used as a sniper rifle through WWII and Korea. The .30-06 cartridge is so good for this sort of use that it is still a common long range hunting cartridge for medium sized game and target shooting to this day.
But the M1903 couldn’t compete with the Lee-Enfield for rate of fire, particularly while still shouldered. The Australians, using the Lee-Enfield, even developed a technique which allowed up to 55 rounds per minute:
The tactic was to fire in conventional rapid-fire mode until the enemy was approximately 100 to 150 yds. away. Then the right hand would leave the small of the butt, and the thumb and first finger would grasp the bolt handle. The little or lower finger was then used to fire the rifle, and the bolt cycled using those two fingers, which stayed on the bolt handle until the rifle was empty. As soon as the bolt handle was down, the trigger was then pulled and the cycle recommenced. As the targets appeared, a quick snap shot was made. The bolt was already working and the recoil was utilized with the disturbance in moving the bolt to align on the next target which was again snap shot. Attention was given to the target only until the shot was made.
Wild. I’d love to see someone actually able to do that, with some degree of accuracy.
Anyway, both the M1903 Springfield and the Lee-Enfield rifles are fairly common today. But as it happens, I don’t think that I had ever gotten around to shooting a SMLE until this outing. And I’ve been shooting for 50+ years. Don’t make the same mistake if you can avoid it.
Jim Downey
1898 Krag-Jørgensen Rifle
Man, I’m happy that I took a lot of images last weekend when we shot these rifles.
OK, as I’ve noted, I’m not really a “rifle guy”. And especially not a “historic rifle guy”. Oh, I can generally ID most of the major designs in history, but damned if I would be able to identify the dozens of minor variations and such.
Which is why I’m writing these blog posts: I’m learning a lot. And like I said, I’m glad that I took a lot of images, because it’s allowed me to determine specific details key to figuring out what a given gun actually is. Like the “1898” stamped on the side of the receiver of this Krag-Jørgensen Rifle:

Krag-Jørgensen Rifle
Nah, you probably can’t see it at the resolution I’ve posted here, but I could make out the date there on the left side of the receiver, under and to the left of the “U.S.” stamp.
The Krag was an important piece of history, both in terms of the technology it introduced, and in the role it played as a military arm. It had an innovative magazine design (more on that in a moment), and fired the first metalic cartridge completely designed to make use of the new smokeless powder: the .30-40 Krag. This was a .30 caliber, 220gr bullet that would achieve 2,000fps out of this rifle, for a respectable 1950ft/lbs of energy. The Krag-Jørgensen was well designed overall, and to this day is considered to be one of the smoothest operating bolt-action guns ever.
Now, about that interesting magazine. Take a look here, with the bolt open:
Krag-Jørgensen Rifle
See how the cartridge is tucked off to the left side there? The magazine cover on the outside of the right side of the gun flips open. Then you just drop up to 5 cartridges onto the shelf and close the cover. When you do, they’re all arranged horizontally. Yeah, weird. But it’s kinda cool, because it is fast and easy to load, and you can top off your magazine at any time. You’ll be able to see this even better in the video below.
But before we get to that, I want to mention something else about the design. There’s a “magazine cut-off switch” on the left side of the receiver, which prevents a cartridge from loading from the receiver. Instead, you could just drop a round in front of the bolt face, and chamber it. This reflected the mind-set of the era, when accurate aimed fire was considered more important than rate of fire. Again, you can see this even better in the video:
As noted in the video, this is an exceptionally smooth operating and accurate rifle, especially considering that it is over 120 years old. It feels very well balanced and easy to use in your hands, in part due to the extra mass of metal in the magazine design. It really was a pleasure to shoot. If you ever get a chance to do so, don’t miss it. As hickock45 notes in this video, they’re not terribly common, so be sure to take advantage of the opportunity.
Jim Downey
4 Nice Reproduction Rifles
As part of our historical rifle weekend, we shot 4 different reproduction rifles all dating to the latter part of the 19th century. In rough chronological order, these were the Spencer Repeating Rifle, the Remington Rolling Block Rifle, the Springfield Model 1873, and the Winchester Model 1885 (High Wall version). Here are our four reproductions:

Four reproductions.
From left to right in the image:
- Winchester Model 1885 (High Wall version) Reproduction by Browning.
- Springfield Model 1873 (‘Trapdoor’ Springfield) Reproduction by Pedersoli.
- Remington Rolling Block Rifle Reproduction by Remington.
- Spencer Repeating Rifle Reproduction by Chiappa.
All shoot the .45-70 cartridge, except for the Spencer, which is in .45 Colt. All are like brand new, having been fired little, even though they were a few years old. Full info is readily available about each original design, as well as about these reproductions, so I’m just going to share some thoughts and video on each one without going into a huge amount of detail.
This nice little reproduction by Chiappa is a very handy and fun gun.

Spencer carbine
The quality of the gun overall is quite nice, with good wood and a very attractive case-hardened receiver. The lever-operated loading mechanism was smooth, but both the trigger and the extractor were in need of breaking in, as can be seen in this video:
This gun holds seven rounds of .45 Colt in the tube magazine located in the stock (the same number as the original in .56-56 Spencer, which has similar ballistics to the modern cartridge). We were only shooting at 25 yards, but this was an easy gun to use quickly, and I can see how it would have been a revolutionary improvement over the muzzle-loaders of the era.
The Remington Rolling Block No. 1 Sporter was a very fine gun, exceptionally well made with excellent fit and finish in every regard:

Remington Rolling Block
The rolling block mechanism was solid, and gave confidence that it would hold up to plenty of use shooting full-power .45-70 loads. Likewise, the substantial weight of the gun meant that recoil was manageable. This is a gun I could easily spend a day with at the range.
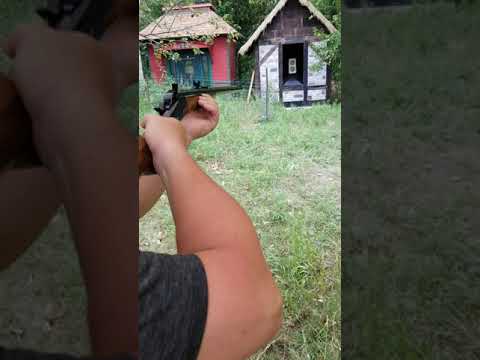
Ah, yes, the Trapdoor Springfield. There’s something that’s just plain cool about this gun.
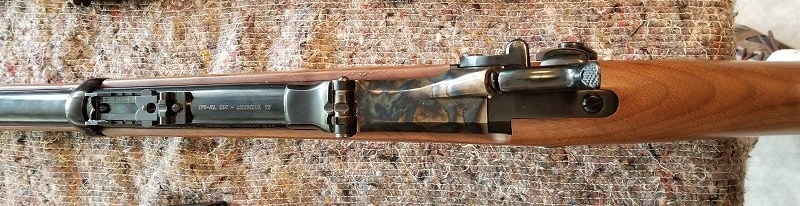
Pedersoli Trapdoor
Of course, Pedersoli is well-known for the quality of their reproductions, and this is no exception. The entire mechanism of the breechblock was tightly fitted and solid, operating smoothly. Likewise the trigger was smooth and comfortable. As with the Remington above, the gun had enough mass to tame recoil from the .45-70 gov loads we were shooting, and it was easy to be accurate with it even on first try.
This is the so-called “High Wall” version, designed to handle high power loads, such as the .45-70 gov cartridge. This reproduction is by Browning, and this particular gun had been custom etched (with inlay) with a “Right to Keep and Bear Arms” design:

Browning 1885
The review of this gun linked above is picky about a number of things which didn’t bother me. I’m not sure whether that is due to our having a slightly different model, or what. I thought that the fit & finish were fine, and the gun operated flawlessly as far as I could tell. I didn’t note any excessive recoil at the time of shooting, though I’m not particularly recoil-shy, so I was surprised to see that in the review. Perhaps if we had tried some more powerful loads?
Anyway, I thought it was a treat to shoot this gun. Here’s one of the other BBTI guys shooting it:
All in all, I thought all four of these reproduction rifles were quite enjoyable to try, and I think that any of them would make a fine addition to your safe, if you’re into rifles. While none of them are original guns from the period, they all offer insight into the technology of that time.
Jim Downey
Review: Diablo 12ga double barrel pistol.
Want some fun? Get an American Gun Craft 12ga double-barrel pistol.
Want a serious self/home defense gun? Get something else.
Oops. I gave away my review’s conclusion. But you should go ahead and read the rest of this, anyway.
* * *
When one of my friends sent me a link about the new American Gun Craft 12ga double-barrel pistol, I thought it looked like a lot of fun. A lot of people thought so, and the cool little pistol got a lot of attention.
For good reason. It looked well made, well designed, and easy to use.
And it is. Check it out:

Diablo 12ga
And this is what it looks like in the hand:

Seriously, this is a very high-quality gun. It’s very solidly made. The fit & finish is impressive. The bluing is rich, deep, and lovely. The rosewood handles fit perfectly, and are warm & comfortable in the hand. They’re polished so highly I at first thought that they were plastic. The trigger is smooth, crisp, and much better than I expected.
The design is simple, but there are little things about it that are quite nice. Such as when the gun is broken open, you can rest it on any flat surface with the barrels pointing up, and it is perfectly stable for loading. If you’re shooting by yourself, this would be very handy.
Since we didn’t know what to expect, we went with the manufacturer’s recommended load of black powder to start with. That’s just 40gr of ffg, with a recommended half ounce of shot. But all we had to shoot out of the gun were 12ga balls (.69 cal ball, about 500gr — say 1.2 ounce). So we expected it to be mild shooting.
It was:
Well, according to this video, that’s probably just about 250fps, and maybe 70ft/lbs of energy. That’s about the same power as a low-performing .22 round out of a 6″ barrel. And it felt like it.
So, since the amount of lead we were shooting was more than double the recommended amount, we doubled the amount of black powder, to 80gr of ffg. Here’s that:
Well, again according to this video, that’s probably about 560fps, and maybe 340ft/lbs of energy. That’s about the same power as a typical 9mm round out of a 6″ barrel. And it felt like it. There was a bit of recoil out of the heavy pistol, but it wasn’t at all hard to manage.
Given how well the gun was made, and the mildness of the first shots, we didn’t have any qualms about increasing the amount of powder to double what was recommended. And that was a fun load to shoot. Others have pushed that boundary MUCH further, as you’ll see in either this video (referenced above) or this very long review. By using much bigger loads and different types of powder, it is possible to get up to energy levels in the range of a .357 or even .44mag out of a 6″ barrel.
So yes, it would be a pretty reliable self/home defense gun, in those terms. And we were shooting it at applicable ranges for that use, with adequate accuracy.
But consider several factors here. First, black powder is very hygroscopic: it sucks up moisture out of the air. That can be a problem with a muzzle-loading gun, and was the reason why Old West gunfighters would commonly shoot off their loads each morning and load their pistols fresh. Because wet powder can underperfom very badly. So you wouldn’t want to load the Diablo and then just set it aside for future use.
Black powder is also a slow-burning and very smoky powder. Shooting it indoors would fill the room with very acrid smoke, and may very well spew burning bits of powder out into the room, causing fires.
Lastly, while the Diablo is indeed easy to load and shoot for a black powder gun, that still takes a hell of a lot more time than it would take to load two additional cartridges into a derringer. And almost every common modern self/home defense gun offers more rounds for use than a derringer.
So we’re back to what I said at the start:
Want some fun? Get an American Gun Craft 12ga double-barrel pistol.
Want a serious self/home defense gun? Get something else.
Jim Downey
The Martini-Henry .577/450
“OK, the Snider was fun. Let’s shoot that Martini-Rossi.”
“Martini & Rossi is a booze brand, dumbass. The rifle is a Martini-Henry.”
“Er … right.”
* * *
OK, I’m not saying that actually happened. But I will admit that historic rifles are not really my thing. Fortunately, my BBTI buddies are more knowledgeable.
The Martini-Henry was the single-shot, breech-loading rifle that succeeded the Snider-Enfield (initially in 1871; our rifle was stamped 1887). Designed from the start to shoot a metallic cartridge, it was quicker to load and fire, faster to reload, and more powerful than the Snider-Enfield. It shot a bottleneck cartridge based on the earlier .577 Snider-Enfield, known as the .577/450, which had a 480gr soft lead bullet of .450 diameter (hence the name) pushed to about 1350fps, for about 1900ft/lbs of energy (about 400ft/lbs more than the Snider-Enfield). Because of the increased velocity/energy and the better ballistic coefficient, it had an effective range out to 1800 yards (for ‘volley fire’ applications).
The Martini-Henry is overall a slimmer, more manageable gun than the Snider-Enfield. It’s about 5″ shorter overall, with a 33″ barrel, and weighs about the same.
The biggest design improvement was that the action functioned by the use of a lever. Pull the lever down, and the block drops down, allowing a feeding ramp to align with the chamber. Insert a cartridge, close the lever, and the block rises and the gun is ready to fire. Here are some images of it:

Martini-Henry from above.

Preparing to load.
And here’s the rifle being fired:
That’s with the full-power, traditional .577/450 loads. Which, while they’re black powder substitute (and hence a ‘rolling’ impulse), still have quite a bit of recoil.
However, there are cartridge adapters available which allow you to use common .45 Colt ammunition. It’s just a brass (or steel) sleeve with the shape of the .577/450 cartridge into which you insert a .45 Colt round. Here’s a brief clip showing that:
And here’s what it’s like to shoot the rifle with the adapter:
Much less recoil. And if you’re buying commercial ammo, much less cost.
Shooting the Martini-Henry is easy, and while there is a noticeable amount of recoil with the full .577/450 loads, it’s not bad at all. With the adapter and .45 Colt loads, the recoil is very mild. Hickock45 has a nice “woods walk” with a Martini-Henry of the same vintage here:
Definitely, if you get a chance to shoot one of these rifles, take advantage of it.
Jim Downey
Shooting an original .577 Snider-Enfield rifle.
Recently the BBTI crew got together to shoot some historic rifles. I’m not going to go into a lot of the details about each rifle, since there is plenty of information available about each online. But I thought I would share a few pics, some video, and my thoughts about each gun.
The first is an original British .577 Snider-Enfield rifle. This is the “Mark III” model, and dates back to 1866.
The .577 Snider-Enfield is a single-shot, breech-loading rifle. The Mark III has a lock on the side latch which secures the breech block in place. A side-hammer strikes a diagonal sloping firing pin to ignite the primer on the metallic cartridge. The barrel is about 36″ long, and the overall length of the rifle is 54″.
Here’s the rifle as seen from above:

.577 Snider-Enfield
Operation is simple: draw the hammer to half cock and unlatch the breech block and flip it open. Drop a cartridge into the “slide”, then push it forward into the chamber. Close the breech block and latch it. When you’re ready to fire, cock the hammer the rest of the way (it has a very short throw, so going to full cock doesn’t take much). Aim, fire. Here, see for yourself:
Recoil is fairly mild. The cartridges use a modern black powder substitute, and have the typical black powder smooth impulse rather than the sharp impulse of modern gunpowder. It shoots a 480gr soft lead bullet at about 1200fps, for an energy of about 1500ft/lbs (about half of what a modern hunting rifle has). Here’s what the cartridge looks like:

.577 Snider-Enfield cartridge
Note that the fired cartridge case is more straight-walled than the unfired cartridge. The cases stuck in the chamber, and had to be knocked loose with a ramrod to be extracted. But you expect some minor issues like that with a gun that is more than 150 years old.
Overall, it’s really a very pleasant piece of history to shoot. If you get a chance, do so.
Jim Downey
IWI Tavor TS12 review
This past weekend I got to try the new(ish) Tavor TS12 semi-auto shotgun, made by IWI.
This gun got a LOT of attention when it was announced at SHOT 2018, and generated a fair amount of interest later when the commercial version was finally released not quite a year ago. And for very good reason: it’s a hell of a package.
OK, the basics: this is a gas regulated semi-auto 12ga shotgun, which will handle either standard 2.75″ or 3.00″ Magnum shotgun loads. It has an innovative three-tube magazine design which will hold up to 16 rounds (15+1) of 2.75″ shells or 13 rounds of magnum shells. It is a bullpup design, with an 18.5″ barrel and 28″ overall length. It weighs 8 pounds unloaded. It uses standard Benelli/Beretta choke tubes. It has M-LOK compatible rails, a continuous Picatinny rail on top, and multiple sling mount points.
So, one of my friends got a new TS12, and wanted to try it. He figured we’d test it with his standard home defense ammo, Dupo 28 explanding steel slugs. The Tavor had not been fired previously, and we decided to try it without an optic, just using the Picatinny rail on top as a guide.
We looked the gun over and figured out the operating controls. It’s very intuitive, and we quickly got the hang of loading and using the gun. Since it was brand new, we expected a little bit of break-in time, and indeed the first few rounds didn’t cycle completely. But after about a half dozen or so, it ran flawlessly. The automatic-reload feature when you move from one tube to the next is really slick, once it was working correctly.
What were my impressions of it?
Well, when you first look at it, the gun *looks* big. I think that is due to the boxy shape of it. The proportions are a little weird, and you figure that it’s a shotgun, so it has to be big. But because it’s a bullpup design, it actually isn’t that big. And when you pick it up to use it, then it feels much smaller, more compact, and very well balanced. In fact, it feels like a tight little package of lethality. This video from TFB really shows how it operates in heavy use.
And it feels really solid. For me, the ergonomics were excellent, and even shooting these substantial 1oz slugs there was minimal perceived recoil. That’s thanks to the gas operating system. Comparing the TS12 to the KelTec KSG, well, there’s really no comparison in terms of recoil. The KSG, while a cool little package (it’s slightly shorter and weighs less than the Tavor) is fairly brutal to shoot. Of course, the KSG is about half the price.
The fit & finish of the TS12 are very good. Like I said, the gun feels solid and well made when you hold it. And when you are just looking it over, the quality is likewise evident. Of course, IWI is a well known firearms manufacturer with a solid reputation.
One note: when the TS12 was announced, it was said to be completely ambidextrous. The final version released isn’t, though you do have your choice of getting a left- or right-hand version, according to the IWI website.
As mentioned, we decided to try the TS12 without an optic. Which was a little difficult, wearing muff-style hearing protection, but quite doable. And at about 20 yards from the target, it was easy to put multiple rounds right where you wanted them:

Final thoughts: it’s a hell of a package. I’m not sure I’d use it for “sport shooting”, but for fun at the range or as a home defense gun, yeah, it’d be fantastic, though a little pricey.
Jim Downey
-
Archives
- April 2024 (1)
- March 2024 (1)
- May 2023 (4)
- April 2023 (1)
- August 2022 (1)
- July 2022 (3)
- May 2021 (1)
- March 2021 (1)
- December 2020 (1)
- September 2020 (4)
- August 2020 (10)
- July 2020 (1)
-
Categories
- .22
- .223
- .22WMR
- .25 ACP
- .30 carbine
- .32 ACP
- .32 H&R
- .327 Federal Magnum
- .357 Magnum
- .357 SIG
- .38 Special
- .380 ACP
- .40 S&W
- .41 Magnum
- .44 Magnum
- .44 Special
- .45 ACP
- .45 Colt
- .45 Super
- .450 SMC
- .460 Rowland
- 10mm
- 6.5 Swedish
- 9mm Luger (9×19)
- 9mm Mak
- 9mm Ultra
- Anecdotes
- black powder
- Boberg Arms
- Data
- Discussion.
- General Procedures
- historic rifles
- Links
- Revolver
- Shotgun ballistics
- Uncategorized
-
RSS
Entries RSS
Comments RSS
